Welcome to SysAid!
You've just installed SysAid and are really excited to get started with it, but rather than diving in haphazardly, you want a guide to show you where to go and what to do first. That's why we've created this Getting Started Guide. Below, we'll take you on a tour of SysAid's basic features. You'll see where to find and how to use the features that you need in order to immediately start managing your service desk and assets more efficiently.
Introduction
This guide is an overview, and many features will only be mentioned in passing. For a full explanation of any feature, please review the specific feature content, accessible from this guide by clicking on the various hyperlinks you will see, or from any page within SysAid by clicking your user name in the top right corner and choosing Documentation. You are also welcome to contact our support team, and they will be able to provide you with any additional information you require.
Logging In
Login instructions vary slightly depending upon whether you have SysAid On-Premises edition or SysAid Cloud edition.
SysAid Cloud Edition
When you registered for SysAid Cloud Edition, you received an email with your login URL, as well as your username and password. Open a web browser of your choice and navigate to the URL you received.
This is the format: https://<your_account_ID>.sysaidit.[com/eu]/Login.jsp
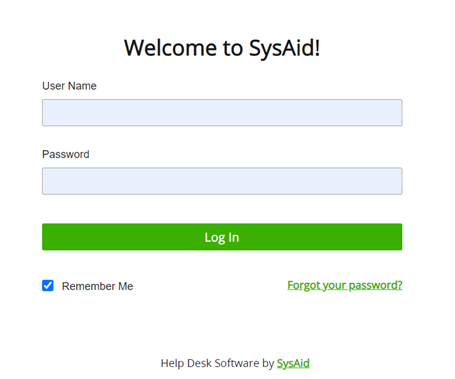
Enter your username and password, and click Login. If you have misplaced your login info, you can use the Forgot your password? link.
SysAid On-Premise Edition
SysAid is entirely web based, so you can also access it from any computer that has network access to the SysAid server. Simply open a web browser and enter the IP address of the server you installed SysAid onto followed by a colon followed by the port you chose. If you did not change the port, the default is 8080.
This is the format: http://<your_server_url>:<port>/Login.jsp
Example: http://10.1.10.25:8080/Login.jsp
You should now be at the login page. You will use the same login information here that you entered during installation. If you have misplaced your login info, you can use the Forgot your password? link*.
*In order to reset the password for the main administrator (the one you created during installation), you must use the reset password utility as explained in the SysAid Administrator Guide.
All SysAid Editions Continue Here
When you log into SysAid, you will see the Manager's Dashboard. For more information on this module, see Dashboard. Note that if you are using the Free edition of SysAid or have purchased SysAid without the Manager's Dashboard module, you will see the Admin Portal instead.
The first time you log into SysAid, the Network Discovery Wizard will launch in a popup window. Please read the section below on Importing Assets for more information about this wizard.
You can use the Navigation Bar at the top of the screen to navigate around SysAid.
SysAid Manager Dashboard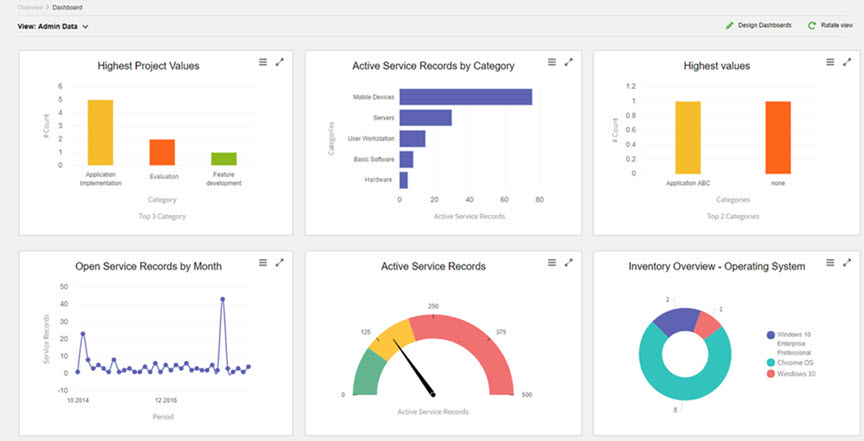
This screenshot has been taken from a fully configured system with service records in it. Your system does not yet look like this, but it will - after you've been using SysAid for a while.
Creating Users
The first thing to do in SysAid is to set up your users.
In SysAid, there are two kinds of users:
- End users, who can access the Self-Service Portal.
- Administrators, who can access all portions of SysAid for which they are granted permission.
Note: Administrators do not automatically have all permissions within SysAid. In order for an administrator to have all permissions, they must be a "SysAid Administrator." See administrator permissions for further information.
This section will cover the creation of end users and administrators.
Verifying SysAid User Settings
Start out by verifying that your personal settings are correct. Click on your user name in top right corner and choose the My Setting option. Here, you can select your language of choice and ensure that your personal information is correct. For information about the different fields on this page, go here.
Next, go to Settings > Customize > Account Defaults. This page contains many of the same items as the My Settings page. The difference here is that these settings affect all new users you create in SysAid, both end users and administrators.
Before you create your users, make sure that all settings here are correct. For a full description of fields on this page, go here.
Do you intend to use SysAid in a language other than English? Make sure to set the default language before importing your users.
Note: SysAid includes translations for the Self-Service Portal for 42 different languages, as well as full translations for nine languages (click here for a complete list). If your language is not on this list, you can still translate SysAid yourself. See Translating SysAid and customizing text below for details.
Creating End Users
You now need to import your users into SysAid. If you set up LDAP/AD integration during installation, then this is already done. To verify this, go to Tools > User Management > End Users.
If you have not set up LDAP/AD, you have three options to import your end users:
Option 1 (Recommended): Import Users Automatically From LDAP/AD.
Setting up LDAP is recommended for the following reasons
- You will not have to duplicate all of your user profiles which are already stored in your LDAP/AD.
- Your users will be able to authenticate directly through your LDAP/AD.
- You can enable single sign-on (Microsoft Active Directory only) so that users automatically log into SysAid when they log on to their computer.
To set up LDAP integration
- Go to Settings > Integration > LDAP.
- If you are using Microsoft Active Directory, use the LDAP configuration wizard to import your AD structure. Be sure to remove any unwanted OUs after import. If you are using an LDAP other than Microsoft Active Directory, fill out the necessary fields using the settings in your LDAP.
- Refer to our complete instructions for configuring LDAP integration.
- Once LDAP integration is enabled, you can also enable Single Sign-On.
Option 2: Import Users From a .csv (Comma Delimited) File
SysAid allows you to import your users from a file. You may do so from Settings > User Management > Import Users. For full instructions on importing from a .csv file, please go here.
Option 3: Create Users Manually
SysAid also allows you to manually create your users. You may do so from Tools > User Management > End Users. For full instructions for manually creating users, please go here.
Creating Administrators
As you begin to use SysAid, you will want to give access to your other service desk technicians, your administrators. There are two ways to create administrators: directly, or by converting existing end users into administrators.
Converting End Users to Administrators
If you have imported your users from LDAP or from .csv, your administrators were imported into SysAid as end users. You must now convert them into administrators so that they can access the administrator portions of SysAid.
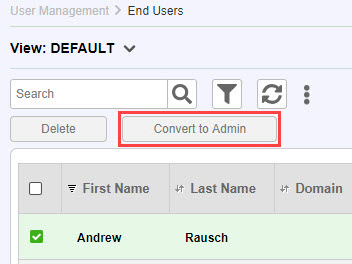
- Go to Tools > User Management > End Users.
- Select the end users you would like to make administrators using the checkboxes. This displays the End User Actions list.
- On the End User Actions list, click Convert to Admin. The selected end users are converted to administrators. They are removed from the end user list and added to the administrator list.
Creating Administrators Manually
If you did not integrate with LDAP or import users from a .csv, you can create your administrators manually. You may do so from Tools > User Management > Administrators. Go here for further instructions for creating admins manually.
Administrator Permissions
After creating your administrators, you must set their permissions for the different modules and features in SysAid.
- Go to Tools > User Management > Administrators.
- Click on an administrator to open their profile.
- Click on the Permissions tab.
- Set the permissions that you want for this administrator
For a full description of each available permission, please go here.
Creating groups (optional section)
For ease of management, you will find it useful to create groups of administrators and end users. Sample uses of groups include:
- Assign service records to administrator groups instead of to individual administrators
- Create SysAid calendar events for user groups
- Create permissions by user group (Full Edition only)
- Limit reporting by user group (requires Manager Dashboard module)
If you imported your users from LDAP, you had the option to import all of the groups in your LDAP. If you have not done this, you may create groups from Tools > User Management > Groups. For detailed instructions on creating groups, please go here.
Note: There is another designation, Department, which you can assign users to. The department list may be edited under Settings > Customize > Lists by selecting the department list.
Configuring Email Integration
SysAid supports email integration for:
- Creating new incidents from incoming emails
- Logging all email correspondence related to a specific service record
- Sending automated notifications to end users and administrators
- And more!
To configure email integration, go to Settings > Integration > Email. Full instructions for setting up Email Integration can be found here.
Service Desk Configuration
You're now ready to start using the SysAid Service Desk, but there are a few configurations that you should make before you get started.
Go to Settings > Service Desk. The options you see here control settings for your service desk. There are some settings that you should configure before beginning to use the service desk:
General Settings SysAid can send out a variety of automated emails to update administrators and end users when changes are made to service records. It's recommended to choose your settings here carefully, so that you receive the notifications you need without getting swamped by emails. More details
Categories In order to properly classify your service records, you should create categories. SysAid comes with a number of default categories. The Categories tab is where you add your own categories. More details
Routing Rules If you have predefined roles for your service desk staff, you can set up routing rules so that all SRs of a specific type or from a particular user group are assigned to the correct administrator. This saves valuable time when dispatching new SRs. More details
Escalation Rules Use escalation rules to ensure that no SRs are lost, and to ensure that the proper escalations are taken when SRs pass critical due times. More details
The above is only a partial list of service desk settings. Go here for a complete list, including a short description of each settings page.
Managing Incidents
Whether you've used another service desk software before or not, it helps to understand the way incidents are managed in SysAid. This includes how you create incidents, how you manage them, and how you resolve them.
For more information about managing changes, problems, and requests, please go here.
Creating Incidents
A new incident can be created in many ways. The most common ways include:
- Submitted by an end user from the Self-Service Portal (More details)
- Submitted by an end user from email (More details)
- Created by an administrator from within SysAid
To create a new incident as an administrator, go to Service Desk > Help Desk > Incidents and click  . More information about creating incidents as an administrator can be found here.
Managing Incidents
Viewing the Incident List
Once an incident has been recorded in SysAid, it falls upon you and your service desk technicians to resolve it. Resolving an incident has two parts: part one is the actual resolution, usually done outside of SysAid. Part two is managing the incident, which is where SysAid comes in.
Go to Service Desk > Help Desk > Incidents to view a list of all incidents recorded in SysAid. You can filter the list to view specific types of incidents, such as new incidents, and then browse through the list to find the specific incident you're looking for.
Viewing Incident Details
Click on any incident in the Incident list. This opens the SR form, which shows details for the selected incident.
There are certain fields on this form that you will update for almost every incident that moves through the system. They are:
Request User
This is the user (either end user or administrator) who needs the incident resolved.
Category
Helps you to categorize the types of service calls. Examples could include "Printer problems," "Server down," "Broken keyboard," etc. In SysAid, you can set up categories, sub categories, and third level categories.
Priority
Indicates how important the immediate resolution of this service record is to the continued normal operation of the company. A server down issue could have a priority of "Very High," while a toner low message could have a priority of "Low."
Status
Tells you where in the service record lifecycle the SR currently is. Examples of statuses are New, Open, Awaiting user response, User responded, Follow up, and Closed.
Assigned To
Tells you who is working on this service record.
Due Date
See when an incident must be resolved by. Allows you to tell if an incident has been resolved on time.
Activities
The Activities field allows you to specify how much time you spent working on an incident. Reports can then be run on SR activities.
Notes
The notes field allows you to leave short notes with a username and timestamp, helpful for creating a log of all work performed in trying to resolve an incident.
Message Log
The message log records all incoming and outgoing emails for an incident. Use it to view complete incident email correspondence.
The SR form includes many additional fields. A full description of all these fields can be found SR Fields.
Resolving Incidents
Once an incident has been resolved (e.g. the printer's working again), you close the incident. If the resolved issue is a common one, you can even add the solution to your SysAid Knowledge Base.
To close an incident, add a solution/resolution and any relevant notes, and then change the status of the incident to Closed.
Example of Incident Management
Here is an example of managing new incidents, often called dispatch:
David, an administrator, has the Incident list open and is viewing all new incidents. One by one, he views and updates details for each incident. He:
- reads the description of the incident (e.g. my printer broke),
- verifies the category of the incident (in this case, printer problems),
- gives the incident a priority,
- assigns the incident to the appropriate administrator (John, who is in charge of all printer issues),
- changes the status of the incident to "open" to indicate that it's been dispatched,
- gives it an appropriate due date depending upon the type and severity of the issue,
- Saves changes.
For a more in-depth overview of creating, managing, and resolving an incident in SysAid, see the Incident Management Overview.
Network Discovery
You can instantly discover your network using agentless discovery methods based on WMI and SNMP protocols. To access a full picture of your network, deploy the SysAid agent to computers running various operating systems (Windows, Linux, Mac, and Unix). And to optimize network communication in large-scale networks and to perform discovery tasks behind firewalls, SysAid's Remote Discovery Service (RDS), acts as a proxy for the SysAid server in remote networks.
Agentless Network Discovery
You can use the WMI and SNMP protocols to perform an agentless network discovery that obtains a full hardware and software inventory for each discovered device. These discovery tasks are performed with the RDS, which can be installed remotely on any network segments that lie beyond firewalls. You can schedule recurring network discovery tasks to ensure that your picture of your network remains up-to-date.
The SysAid Agent
Aside from basic hardware and software inventory, the SysAid agent provides additional, Asset Management capabilities. For example, you can launch a remote control session or initiate a chat conversation directly from a service request as long as the attached asset is running the SysAid agent. Furthermore, the SysAid agent allows end users to submit a ticket with an automatically captured screenshot of their screen using a single keystroke (F11 by default). The SysAid agent includes many other unique capabilities such as monitoring, asset availability, My Desktop, and more.
Import Assets From .csv Files
You can import and update asset data using a .csv (comma-separated values) file. This capability allows you to easily migrate data from another system and to integrate with external Asset Management databases.
The following guides are available to help you import your assets into SysAid:
- For WMI scanning, SNMP scanning, and importing assets manually or via a .csv file, see the Network Discovery Guide.
- For deploying the SysAid agent, see the SysAid Agent Deployment Guide.
Go ahead and import your assets now. Subsequent sections of this guide assume that your assets are already imported into SysAid.
What's the fastest way to get started with SysAid Asset Management? Go to Settings > Network Discovery > General and click Run WMI Scan. This opens the Network Discovery Wizard. Start importing your assets immediately!
Managing Your Assets
Earlier, you imported all of your assets into SysAid. Now, it's time to start taking advantage of SysAid Asset Management.
Assigning Asset Groups
You can sort your assets into groups to more easily view and report on specific assets. To create asset groups, go to Assets > Asset Management > Asset Groups. Complete instructions for creating groups and adding assets can be found here.
Viewing the Asset List
The Asset list is where you can view all of your assets, search for an individual asset, sort your assets, and more.
Go to Assets > Asset Management > Asset List to view the Asset list. Complete instructions for using this list can be found here.

To view details for an individual asset, click on that asset. This opens the Asset form.
Viewing Asset Details
The Asset form shows all data relevant to an individual asset. Much of the data shown here is collected automatically by the SysAid Agent, by WMI scanning, or by SNMP scanning, depending upon the type of asset.
You can view several types of data from the asset form:
Viewing Hardware Inventory
To see an overview of an asset's hardware, click on the Information tab. This is the default tab that opens when you view details for an asset.
To view complete hardware information, click on the Hardware tab.
Viewing Software Inventory
To view software installed on an asset, click on the Software tab. To manage software products for all assets on your network, see the section below, Managing software products.
Viewing an Asset's Service History
SysAid records a complete SR history for each of your assets. Click on the Service Desk tab to view this history.
Note: In order to keep an accurate service history for your assets, you must attach all SRs to the assets they affect. This is done by selecting an asset as the Main Asset for an SR. This can be done by end users from the Self-Service Portal (see Incident Management Overview ), or by administrators from the admin side of SysAid.
Other Information Available From the Asset Form
A complete description of all information available to you on the Asset form can be found here.
Monitoring Assets
All SysAid packages come with basic workstation monitoring capabilities. The Monitoring module extends this functionality to servers and network devices. Monitoring configurations are created from Assets > Monitoring > Workstations/Servers/Network Devices. Please go here to learn how to monitor your assets.
Performing Remote Control
SysAid allows you to perform a a remote control session to any computer that has the SysAid agent installed. You can initiate a remote control session from several different places within SysAid:
- From the RC tab on the Asset form.
- From Assets > Asset Management > Online Users using the remote control icon.
- From the SR form when a service record has an attached asset.
- From within a Chat.
For more information about performing remote control, please see our full Remote Control Guide.
Managing Software Products
After deploying the SysAid agent to all of your computers, SysAid collects all software information for these computers. You can easily use this data to manage software licenses.
To manage software licenses, go to Assets > Asset Management > Software Products. Full instructions for managing software products can be found here
List of Software Products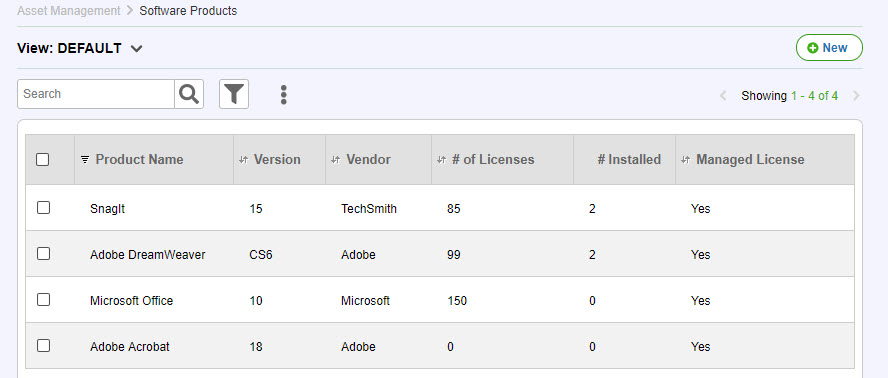
Customization
By this point, you've seen the basics of what SysAid has to offer, both in asset management and service desk. As you've surely noticed, SysAid has a tremendous depth of features. This section discusses options you have for customizing SysAid to meet your needs even more closely.
Note: Customization options are only available to administrators who have SysAid Administrator privileges.
Customizing Lists and Forms
Almost every single list page and form page in SysAid can be customized.
Customization of lists includes:
- Determining which columns appear and in which order
- Adding drop-down filters
- Creating new views
Customization of forms includes:
- Determining which fields appear and in what order
- Marking fields as read only
- Adding new tabs (and in Full Edition, determining which users can view these tabs)
Customizing the End-User Submit Incident and Submit Request Forms
End users submit incidents and requests from the Self-Service Portal using the Submit Incident and Submit Request forms. You can easily customize these forms to meet your particular needs.
To customize the Submit Incident form, go to Settings > Self-Service Portal > Incident Submission Form. Full instructions can be found here.
To customize the Submit Request form, got to Settings > Self-Service Portal > Request Submission Form. Full instructions can be found here.
Setting Self-Service Portal Settings
In addition to customizing the Submit Incident and Submit Request forms, SysAid gives you additional customization options for the Self-Service Portal.
Go to Settings > Self-Service Portal > Self-Service Portal Settings. Here, you can determine all settings for the Self-Service Portal, including which features are enabled when your end users access the Self-Service Portal.
Go here for a complete description of Self-Service Portal customization options.
Customizing Drop-Down Lists
Nearly every drop-down list in SysAid (e.g. Status, Location) can be customized. To customize lists, go to Settings > Customize > Lists.
Full instructions for editing lists can be found here.
Customizing the Location list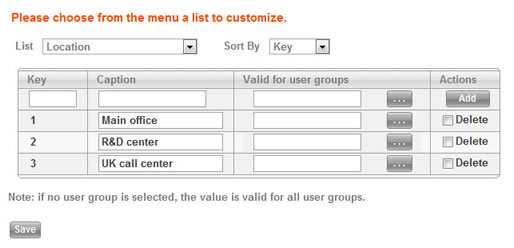
Note: If you would like to rename custom lists (e.g. SR Custom List 1), you must edit the names in the translation file. Please see the section below on the SysAid translation file.
Translate SysAid and Customize Text
SysAid comes available in a variety different languages, right out-of-the-box (click here for a full list.) However, you may need to translate SysAid into a language that's not provided. Alternatively, you may want to edit the translation for a particular language, or you may want to change various captions in SysAid to adhere to your existing Service Desk terminology. You can do all of this using the SysAid translation file.
Go to Settings > Customize > Translation to edit the translate file. Full instructions for editing the translate file can be found here.
Fun with the translation file -- SysAid login page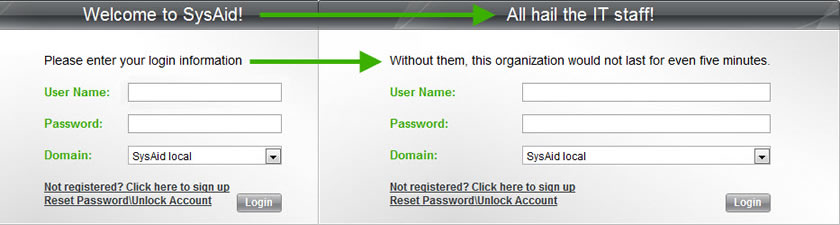
What's Next?
Explore SysAid's Many Features
Thus far, we have seen the Service Desk and Asset Management modules of SysAid. This is only a small portion of what SysAid has to offer you.
The best way to continue learning SysAid is to explore. Click on all the menu items, open all the tabs-- look everywhere. If at any time you don't understand a feature, review the specific feature content, accessible by clicking on your user name in the top right corner and choosing Documentation, this will bring you directly to the topic for the screen you are on. In this way, you will be able to learn everything that SysAid can do for you.
Encourage Users to Begin Using SysAid
In order to get the most out of SysAid, you need to use it!
- Make sure that your end users begin to use SysAid for submitting incidents and requests.
- Help your users adjust to using the F11 hotkey.
- Make sure users email SysAid and not you directly (so that their emails are captured by SysAid).
- Set up administrator accounts for all of your service desk technicians and have them start logging into SysAid to view their service records
- Make sure your technicians record all of their activities in SysAid and that they update service record statuses as needed.
Try Out Additional Modules
SysAid contains a number of additional modules that will help you to better manage your IT operations. Some of these are included with all versions of SysAid, and some are unlocked only if you have purchased them. Go to My Menu > About to view all modules included in your license.
Each module has its own guide, which you can find on the documentation page of our website. Decide which modules are right for you, and start using them!
More information about additional modules:
- If you are using a trial of SysAid, you can access all modules available for your edition.
- If you purchased SysAid without some of the additional modules, you can request a temporary license for any module by emailing sales at clientrelations@sysaid.com.
- To read about all of SysAid's available modules, go here.
Enjoy SysAid!
The most important thing is to enjoy SysAid! SysAid is now the hub of your service desk and asset management operations, and much more. If you use SysAid to its full potential, your life as an IT administrator will be much easier.
If you have any questions along the way, we ask that you contact us so that we can provide you with the assistance you need. Have fun with SysAid!