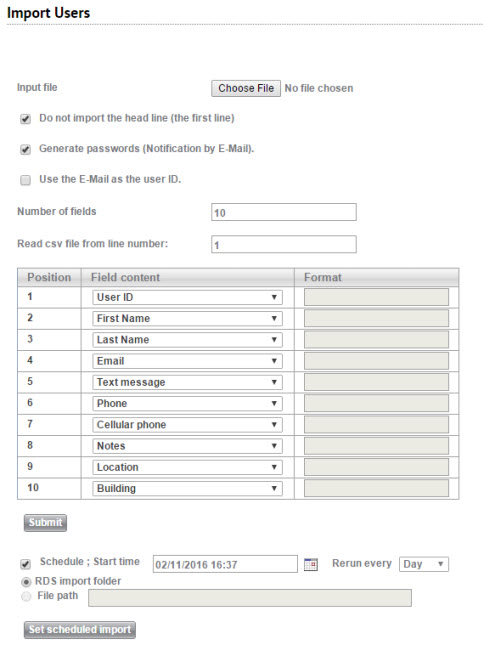
This page allows you to easily import a list of users from a .csv file. You can also update existing users by reimporting them with updated information or automatically syncing SysAid with your .csv file and making the changes in that file.

To import a list of users
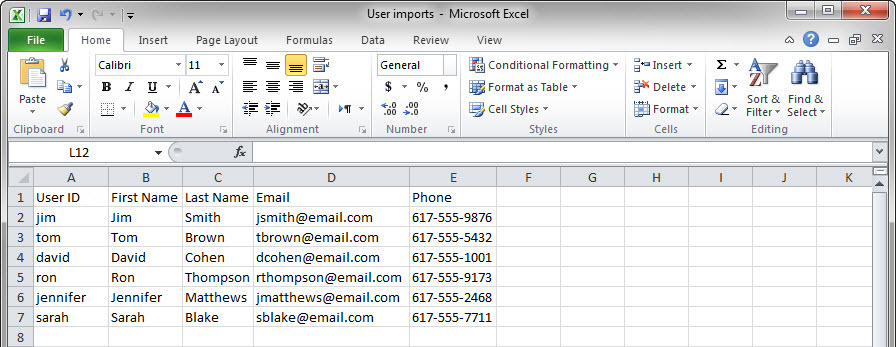
- Create a .csv file with the users you would like to import. You can easily create a .csv file using Microsoft Excel (save as CSV). Columns in the .csv are fields to import for each user, and rows in the .csv are the individual users. See the image below for an example.
.csv file ready for import into SysAid
- Select the .csv you've created by clicking Choose File.
- If your .csv has column headers (like in the picture above) check the Do not import the head line box.
- If you would like your new users to be able to log into SysAid, it's recommended to check the Generate passwords box. This generates a random password for each new user you import and emails the password to the user. The user can then change their password at a later time.
- Check the Use the email as the user ID box if you would like SysAid to use the imported email addresses as the users' User IDs. The advantage of using email addresses is that they are unique, and you don't have to worry about overwriting existing users. If you check this option, there is no need to import the User ID field.
- Select the number of fields to import. The number of fields is equal to the number of columns in your .csv file.
- Choose which row in the .csv file should be the first row to import. If you change this from the default value of "1," it's recommended to uncheck the Do not import the head line box.
- Select each field you are importing in the Field content column. Each field corresponds to one column in the .csv file. The Field content in Position 1 is the left-most column in your .csv. Note that you must import either the User ID or Email field.ImportantIf you would like to update an existing user, the User ID of that user should be imported, along with the fields to be changed. If you do not import a User ID that already exists in SysAid, SysAid creates a new user instead of updating an existing one.
- If you select any date fields, specify the date format in the Format column. You can use either European (dd/mm/yyyy) or US (mm/dd/yyyy) date formats.
- Click Submit to import your users.
You can verify that your users were correctly imported and/or updated from Tools > User Management > Administrators/End Users.
Automatically sync SysAid with a .csv file
You can set SysAid to automatically sync its user information with a .csv file. This means that at the intervals you define, SysAid checks the .csv file for changes. If any changes have been made, SysAid imports the file and overrides the existing user information with the updated information in the .csv file.
On-Premises users can accomplish this by pointing to the file location of the .csv file or by connecting to the .csv file via the RDS . Cloud users can perform this sync only by connecting to the .csv file via the RDS . The RDS scans the folder and uploads the copy of the .csv file to the server every 10 minutes. The server processes the updated information based on the selected schedule time.
To automatically sync your users with a .csv file via the SysAid server
- Check the Schedule box.
- In the Start Time field, select a date and time to begin syncing with the file.
- From the Rerun Every drop-down list, select if the sync should occur every hour, day, or week.
- Select the File path option button.
- In the File Path field, enter the file path location of the .csv file.
- Click Set scheduled import.
To automatically sync your users with a .csv file via the RDS
- Check the Schedule box.
- In the Start Time field, select a date and time to begin syncing with the file.
- From the Rerun Every drop-down list, select if the sync should occur every hour, day, or week.
- Select the File path option button.
- Click Set scheduled import.
- On your system, add a copy of the .csv file to the RDS folder under WEB-INF/csvUserFiles.ImportantDo not attempt to permanently store the original .csv file in this location as the RDS uploads it to the server and removes it from this location.
- Access the RDS and open the DiscoveryService.properties file.
- Find the "csv.user.import" parameter and set its value to "true". If the parameter does not exist in the file, add it manually.
- Save the file.
- Restart the RDS service.

Importing list values that don't exist in SysAid
Companies
When importing users, if SysAid imports a user's company and that company is not registered in SysAid, SysAid automatically creates the company. In addition, if you import another .csv file with other users from the same company, SysAid automatically registers all the relevant users under the same company.
Custom lists
For the department field, or any other customized list field, SysAid does not create new list entries when importing from a .csv file. You must, therefore, ensure that all the list entries in your .csv file are paralleled in SysAid. If a list value that does not exist in SysAid list appears in your .csv file, SysAid ignores it.
For example, if you import a department value of Development but your department list in SysAid includes only the departments Management, Marketing, and Support, SysAid ignores this value and the department field for this user is left blank. To fix this, simply add the new department to your department list from Customize > Lists and then upload your .csv file again.