Introduction
The SysAid Administrator guide includes instructions to assist you in making system level changes to SysAid that do not involve the GUI. The changes described below should only be performed by an administrator who is familiar with both the workings of his network and with SysAid.
For your reference, the default installation directory for SysAid is C:\Program Files\SysAidServer.
Terms in orange are variables that you must replace with the appropriate value.
Change the SysAid login URL
By default, the SysAid server login URL is taken from the hostname of your local machine. In order to change the SysAid server URL to another (e.g. external) hostname / IP address, please do the following:
- Access the computer on which the SysAid Server is installed.
- Open the serverConf.xml file located at ...\SysAidServer\root\WEB-INF\conf.
- Check to see if you have the tag <serverURL>
SysAidServerURL:PortNumber</serverURL> on the line below the tag <externalLoginClass> none <externalLoginClass>.
If you do not have the above tag, then insert it on the line immediately after <externalLoginClass> . - Replace
SysAidServerURLwith the desired hostname / IP address for your SysAid server. Make sure not to change the listening port.
Example: http://www.sysaid.com:8080 - Save your changes and restart the SysAid Server service.
- Log in to SysAid and check that a) the SysAid server URL under Settings > Network Discovery > Downloads has changed, and that b) if you send a notification about a new password to a user, the login link in the email includes the correct hostname / IP address.
Note : After changing the SysAid login URL, you must redeploy the SysAid Agent with the new URL.
Change the SysAid listening port
When you first install SysAid, you choose the listening port for Tomcat. The listening port becomes part of the SysAid URL:SysAidServerURL:PortNumber
Example: http://SysAidServer:8080
In order to change the port which tomcat listens on, please do the following:
- Access the computer on which the SysAid Server is installed.
- Open the server.xml file located at ...\SysAidServer\tomcat\conf.
- Locate the line:
<Connector port="8080" protocol="HTTP/1.1"
(Note that if you chose a different port during SysAid installation, that port number will be shown here instead of 8080.)Note:If you are running Tomcat version 7 till 9 , the displayed protocol is "org.apache.coyote.http11.Http11Protocol". If you are running version 9 or higher, the protocol is "org.apache.coyote.http11.Http11NioProtocol"
- Change the value port="8080" to another convenient port (e.g. port="8180").
- Save changes.
- Open the serverConf.xml file located at ...\SysAidServer\root\WEB-INF\conf.
- Check to see if you have the tag <serverURL>SysAidServerURL:PortNumber </serverURL> on the line below the tag <externalLoginClass> none <externalLoginClass>.
If you do not have this line, go to step 8.
If you do have this line, change PortNumber to the new port number you chose in step 4 above. - Save your changes and restart the SysAid Server service.
You must now use the new port number whenever you log in to SysAid.
Change the SysAid session timeout
If you find that you frequently need to log back into SysAid because your session times out, you might want to lengthen the SysAid session timeout. In order to increase the session timeout interval in SysAid, please do the following:
- Stop the SysAid Server service.
- Open the serverConf.xml file located at ...\SysAidServer\root\WEB-INF\conf.
- Find the line <webServerUser>false</webServerUser>, and add a new line after it.
- On the new line, add <maxInactiveInterval>
XXXX</maxInactiveInterval>, whereXXXXis the desired session timeout in seconds. The maximum supported value is 99999. - Save your changes and restart the SysAid Server service.
If you choose a timeout interval of greater than 30 minutes, you must also update the timeout interval for the Tomcat web server.
- Open the web.xml file located at ...\SysAidServer\tomcat\conf.
- Find the <session-timeout> paramenter.
- Modify the value <session-timeout>
XXXX</session-timeout> as you see fit, whereXXXXis the desired session timeout in minutes. - Save your changes and restart the SysAid Server service.
Reset the main administrator password
The SysAid login page allows you to reset your password if you've forgotten it. This is true for any password stored in SysAid except for the main administrator password (the main administrator is the administrator you created during SysAid installation). If you forget this password, you must use the SysAid password reset utility as described below. This utility is also useful if you've forgotten the username of the main administrator.
For Windows
If you have forgotten the main administrator's username or if you need to reset the main administrator's password, please do the following:
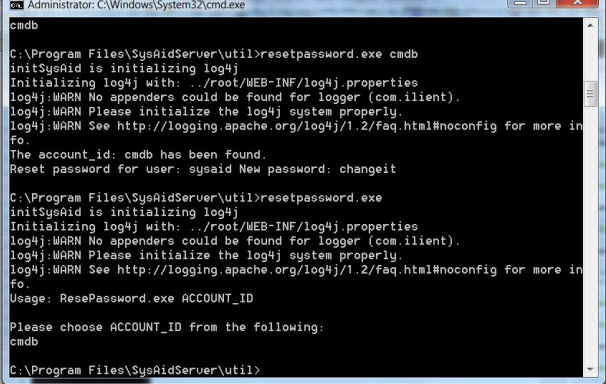
- Open the command prompt (Run > CMD).
Note : On Windows Vista, you need to run CMD as an administrator. Go to Start > All programs > Accessories and right-click Command Prompt and select Run as Administrator. - Change the directory to C:\Program Files\SysAidServer\util.
- Type ResetPassword.exe and press Enter. Your account name should then be listed.
- Type ResetPassword.exe "
ACCOUNT NAME" (with the quotes) and press Enter. - The main administrator password has been reset. The username and new password ("changeit") for the main administrator are now displayed.

For Linux
The script to reset the main administrator password is located at http://cdn3.sysaid.com/resetpassword.sh. The script should be run with the following two parameters:
Note: You need to stop Tomcat before running the script. Your terminal environment also needs to support Java commands. If you can run "java -version" from the terminal, then the script should work.
- The path to the root SysAid folder. In Linux, it is usually the SysAid folder under the Tomcat webapps (e.g. /var/tomcat/webapps/sysaid).
- The account name (e.g. Acme).
Example: ./resetpassword.sh /var/tomcat/webapps/sysaid Acme
The script shows you the administrator username and the new password (which is "changeit").
Attachments are stored in the file system
By default, all attachments in SysAid accounts are stored in the File System. This is SysAid's recommendation, as storing attachments in the database (possible only for On-Premises accounts) might lead to a very big database size and backups that take a long time.