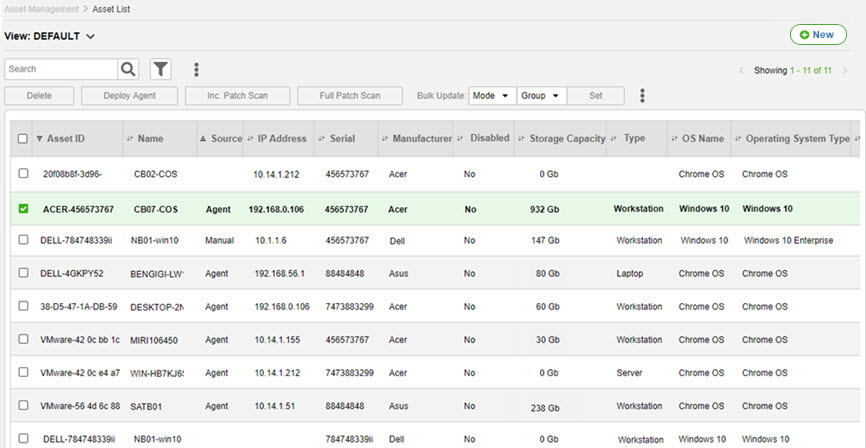
This page includes a full list of your assets. By clicking any row entry you can reach the full details of each asset.

For general instructions for using list pages in SysAid, see Using SysAid Lists.
Creating a new asset
To create a new asset, click  . This opens a new asset in the asset form. For further instructions, see Asset Form.
List actions
You can modify the list with list actions. To display the list actions, select one or more of the check boxes corresponding to the assets you want to modify.
If you are using a cloud edition and perform a list action on 50 or more assets, the action runs in the background and it could take a few minutes until the action is applied to all of the selected assets.

Delete
Delete the selected assets. You must have the correct permissions to delete assets.
Export Selected to PDF
Click  and select this option to export the selected assets to .pdf. You can then easily print them.
Export Selected to Excel
Click  and select this option to export the selected assets to .csv. You can then print them, or use the data for further calculations.
Deploy Agent
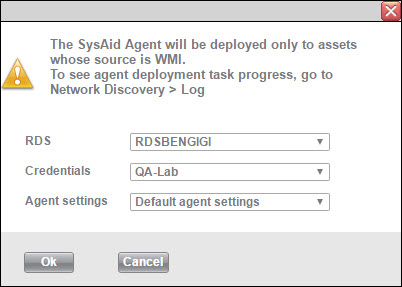
Deploy the SysAid Agent to the selected assets. The selected assets must haveSource = WMI (i.e. they must have been detected during a WMI scan).
From the dialog that opens, select the RDS, RDS Credentials, and Agent settings you want to apply to this deployment. When you are finished with your selections, click OK. You can view the updated settings in a read-only window from the Asset form.

Inc. Patch Scan
Immediately scan the selected assets for patches not included in the most recent scan.
Full Patch Scan
Immediately scan the selected assets for all available patches.
Mode
From the drop-down list, choose whether to enable or disable the selected assets and click Set . Automatic inventory updates, monitoring, and all other agent capabilities are turned off for disabled assets. Disabled assets do not count against your license total.
Group
Choose an asset group from the appropriate drop-down list and click Set. All selected assets are now part of the chosen asset group.
More Actions
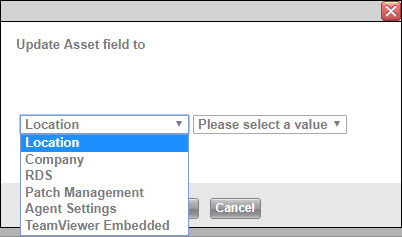
Click More Actions to open a window with the additional asset fields. Select one of these fields, and then choose the desired value for that field from the adjoining drop-down list. Click Save to update each of the selected assets with the new field value.

Location | Select the location for the selected assets. |
Company | Select the company that the selected assets belongs to (Available in Full edition only). |
Select which RDS node to use for the selected assets. Note that updating the RDS field changes the Remote Discovery Service associated with the assets. If you select a new RDS, make sure to choose an RDS accessible to the assets (e.g. on the same network). | |
Patch Management | SysAid Patch Management operates on an annual subscription licensing model. This means that you must have a valid license subscription to retain Patch Management capabilities, and you can designate the quantity of assets covered by your Patch Management license based on your specific needs. Patch Management functionality is only available for assets that have active asset licenses. Example: Let's say that you are using SysAid to manage 1,000 assets, and 600 of them are qualified for Patch Management. If you purchase a Patch Management license for 400 assets, you can select which assets to enable for Patch Management functionality. Once an asset is enabled, SysAid runs an initial scan on the asset to obtain it's patch data. For more information about SysAid Patch Management, see the Patch Management Guide. This field allows you to manually Enable or Disable Patch Management functionality on specific assets. |
Agent Settings | Select the Agent Setting configuration you want to apply to the selected assets. |
SysAid TeamViewer Embedded operates on an annual subscription licensing model. This means that you must have a valid license subscription to retain TeamViewer Embedded capabilities, and you can designate the quantity of assets covered by your TeamViewer Embedded license based on your specific needs. TeamViewer Embedded functionality is only available for assets that have active asset licenses. Once you enable TeamViewer Embedded on an asset, that specific license cannot be used for another asset until the next monthly billing cycle. Example: Let's say that you are using SysAid to manage 1,000 assets, and 600 of them are qualified for TeamViewer Embedded. If you purchase a TeamViewer Embedded license for 400 assets, you can select which assets to enable for TeamViewer Embedded functionality. Once you've used all of your licenses and want to free up some of the licenses to perform sessions on other assets, you can disable licenses on assets and enable them on other assets once the next monthly billing cycle starts. This field allows you to manually Enable or Disable TeamViewer Embedded functionality on specific assets. |
Predefined list views
The SysAid Asset list includes several predefined views that correspond to lists in other SysAid locations:
Asset Dashboard
Controls the Assets tab in the Asset Details section of the Asset Management Dashboard.
Browse Assets
Controls the Select Asset screen that appears when you change the Main Asset on a service record.
Predefined Patch Management list views
Patch Management
This view provides a general overview of all the Patch Management enabled assets including hyperlinked numbers (stats) indicating how many patches are in a specific status on the asset.
By default, this view includes the following status columns:

Installed Patches | Displays the total number of patches installed on the computer. Once a patch is installed on a machine, you cannot change its status on that machine. |
Failed Patches | Displays the total number of patches that have been approved for the computer, but the attempts to deploy them were unsuccessful. This number is included in the total number of missing patches. To redeploy failed patches, you must mark them for redeployment in the Failed view of the Patch Management list or in the list represented by the Failed Patches stat. |
Missing Patches | Displays the total number of patches that are applicable but not installed on the computer. Includes patches whose attempt to deploy on the computer have failed, patches that have been approved on the computer or approved with Change SR, and patches that are pending approval on the computer. |
Clicking on the stat in a status column opens a list of patches included in the total. Each list allows you to perform relevant list actions to affect the status of the patches in the list on your computer. For more information about which list actions are relevant to which statuses see the the list actions for the various views in the Patch Management list.
Missing Patches
You can assign different statuses to a patch for each of its relevant assets. When an asset is enabled for Patch Management, its relevant patches are either already installed or "missing". SysAid assigns the Pending Approval status to these patches, and you can then choose to approve the patch, approve it with Change Management, or deny it.
This view displays assets that are missing some patches and hyperlinked numbers (stats) indicating how many patches are in a specific "missing" status for a given asset ("missing" can include failed, pending approval, denied, Change SR, and approved patches).
By default, this view includes the following status columns:
Missing Patches | Displays the total number of patches that are applicable, but not installed on the computer. Includes patches whose attempt to deploy on the computer have failed, patches that have been approved on the computer or approved with Change SR, and patches that are pending approval on the computer. |
Approved Patches | Displays the total number of patches approved for the computer, but not yet deployed on it. |
Pending Patches | Displays the total number of patches relevant for the computer, but not yet approved for it. |
Change SR Patches | Displays the total number of patches marked for approval on the computer using Change Management and not yet approved on the computer (this option is only available to editions of SysAid that include the ITIL module). |
Denied Patches | Displays the total number of patches that have been denied for the computer. |
Failed Patches | Displays the total number of patches that have been approved for the computer, but the attempts to deploy them on the computer were unsuccessful. To redeploy failed patches, you must mark them for redeployment in the Failed view of the Patch Management list or in the list represented by the Failed Patches stat. |
Clicking on the stat in a status column opens a list of patches included in the total. Each list allows you to perform relevant list actions to affect the status of the patches in the list on your computer. For more information about which list actions are relevant to which statuses, see the the list actions for the various views in the Patch Management list.