The asset form allows you to record and view all information relevant to a particular asset. If the asset was created in SysAid from a WMI or SNMP scan, by the SysAid agent, many of the fields on this page are automatically populated.
Layout and Customization of the Asset Form
The information contained in the asset form is split up into multiple tabs, each with its own default fields. Note that different asset types display different tabs.
The descriptions of each tab below describe the fields that appear on each tab by default. For a full list of all fields available on the asset form, please consult the table at the bottom of the page.
You can add any fields you like to any tab by customizing the form using the design form icon ![]() . Note that each asset type is customized individually.
. Note that each asset type is customized individually.
Tabs on the Asset Form
Information
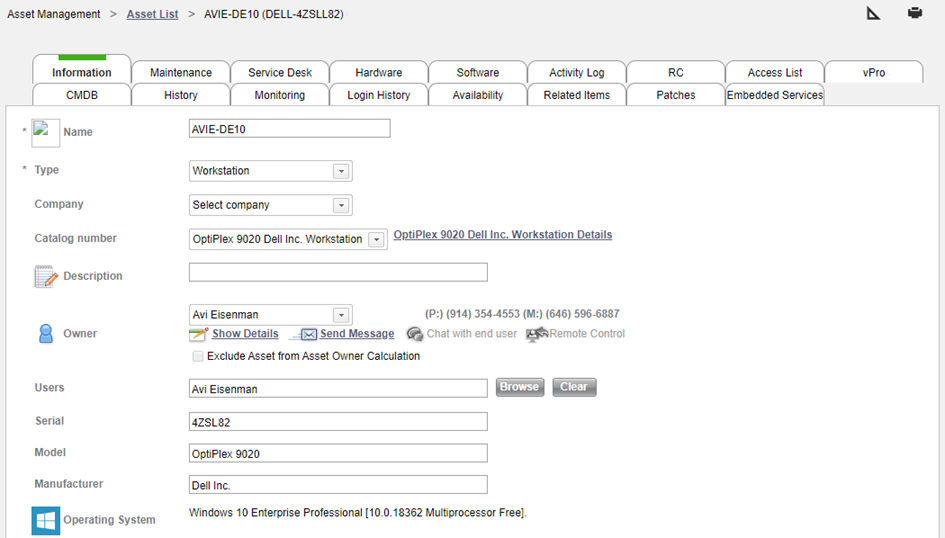
The information tab contains general asset details. This includes the asset's type, group, company, catalog number, owner/users, and more.
For a full description of the fields on the Information tab, please see the table at the bottom of this page.
Note About the Users Field:
Users that appear in the Users field on the asset can select that asset when submitting a ticket from the Self-Service Portal.
Write to SNMP devices
If you have mapped an SNMP OID to a specific field and enabled editing of that OID, you can change the value of that OID. Keep in mind that this changes the field value not just in SysAid, but also on the SNMP device itself.
To write to an SNMP device
- Next to the name field, click
 .
. - Enter the updated value for the Name field on the device.
- Select the credentials you want to use to authenticate your change.
- Click Update.
Edit SNMP OID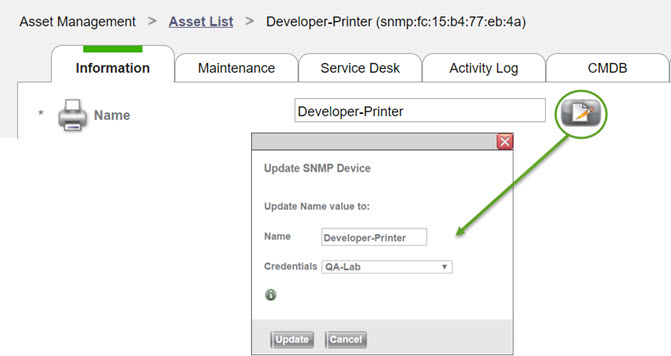
View agent settings and logs
If your agent settings have been updated, you view them in a read-only window by clicking the linked number in the Agent Settings Version field.
You can also pull the agent logs directly from the server without logging in to the agent station. When the logs are available, the date and time of your request appears as a link in the Get Agents Logs field.
To retrieve the asset's agent logs
- In the Get Agents Logs field, click Retrieve Agent Logs.
- Click the link to download a zip file containing the requested log files.

Maintenance
Here you can add details regarding asset maintenance, such as the purchase date of the asset, the name of the supplier, the warranty expiration date, and more. As with all date fields, you can create reminders under Settings > Customize > Reminders. An example would be setting a notification right before the warranty expires.
Service Desk
The Service Desk tab shows a list of all service records related to this asset. A service record is related to an asset if the asset appears in the Main Asset field for that service record.
Instructions for using the service record list here are the same as for using the main Service Desk list.

Hardware
This tab shows you hardware information for the asset. All data here is collected automatically by the SysAid Agent and is updated any time a change is detected on the asset.
Software
This tab shows you software information for the asset. All data here is collected automatically by the SysAid Agent and is updated any time a change is detected on the asset. Software products that you've registered under Assets >Asset Management > Software Products appear first with additional details about the software product. Note that serial number are only collected for several products, such as Microsoft Office.
Patches
The Patches tab allows you to review the patches related to the asset. You can access a separate view corresponding to each patch status: Installed, Failed, Missing, and Approved. Each view includes list actions relevant to that patch status. Using these list actions override any values automatically set by the policy associated with this asset. In addition, you can also enable or disable Patch Management functionality for the asset.
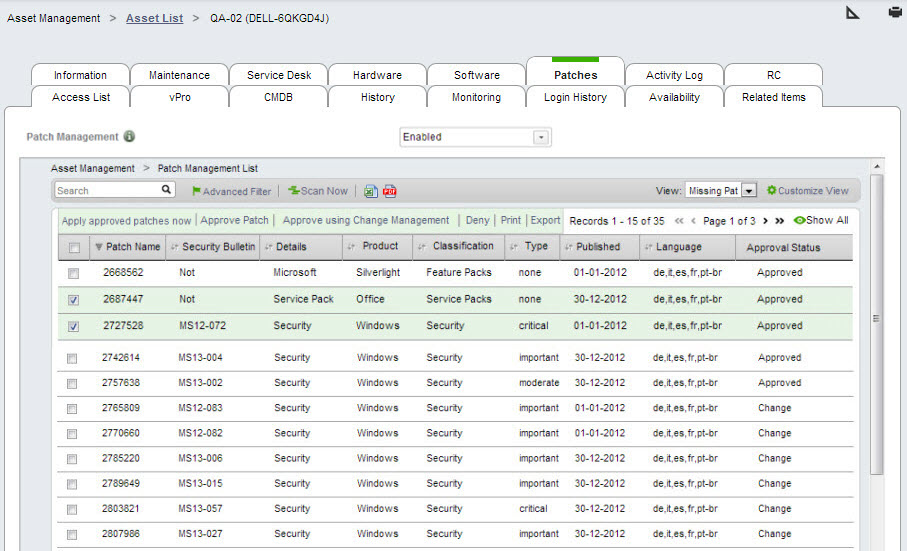
You can scan the asset to determine which patches the asset is missing.
To immediately initiate a patch scan on the asset
- Click Scan Now.
To approve or deny patches
- In the Patches tab, select the patches you want to affect.
- From the list actions, select Approve Patch, Approve using Change Management, or Deny.
If you selected Approve using Change Management, select a change method and template, and click OK. For more information on using Change Management, see the Patch Management Guide.
To apply approved patches
- In the Patches tab, select the Missing Patches or Approved Patches view from the View drop-down list.
- Select the patches you want to apply.
- From the list actions, select Apply approved patches now.
To enable/disable Patch Management
- Select Enabled or Disabled from the drop-down list on the top of the tab.
For more information about enabling/disabling Patch Management functionality, see Asset List.
Activity Log
Here you can see the list of activities that have affected this asset. The types of activities that can affect assets are: inventory changes, service records opened or modified, remote control sessions performed, and more. You can click the More info... link to view full details for an activity.

RC- Remote Control
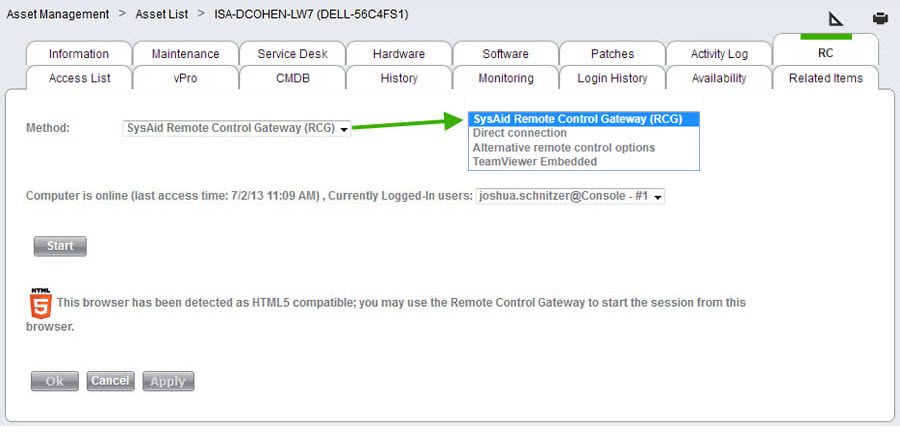
This tab allows you to perform a remote control session on this asset. Select your desired remote control method, and select the desired session to connect to (if applicable). For full instructions for using SysAid Remote Control, please see the complete Remote Control Guide.
Access List
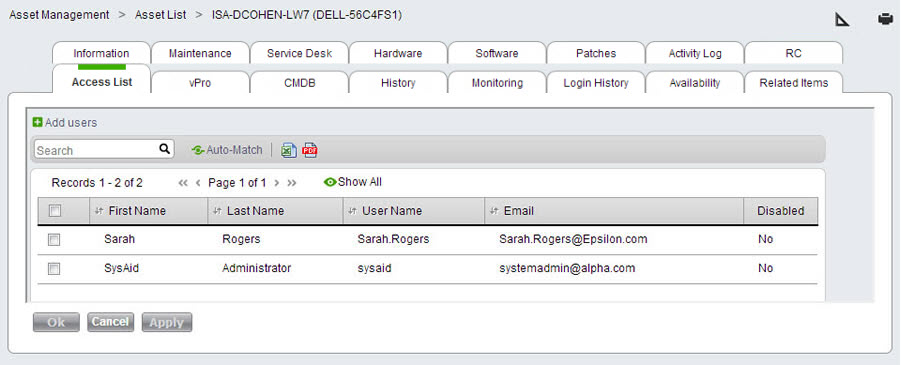
The Access List tab allows you to register users on this asset for SysAid My Desktop. Click  to open a list where you can select your desired users. Alternatively, click Auto-Match to automatically register users on this computer based upon computer owner and usage patterns. For more information about Auto-Match, please see the My Desktop Guide.
vPro
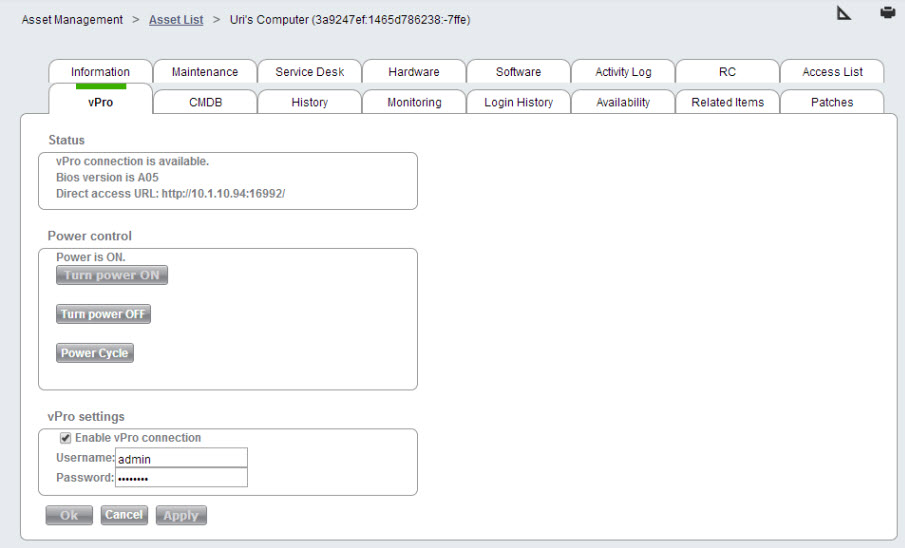
vPro is a motherboard technology by Intel that provides support for My Desktop to computers, even if they are turned off. If you have vPro compliant network assets, you can use SysAid to power on these assets remotely. You can then use SysAid to perform a remote control session.
To enable vPro access to an asset, check the box Enable vPro connection, and enter a valid username and password. Then click Apply.
To learn more about Intel vPro, go to: http://www.intel.com/technology/vpro/
CMDB
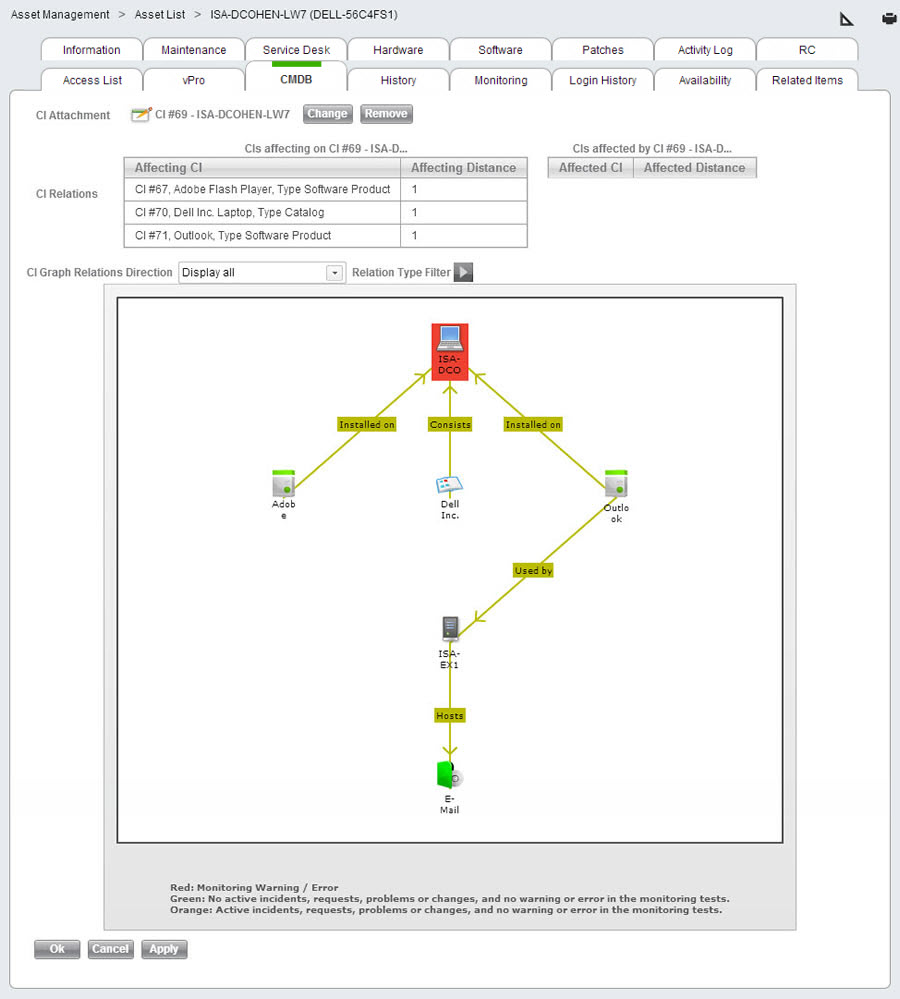
If you have imported this asset into the CMDB, this tab allows you to see connections between this asset and other CIs in your CMDB. Using the drop-down filter, you can view CIs that affect this asset, CIs affected by this asset, or all relationships.
If an asset has a problem that prevents it from functioning normally, it's a good idea to check the CMDB tab to see what other network assets could be affected by the problem.
History
Under this tab you can see a list of all changes that have been made to this asset. Click on a version number to open a new screen with a snapshot of the asset at that revision.

Monitoring
This tab shows you a list of monitoring configurations for this asset. This is the same list that can be seen from Assets > Monitoring > Workstations/Servers/Network Devices, with the only difference being that here, only the selected asset is shown.
Login History
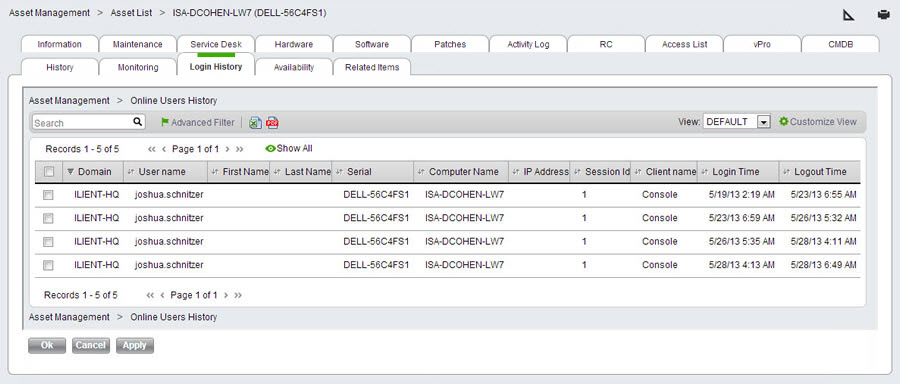
This tab shows you the login history for this computer. This is the same information that's contained under Assets > Asset Management > Online Users > History (tab), but here it is restricted to the asset you are viewing.
Asset Availability
This tab shows you the availability (uptime) of the asset over time. Asset availability is only for assets whose source is Agent.
Note that the table shows N/A for any time period that occurred before the Reporting since date.
Read more about asset availability here.
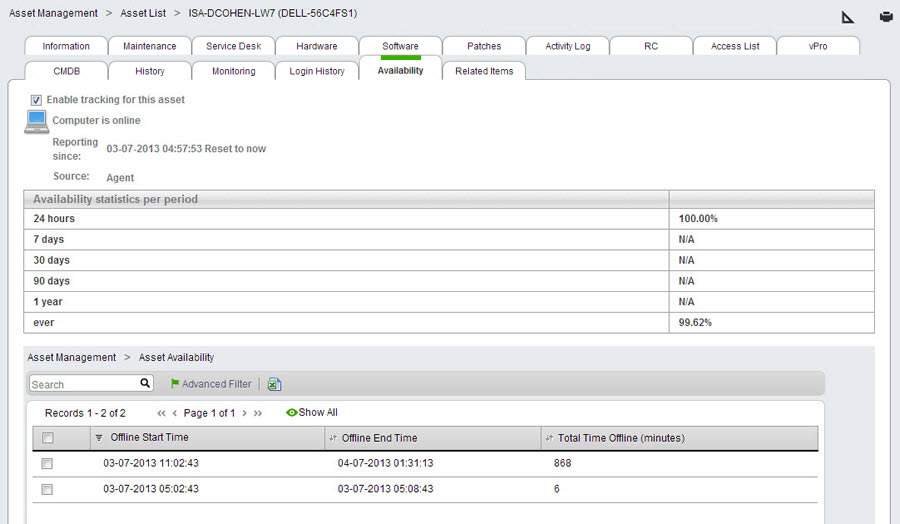
Enable Asset Tracking
Asset tracking (i.e. monitoring an asset's availability) is enabled automatically for all assets of type Server and for all assets where the word "server" is contained in the name of the operating system. For all other assets, you may check the box Enable tracking for this asset to begin monitoring the asset's uptime.
Resetting the Asset Availability History
On the line Reporting since, click Reset to now to delete all asset availability records for this asset and start tracking again from now. Important: You cannot restore the asset availability records once you've deleted them, so use caution before clicking this button!
Viewing Offline Periods
The bottom table includes all offline events for the current asset for the selected timeframe. You can select the timeframe by using the Offline Start Time filter.
Offline Start Time filter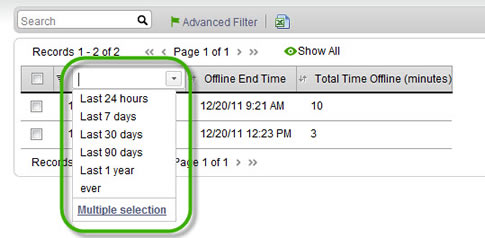
Related Items
View items related to this asset, and attach new items to this asset. You can click on any related item to open that item in a new window. You can add a new related item by selecting the item type, click Add, and selecting the desired item from the list that opens. This asset will also be seen on the Related Items tab of any attached items.
Embedded Services
This tab displays information about the embedded services deployed on the asset.
Available fields on the Asset form
There may be fields which are not listed in the table below.
They may be custom fields that were added to your system, or fields added by a third-party integration.
| Available Fields on Asset Form | Field Description |
|---|---|
| Access List | Shows all users registered for My Desktop on this asset. Also allows you to register new users. |
| Activity Log | Shows all changes to the asset. Includes changes to software, hardware, devices, and linked service records. |
| Asset Custom date 1, 2 | Customizable date fields. Can be used to trigger reminders. |
| Asset Custom Integer 1, 2 | Customizable integer fields. No letter or decimal values. |
| Asset Custom List 1, 2 | Customizable lists. Lists can be customized from Settings > Customize>Lists. |
| Asset Custom Notes | Allows you to leave notes about the asset. |
| Asset Custom Text 1, 2 | Short text fields that allow you to record information about the asset. |
| Attachments | Allows you to attach files to the asset. Attachments are added with a timestamp, which allows you to easily identify different versions of a file with the same name. When you attach a file, SysAid validates that the file extension is a valid file type. The following file types cannot be loaded as attachments: jsp, jspx, jsw, jsv, jspf, wss, do, action, exe, msi, ps1, html, htm, pif, application, gadget, msp, com, scr, hta, cpl, msc, jar, bat, cmd, vb, vbs, vbe, jse, ws, wsf, ps1xml, ps2, ps2xml, psc1, psc2, msh, msh1, msh2, mshxml, msh1xml, msh2xml, scf, lnk, reg. |
| BIOS Type | The BIOS loaded on the computer's motherboard. |
| Building | The building the asset is located in. |
| Catalog Number | The catalog item associated with this asset. You can configure catalog items under Assets > Asset Management > Catalog. |
| CI Attachment | The asset's corresponding entry in the SysAid CMDB. All assets can be automatically imported into the CMDB from Settings>CMDB > Import Settings. |
| CI Relations | All relationships between the currently viewed asset and your other configuration items. |
| CI Relations Graph | A visual representation of the relationships between the currently viewed asset and your other CIs. CIs with open service records (incidents), changes, or problems are highlighted in orange. CIs with monitoring warnings/errors are highlighted in red. |
| CPU | Shows details about the central processing unit(s) of the computer. |
| CPU Count | The number of CPUs in the computer. |
| CPU Model | The model of the computer's CPU. |
| CPU Speed | The clock rate of the computer's CPU (in MHz). |
| CPU Vendor | The manufacturer of the computer's CPU. |
| Child Assets | Includes links to the child assets of this asset. In Asset Management, the Parent/Child relationship is for organizational purposes only. |
| Company | The company this asset belongs to. Assigning an asset to a company may affect which administrators can view/modify it, depending upon administrator permissions. To edit the companies list, go to Tools > User Management > Companies. |
| Company Serial | This is your internal company serial number for this asset (not related to the manufacturer's serial number that's printed on the device). |
| Cubic | The cubicle this asset resides in. |
| Current Carrier | The carrier currently being used by a mobile device. |
| Department | The department this asset belongs to. You can create departments under Settings > Customize > Lists (choose the Department list). |
| Description | A description of the asset. For example, Marketing Printer. |
| Disabled | Shows whether the asset is disabled or not. Automatic inventory updates, monitoring, and all other agent capabilities are turned off for disabled assets. Disabled assets do not count against your license total. If an asset is not disabled, it's enabled. |
| Display | Information about the computer's display adapter and the driver for the monitor. |
| Display Adapter | The computer's display adapter. |
| Display Memory | Shows the amount of onboard memory for the computer's display adapter. |
| Display Resolution | The maximum screen resolution for the computer's display adapter. |
| External Serial | Allows you to record any additional serial number for the asset, such as a serial number given by a 3rd party reseller. |
| Floor | The building floor on which the asset is located |
| Group | The asset group this asset belongs to. You define asset groups as you see fit. You have the option of restricting administrators to view assets in certain groups only, so design your groups thoughtfully. Groups can be created from Assets >Asset Management > Asset Groups. |
| Hardware | Extensive hardware information about the computer. Includes information about CPUs, display adapters, memory, storage devices, and network adapters. Automatically updated by the agent. |
| Service Desk | Shows a list of service records related to the currently viewed asset. This is a great place to check if the problem you are currently working on has ever previously happened to the device. |
| History | Shows a list of all changes made to the asset, including a timestamp and the entity that made the changes. Clicking on the version number will open a new window with a snapshot of how the asset looked at that time. |
| Home Carrier | The primary service provider for a mobile device. |
| ICC | The unique identification number for the SIM card currently inserted into a mobile device. |
| IMEI | The unique hardware identification number for a mobile device. |
| IP Address | The asset's IP address. |
| Last Access Time | The last time the agent installed on this computer contacted the SysAid server. |
| Last Boot | The last time this computer booted up. |
| Last Maintenance | The last time maintenance was performed upon this computer. |
| Links | Here you can embed hyperlinks to anything you choose. For example, you might include a link to the technical support page on the website of the asset manufacturer. |
| Links to other items | Shows you any service records linked to this asset. You can attach additional service records, if you like. |
| Location | The physical location of the asset. You can build this list yourself from Settings > Customize > Lists. |
| Login History | This tab shows you the login history for this computer. This is the same information that's contained under Assets > Asset Management > Online Users > History (tab), but here it is restricted to the asset you are viewing. |
| MAC Address | Shows the MAC addresses for the different network adapters installed on the currently viewed computer. |
| Manufacturer | The manufacturer of the asset. |
| Memory | Total physical and virtual memory for the currently viewed computer. |
| Model | The model of the asset. |
| Monitor | Useful for desktop computers. Allows you to specify an associated monitor. |
| Monitor Serial | The serial number of the associated monitor. |
| Monitoring | Shows you all monitoring rules applied to this asset. |
| Mouse | The mouse connected to the currently viewed computer. |
| Name | The name of the currently viewed asset. |
| Network | The computer name on the LAN, and the network adapter name and IP address. If the computer has multiple network cards you can select which card is pinged when testing for connectivity. |
| Online Users | Shows users currently logged into this asset. |
| Operating System | The operating system of the currently viewed computer. |
| Operating System Type | The type of operating system installed on the asset. |
| Operating System Version | The version of the operating system installed on the asset. |
| OS Serial | The serial number of the installed operating system. |
| Owner | The person this asset belongs to. If user's asset is determined by owner for the Self-Service Portal, the designated "owner" is able to submit a service record for this asset. When the option Same as owner is defined at the Asset Type level, the asset owner is defined by the user who logs in five times in a row to the asset. Location, department, and company are also retrieved from the owner, when available. Use the Exclude Asset from Asset Owner Calculation checkbox to avoid the mentioned logic and define the owner manually. |
| Parent Asset | Allows you to select a parent asset for this asset. Once you've selected a parent, you'll see the name of the parent asset and link to view details for the parent. Furthermore, the current asset becomes a child asset and shows up under the list of Child Assets for the parent asset. |
| Patch Management | Allows you to enable or disable Patch Management functionality on this asset. |
| Patch Management Policy | Allows you to select a Patch Management Policy to attach this asset to. Patch Management Policies determine the automatic Patch Management behavior for a group of assets. For more information, see Edit a Patch Management Policy. |
| Phone number | The phone number of a mobile device. The phone number is device and mobile network carrier dependent and may not be available for all devices. |
| Printers | Shows all printers configured on this computer, and the ports that they use. |
| Purchase cost | Allows you to record the initial purchase price of the asset. |
| Purchase date | Allows you to record the date you purchased/acquired the asset. |
| RC | Allows you to perform a remote control session to the asset. For more information about this option, please see the RC tab, above. You can also consult the Remote Control Guide for more details. |
| RDS | Shows the Designated Remote Discovery Service for this asset. You can select a different RDS as needed. Read more about RDS here. |
| Registry Values | Allows you to monitor specific registry values on your computers. You can select which values to monitor from Settings > Asset Management > Registry Keys. |
| Serial | The asset serial number. For computers, this is the motherboard serial number. |
| Service Pack | The operating system service pack. |
| SNMP Custom Text 1-20 | You can map SNMP custom OIDs into these fields. You can change the field names to reflect the mapped OID from the translate file located at Settings > Customize > Translation. |
| SNMP Parameters | Shows the network discovery details used for the SNMP scan that discovered the SNMP device. SNMP devices only. |
| Software | Contains a list of all software products installed on the computer, as well as version number and serial key (for certain products). |
| Software Products | Contains a list of all software detected on the computer that has also been registered in SysAid under Assets > Asset Management > Software Products. You can also see the software vendor, install names, and support expiration. Useful for keeping tabs on the software products most important to you. |
| Source | Shows how the asset was create in SysAid. Source can be SNMP, WMI, Windows Agent, manual, etc. If the source is WMI, there is a link which allows you to automatically deploy the agent. |
| Storage | Summary of total storage on the computer currently being viewed. |
| Supplier | The supplier you acquired the asset from. Suppliers can be set up under Assets > Asset Management > Supplier List. |
| Support Provider | The organization that provides support for this asset. This pulls from the supplier list, and can be set up under Assets > Asset Management > Supplier List. |
| SysAid Agent Version | The version of the SysAid agent installed on the currently viewed computer or mobile device. |
| Type | The type of asset. You can set up new asset types under Settings > Asset Management > Asset Types. When an asset is selected as the Main Asset for a service record, the remote control button will only appear for computer asset types. |
| Update Time | Shows the last time the asset sent an inventory update. You can click Update now to manually request an inventory update for the device. |
| Users | Individuals registered as users of this machine. If user's asset is determined by network user for the Self-Service Portal, whoever is listed as a user in this field will be able to submit a service record for this asset. |
| vPro | vPro is a motherboard chipset from Intel. If a computer supports vPro, you can remotely turn on that computer from here. |
| Warranty Expiration | Allows you to record the warranty expiration date of the asset. You can set up a reminder to notify you in advance from Settings > Customize > Reminders. |