Service Desk Lists are now available in Spaces, as Queue Views!
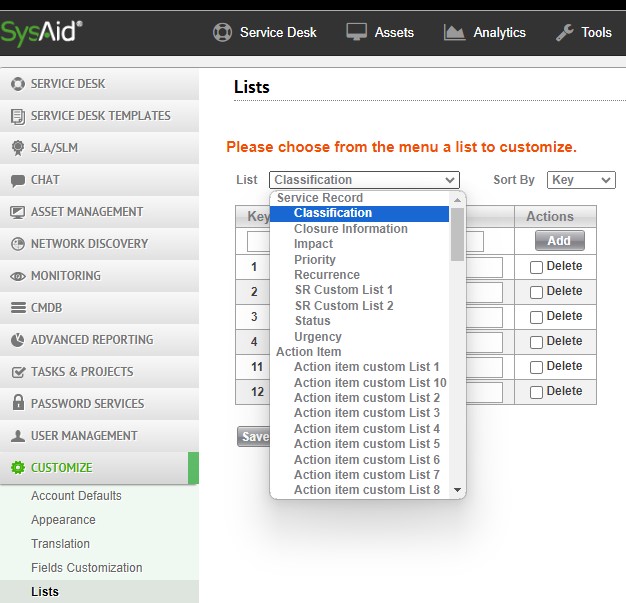
Every single list in SysAid can be customized. This page allows you to customize these lists. Any changes made to a list here will affect that list in every place it appears throughout SysAid.

Add Fields
Open the Customize List page
Select the desired field from the list of available columns by clicking on it. You can select multiple entries at once using SHIFT or CTRL.
Click the arrow button
 to move the field(s) to the list of visible columns.
Use the up or down arrows (to the immediate right of the visible columns list) to order the fields according to your preference.
Click Save to add the changes to your current view. For more save options, see managing list views below.
Remove Fields
Open the Customize List page
Select the desired field from the list of visible columns by clicking on it. You can select multiple entries at once using SHIFT or CTRL.
Click the arrow button
 to move the field(s) to the list of available columns.
Click Save to add the changes to your current view. For more save options, see managing list views below.
Note:
Certain special lists, such as the Company list or Assigned To list, are edited in other parts of SysAid.
Edit List Values
Add a new Value (entry)
Select the list you would like to edit.
Enter a key number for the new entry.
Enter a caption for the new entry.
If only certain user groups should be able to select this entry, select them using the ellipses
 button. If no groups are selected, any administrator will be able to select this entry.
Click Add.
Click Save.
Tip: When building a list, use key values that are separated by 10, or even by 100. For example, first entry in the list is 101, second entry is 201, third entry is 301, etc. This way, you can insert additional entries in between if you need to.
Rename a List Value (Caption)
Select the List you’d like to edit
Overwrite the Caption Field of the relevant List value (entry)
Click Save.
Delete a List Value (Entry)
Select the list you would like to edit.
Check the Delete checkbox next to the entry you would like to delete.
Click Save.
Note that you can't delete list entries that are currently in use. For example, you cannot delete the pending status when there are pending service records.
Reorder List
For each list, you can choose to sort the list entries by key number (lowest to highest) or by caption (in alphabetical order).
Select the list you would like to edit.
In the Sort by drop-down list, choose either Key or *Caption.
Click Save.
Rename a List
You can rename any list (e.g. SR Custom List 1) by editing the translation file.
Go to Settings > Customize > Translation and then go here for further instructions.