Customize Lists
- 06 Jul 2022
- Print
- PDF
Customize Lists
- Updated on 06 Jul 2022
- Print
- PDF
Article Summary
Share feedback
Thanks for sharing your feedback!
You may reach the Customize List page by clicking the  from any list in SysAid which does not have the upper form icons.
You may reach the Customize List page by clicking on the customize list icon ![]() from a few lists in SysAid which has the upper form icons.
from a few lists in SysAid which has the upper form icons.
Customize the Project list
Customize the Asset list
The customize list page has three functions
- Choose which fields show up in your lists and in which order.
- Choose which drop-down filters show up in your lists and in which order.
- Create and manage additional list views.
Customize List page
Add and remove fields from your list views
To add a field(s) to the list view
- Open the Customize List page.
- Select the desired field from the list of available columns by clicking on it. You can select multiple entries at once using SHIFT or CTRL.
- Click the arrow button
 to move the field(s) to the list of visible columns.
 - Use the up or down arrows (to the immediate right of the visible columns list) to order the fields according to your preference.
- Click Save to add the changes to your current view. For more save options, see managing list views below.
 to move the field(s) to the list of visible columns.
To remove a field(s) from the list view
- Open the Customize List page.
- Select the desired field from the list of visible columns by clicking on it. You can select multiple entries at once using SHIFT or CTRL.
- Click the arrow button
 to move the field(s) to the list of available columns.
 - Click Save to add the changes to your current view. For more save options, see managing list views below.
 to move the field(s) to the list of available columns.
Manage filters
SysAid gives you a large array of predefined drop-down filters for use is filtering your lists.
Drop-down filters
Drop-down filter on the Asset list (appears on mouse-over)
To enable or disable a drop-down filter
- Open the Customize List page
- Select the desired filter from the list of Filter Menus by clicking on it.
- Click Edit. The Customize Filter view opens.
- Using the Enable Filter checkbox, enable or disable the filter as you see fit.
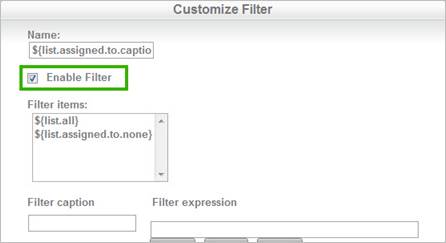
- Click Close to return to the Customize List page.
- Click Save to add the changes to your current view. For more save options, see managing views below.

To rearrange filters (old list style only)
- Click to select one or more filters that you would like to reorder. You can select multiple entries at once using SHIFT or CTRL.
- Click the arrow buttons
 to move the selected entries up or down. The drop-down filters display from left to right on the list page.
 - Click Save to close the customize list page and return to your list.
 to move the selected entries up or down. The drop-down filters display from left to right on the list page.
To add a new drop-down filter
Please contact support at helpdesk@sysaid.com for assistance in adding new drop-down filters.
Full only: If you have added a custom list field to your database using Customized Entities and you would like to create a drop-down filter for this new list, please go here for instructions.
To remove a drop-down filter
It is not recommended to remove filters. If you no longer need a filter, please disable it.
Static filters
A static filter will apply to all results shown in the selected view, and can only be removed by returning to the Customize List view. Please contact support if you would like to add a static filter.
Archive filter (Service Desk lists only)
Choose whether the current view shows archived records or not. The view can show only archived SRs, only SRs that are not archived, or both.
Manage list views
Because you use SysAid in different ways at different times, you will need to have different list views readily available without needing to customize the desired view each time. Furthermore, only SysAid administrators can customize views, but any administrator might need to change views. For those reasons, you can create and customize as many different list views as you like. For more about using list views, please go here.
Default list view, project list
Default list view, asset list
The view you see when you open the Customize List page is your currently active view.
Creating a new view
- Open the Customize List page.
- Decide how your view will look by following the instructions in sections 1 and 2 above.
- Click the radio button Please enter a name for the new view .
- Enter a name for the new view.
- Click Save.
Editing an existing view
- Open the Customize List page.
- Decide how your view will look by following the instructions in sections 1 and 2 above.
- Verify that the radio button next to Existing view is selected, and verify also that the view you would like to modify is selected in the drop-down list.
- Click Save.
Deleting a view
- Open the Customize List page.
- Select the view you would like to delete in the Existing view drop-down list.
- Click Delete view.
- Click Save.
Please be warned that a deleted view cannot be recovered! The Default view cannot be deleted.
Return to Default: This restores the current view to its default state as included with new SysAid installations. A backup of the current view is created in case you realize that you need any of the changes that you've made. Return to Default is only available for views that come with SysAid, not new views that you've added.
Restrict a view to specific admin groups (Full only)
For any view that you create, you can choose which administrator groups have access to that view:
- Select any list view that you've created. Predefined views cannot be restricted (such as Default).
- Once you have selected the view, customize the view.
- At the top of the Customize List page, use the Ellipses button
 to open a list of groups.
 - Select the groups that have access to this view.
- Save changes to the view.
 to open a list of groups.
.png)