Here is a partial list of the default fields that appear in the Top Panel and the General Details tab in the main panel in an SR. Some of these fields are explained in this section. The remainder are discussed in the list of available fields at the bottom of this help page.
When you are done making all necessary changes to your service record, click OK/Apply to save your work.
Navigating the top panel
The top panel is intended for high-level information, such as the SR's category, assigned admin, and status. These fields remain fixed in place at the top of the screen so you can review them whenever the SR is open. To optimize space on your screen, the fields in the top panel appear side-by-side and the entire panel can be collapsed and expanded at any time.
Sub Type
In order to select another sub type, you must first create it under Settings > Service Desk Templates > Sub Types . Each sub type allows you to display a different set of fields on the form. Example: You have two departments using SysAid-- IT and Maintenance. Each of these two departments will need to record different types of information on the SR form, and you would therefore like to create a different form for each of them. By customizing the form, you can choose which fields appear on the form for each sub type. When IT is creating a new service record, they choose the IT sub type and the SR form shows only IT relevant fields. When Maintenance is creating a new service record, they choose the Maintenance sub type and the SR form shows only maintenance relevant fields.
Category
This allows you to categorize your service records. Categories are important for routing of service records, automatically calculating due dates, and reporting. To customize which categories are available, see the Category List.
Title and Description
The title and description of the service record.
If Automatic Suggestions from the Knowledge Base is enabled for admins, a list of related articles from the Knowledge Base appears as you type your title. This enables you to find articles that address your issue and resolve the SR faster. If a suggestion looks like it could be a good resource for resolving the issue, click the title to view the full article.

Notes
Allows you to log notes on the service record. When you add a note, SysAid includes your name and a timestamp indicating when the note was added.
To add a note, Click New. Enter your note, and click Add.
To see all the notes and not just the most recent notes, click All Notes.
By default, end users can view this field from the Self-Service Portal, and can even add their own notes.
When an admin adds notes, the end user can be notified as specified under Settings > Service Desk > General.
When an end user adds notes, the status of the SR can be updated as specified under Settings > Self-Service Portal > General Settings.
If you are using email integration, you can configure email replies on the SR to automatically populate in the notes.

Status
This allows you to record the progress of the service record from submission to resolution. You can change the status of a service record as many times as you like to reflect ongoing updates. Status changes can send out automatic notifications as specified under Settings > Service Desk > General. If you choose a closed status, the Closure Information field appears and you can select the appropriate closure information.
Example of the lifecycle of a service record:
- A service record is submitted via email integration and automatically is given the status New.
- The helpdesk dispatcher reads the service record and decides that it should be assigned to Tom. He assigns the SR to Tom and changes the status to Open.
- Tom views the service record, realizes that he's missing some information, and sends the end user an email. He then changes the status to Awaiting Response.
- The end user receives the email and responds with the desired information. SysAid Email Integration automatically adds the response to the service record and changes the status to Client Responded.
- Tom sees that a response has arrived, reads the response, and realizes that he won't be able to resolve the issue for at least two days. He changes the status to Follow-up and puts a follow-up date on the service record.
- In two days, the follow-up date arrives, and an escalation rule changes the status of the service record back to Open.
- Tom sees that the service record has opened, and knows that he can resolve it now. Tom resolves the service record, changes its status to Closed, and enters the appropriate closure information.
Urgency, Impact, and Priority
These fields indicate how critical this service record is to the continued operation of your company.
- Urgency is how soon the issue will affect normal company operations.
- Impact is how big the effects of the problem will be.
- Priority is calculated based upon urgency and impact, as seen in the Priority Matrix.
Service records opened by email receive the urgency specified for that email address under email integration. Service records that are opened by end-users receive the default service record impact specified under Settings > Service Desk > General and either the default service record priority specified under Settings > Service Desk > General or the priority specified by any applicable priority rule or the Priority Matrix.
Due Date
The due date indicates by what date this service record must be resolved. Due dates can be calculated automatically using due date rules. If you don't want due dates changed after they've been set by the system, you can make them read-only by customizing the form using by clicking Design Form. Go here for more information on making form fields read-only.
Submit User
The submit user is the user who submitted the service record. The functionality here is the same as for request user, but with one major difference: the submit user can't be changed.
Assigned To and Admin Group
Assigned To is the administrator who is working on the service record, and Admin Group is the group of administrators who is responsible for the service record. Depending upon how you assign work in your service desk, you may assign a service record to an admin, an admin and an admin group, or just an admin group.
Assigned to and Admin Groups can receive automated notifications when a service record changes as specified under Settings > Service Desk > General. You can set up automatic SR routing by assigning an SR to an admin group with automatic dispatching enabled and leaving the Assigned To field blank. SysAid then assigns the SR to the admin in the group who is assigned to the least amount of SRs.
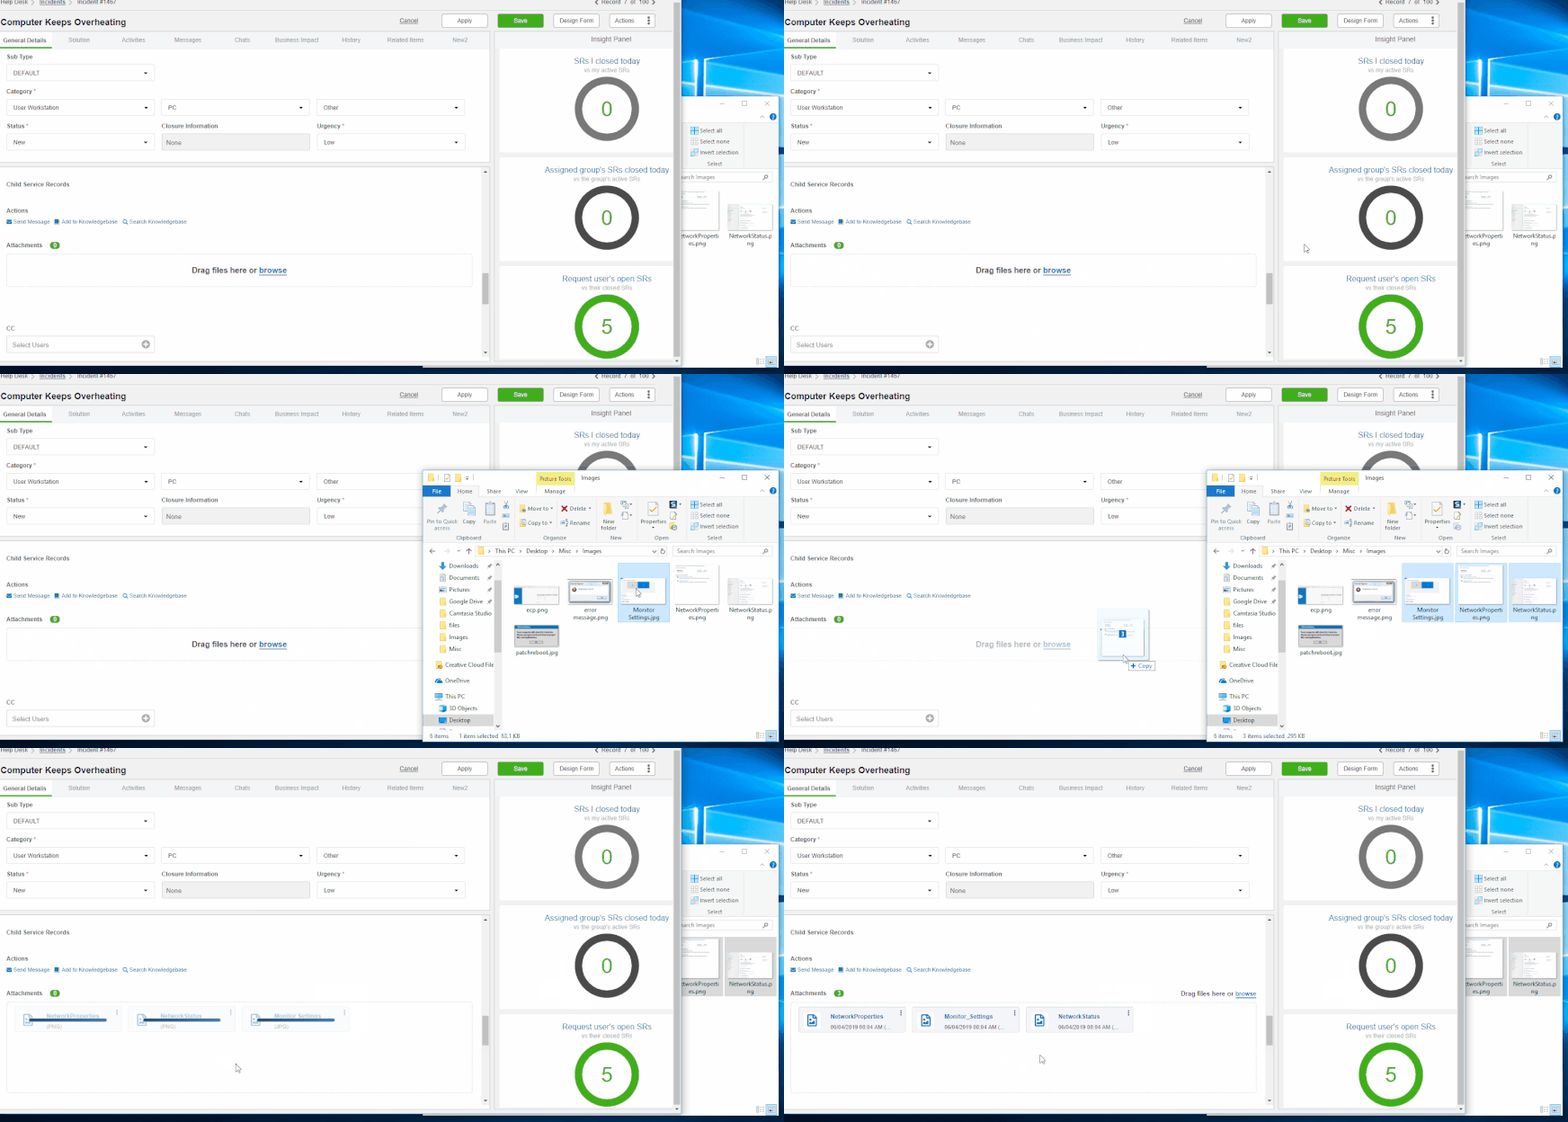
Attachments You can add relevant attachments to the SR by dragging them directly into the Attachments field or by clicking Browse
You can sort the attachments by type or by date added, by clicking Sort By and selecting how you want the attachments sorted.
You can filter the attachments to display specific types of attachments, by clicking the Filter drop-down and selecting an attachment type.
You can select preview attachments by clicking one and toggling through the other attached images in the gallery view.
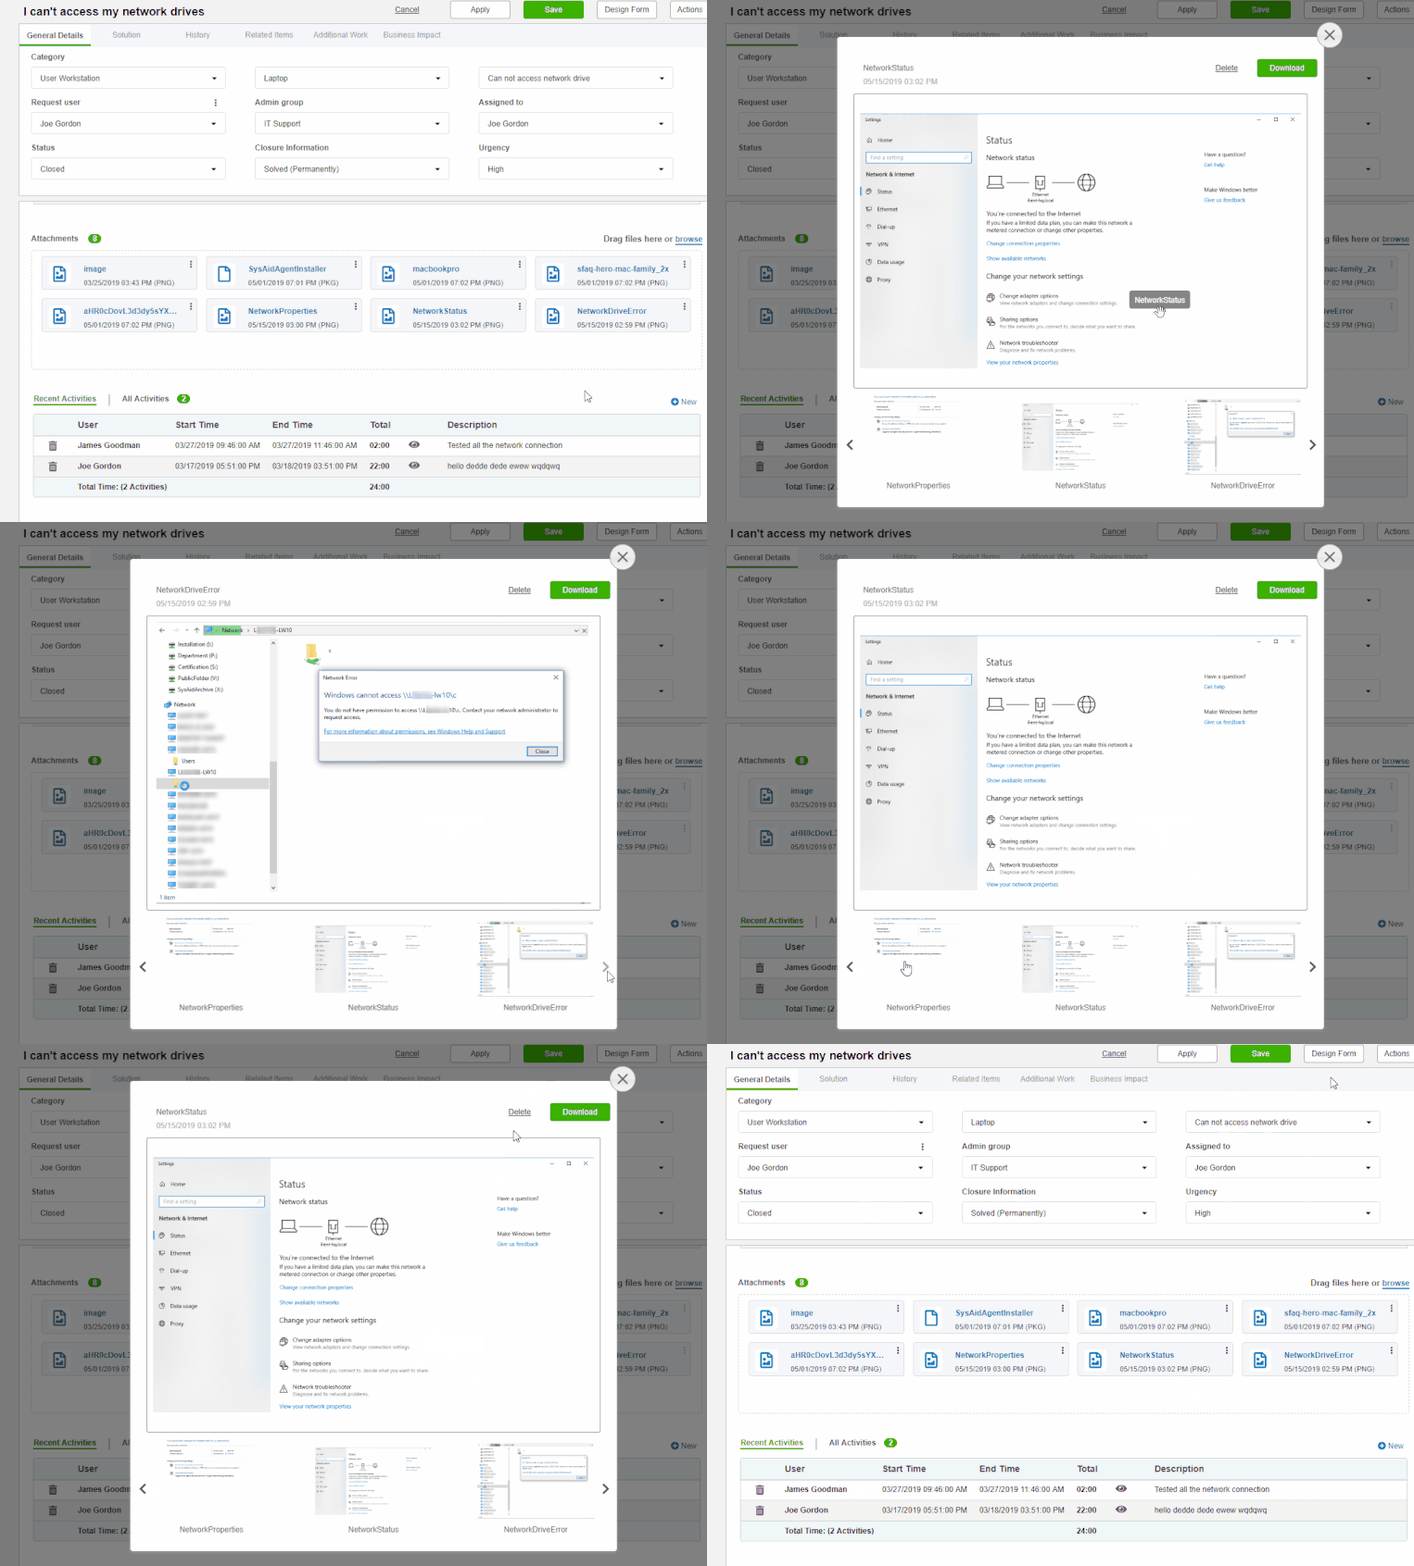
You can easily locate ticket attachments by searching for them in the Attachments search bar.

You can download or delete an attachment by clicking on it's ellipses in the attachment form or from Download or Delete button in the the gallery view.
![]()
When you attach a file, SysAid validates that the file extension is a valid file type.
The following file types cannot be loaded as attachments:
jsp, jspx, jsw, jsv, jspf, wss, do, action, exe, msi, ps1, html, htm, pif, application, gadget, msp, com, scr, hta, cpl, msc, jar, bat, cmd, vb, vbs, vbe, jse, ws, wsf, ps1xml, ps2, ps2xml, psc1, psc2, msh, msh1, msh2, mshxml, msh1xml, msh2xml, scf, lnk, reg.
Activities
Activities represent the time an administrator spent working on a service record, and can include any relevant notes or telephone conversations with the end user. Activities logged here appear in SR activities reports.
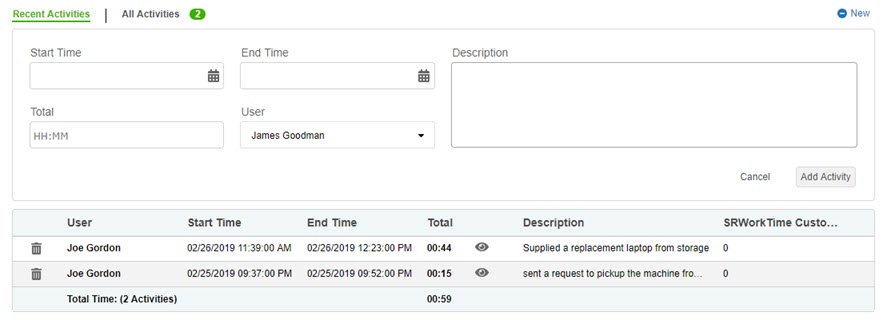
To record an activity:
- Click New.
- Enter the Start Time for the activity.
- Enter the End Time for the activity. This manually calculates the total time. Alternatively, you may manually enter the Total time in the format XX:XX.
- Select a User to indicate who reported the activity.
- Enter a Description for the activity.
- Click Add Activity. Your activity appears in the table below.
The activity is logged against whichever user appears in the User field. If you click Change to change the user, you can log an activity for a different user.
To see all the activities and not just the most recent activities, click All Activities.
You can delete an activity at any time by clicking .
.
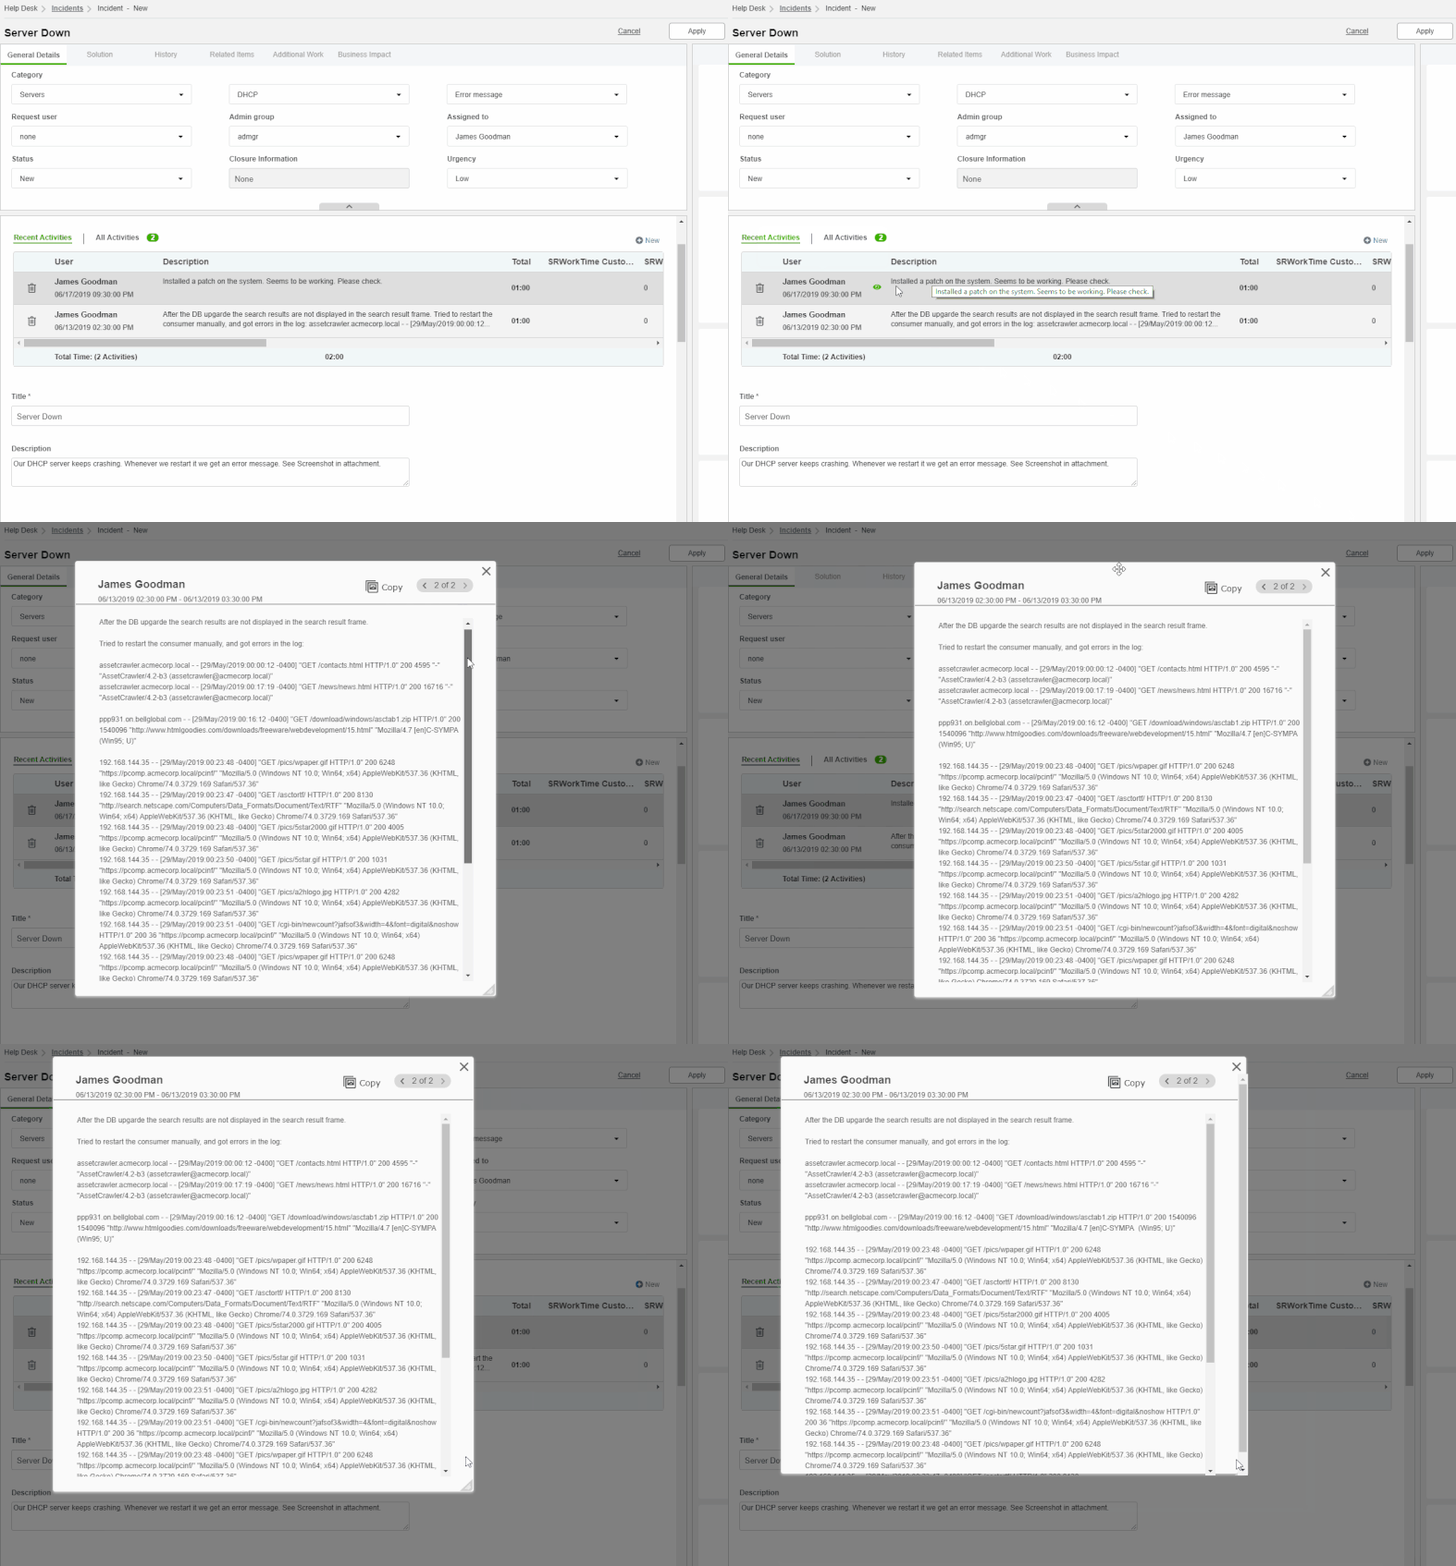
To view an activity, click in the activities row.
To copy the text of an activity, click Copy when the activity's light box is opened.
Messages
The message log records all emails sent from a service record and all emails received by SysAid that are connected to a service record.
SysAid identifies an email as being relevant to a service record if it finds "#XXXX" in the subject of an email and "XXXX" corresponds to an existing service record ID. (Example subject line: "Regarding Service Record #106 Software X keeps crashing")

Click Open All to open a new window that attaches all emails into one page for easy viewing.
To see all the messages and not just the most recent messages, click All Messages.
Click on the Body of a message to view the full message in a new window.
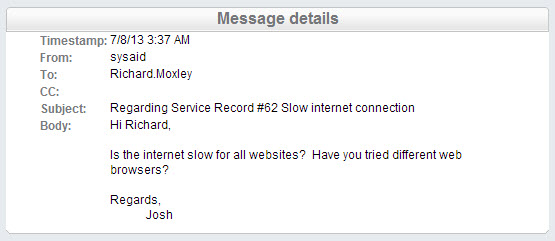
Viewing automatic messages in service records
Under specific circumstances, such as when a status changes, SysAid may send emails automatically from a service record. Automatic emails sent by a service record are also shown in the message log.
To show automatic messages, from automatic messages drop-down list, click Show.
To hide automatic messages, from automatic messages drop-down list, click Hide.

You may also choose whether automatic messages are shown or hidden by default under Settings > Service Desk > General using the option "Display the automatic notifications in messages." Regardless of what you select there, you can always click show/hide to show or hide automatic messages.
Selecting an SR template
The tabs and fields that appear on the SR form depend upon the SR template selected. When creating incidents, templates can be used to prepopulate fields on the incident, which is useful when creating incidents for common problems. When creating changes, requests, and problems, the chosen template determines the workflow for the SR. You can choose the SR template manually from the Template drop-down list. The template is also changed automatically after a category is selected for the SR (new SRs only). Note that the Template field appears on the SR form when creating new SRs only.
To create templates, go to Service Desk > Service Desk Templates > Incident/Request/Change/Problem Templates.
To choose which template is associated with each category, go to Settings > Service Desk > Categories.
Use incident templates to change which fields appear on the SR form, and to quickly fill out the SR form when logging common problems.
Use request, change, and problem templates to select the correct workflow for the task at hand.
Using advanced drop-down lists
Some of the drop-down lists on the SR form offer additional functionality. These drop-down lists allow you to type the list item you are looking for so that it is easier to find. You can also choose advanced search to open a dedicated search page.
Searching through an advanced drop-down list
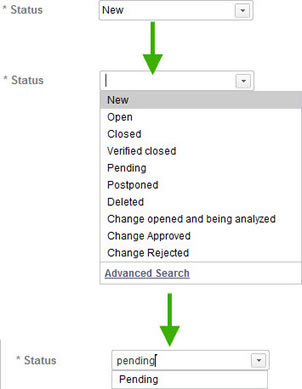
Matching incidents to problems (ITIL only)
There are frequently instances where an incident is caused by a larger problem. When you are viewing an active incident, SysAid suggests open problems that may be the cause for the incident. By locating the correct problem, you can find out information that could help you to more easily resolve the incident, such as a workaround. You can also easily attach the incident to the problem, which will ensure that the incident is properly resolved when the problem is resolved.

Matching an incident to a problem
If there are one or more problems that could be related to the incident you are currently viewing, SysAid displays these in a list. You may click on a problem name to view details for that problem. This can help you understand if a problem has caused the incident. If you find that a problem has indeed caused the incident, return to the SR form and click the check box next to that problem's name. When you save the SR form, the problem is attached to the incident under related items.
Which problems does SysAid display?
SysAid displays problems in two instances:
- There is an active problem with the same category or main CI as the current incident.
- There is an active problem attached to an active incident that has the same category as the current incident.
Available fields for the SR form
The fields listed here are also available on non-workflow tabs on the Request, Change, and Problem forms.
You may see fields not listed below. They may be custom fields that were added to your system, or fields added by a third-party integration.
Field Name | Description |
|---|---|
Actions | Displays three links that allow you to 1) send a message to the user who opened the service record, 2) add the SR as an article in the Knowledge Base, and 3) search the Knowledge Base for articles related to the category of the current SR. |
Activities | Allows you to record service record activities. |
Admin Group | Allows you to assign the service record to a group of administrators. Depending upon your Service Desk settings, administrators in this group may receive automatic emails when the service record is updated. |
Agreement | (Full Edition only, SLA only) Shows the name of the service level agreement (SLA) attached to the incident. Read more about SLAs here. |
Asset ID (list only) | Shows the Asset ID of the asset that the request is attached to. |
Assigned Counter | Shows the number of times the SR has been assigned or reassigned since it was opened. |
Assigned to | Allows you to assign the service record to an administrator. Please read more about this field above. |
Attachments | Allows you to add attachments to a service record. Please read more about this field above. |
Category | Allows you to categorize your service records. Categories are important for routing of service records, automatically calculating due dates, and reporting. You may configure categories under Settings > Service Desk > Categories. |
CC | Any users in the CC list are automatically added to the CC field when you send an email from the SR. |
Chats | Displays a list of all chats attached to this service record. For more information, see Chats. |
Child Service Record | If this service record is the parent of other requests, the list of the child service records will be presented in this field, as links to these child requests. Updating the status of the parent SR will update the status of any children. Also, any email you send from the parent SR can be sent to the children as well (by means of a checkbox on the send email form). When closing a service record that has child service records, the solution field will be copied from the parent to its child service records. |
CI Relations | Shows you which CIs are related to the service record's Main CI, and shows you whether they're directly connected or connected through other CIs. |
CI Relations Graph | Shows a graphical display of which CIs are related to the Main CI of the current service record. |
Classification | Allows you to specify the relative scope of the service record, whether minor, significant, or major. Classification is typically used for changes, but can also be used for incidents and problems. |
Close Time | Displays the time and date that the service record was closed. Only shows a time and date if the service record is in a status with a closed status class. |
Closure Information | Allows you to specify additional information about the way the SR was closed. This field only appears if the SR is in a status with class "Closed". This field always appears next to the Status field, regardless of where it is in the list of visible fields on the Design Form page; likewise, if the Status field is not in the list of visible fields, then Closure Information will never be visible. This list can be edited under Settings > Customize > Lists. |
Company | This is the company of the SR's request user. You can assign users to companies under Tools > User Management > End Users. If you select a company before selecting a request user, the list of request users will show only users from the chosen company. |
Current Support Level | This is determined by the group that the SR is currently assigned to. By looking at this field for all of your service records, you can see the distribution of your SRs throughout your various levels of support. You assign support levels to groups under Tools > User Management > Groups. |
Department | This is the department of the SR's request user. You can assign users to departments under Tools > User Management > End Users. You can create departments under Settings > Customize > Lists (choose the Department list). |
Description | This is the description of the service record. When a service record is created from an email, the body of the email is added to this field. |
Disable End User Notifications | If this checkbox is checked when the SR form is saved, end user notifications are not sent. Notes about this checkbox:
|
Due Date | Presents an empty pane and a calendar icon. An administrator can fill in the due date for the request either by clicking the calendar icon and selecting the date or by typing it into the pane. |
Email Account | This field only contains an email address if the service record was created from an email. It shows the email address that the end user originally emailed to create the service record. This email account is used for sending automatic emails for this service record. If this field is blank, the default help desk email account is used for sending notifications. |
| Email Address | The email address of an end user who submits the SR as a guest. The field is not visible in the Admin Portal, it is only visible in the End-User Portal in Guest mode. SysAid copies the contents of this field to the Submit User and Request User fields for that SR. |
Escalation Level | Displays the escalation level of a service record. A 0 means the SR is not escalated. |
Follow-up Actual Date | The date that an administrator actually followed up on a service record. Can be used to trigger escalation rules. |
Follow-up Planned Date | The date that an administrator intends to follow up on a service record. Can be used to trigger escalation rules. |
Follow-up Text | This is a notes field that allows you to write any notes related to the desired follow up for this service record. |
Follow-up User | This list allows you to choose which administrator will be following up on this service record. |
History | Shows a history of the changes made to the service record. For more information, see History. |
Impact | Impact is how big an effect the SR will have on your organization. Impact is chosen by administrators. This is in contrast to Urgency, which is how soon the SR will have a negative effect on your organization. You may edit the Impact list under Settings > Customize > Lists. |
Is Escalated (list only) | This field shows whether or not an SR is escalated. Is either "yes" or "no". |
Links | Allows you to add links to websites, FTP, local/network storage, and Lotus Notes items. |
Links to Other Items | This field easily allows you to see if an incident is linked to a change, problem, task, etc. For more information, see Related Information. |
Location | Allows you to choose a location for the service record. The location list may be edited under Settings > Customize > Lists. |
| Main Asset | This is the primary asset affected by the service record. |
Main CI | The primary CI affected by the service record. For more information, see Related Information. |
Main Project | If the service record is connected to a project, you may select the project here. For more information, see Related Information. |
Main Task | If the service record is connected to a task, you may select the task here. For more information, see Related Information. |
Max Support Level | This is the highest support level of any group the service record has been assigned to since it was opened. By looking at this field for all of your service records, you can analyze the average support level an SR reaches before it is resolved. You assign support levels to groups under Tools > User Management > Groups. |
| Merged service records | Displays the service records that were merged into the current service record. |
| Merged to | Displays the service record that the current service record was merged into. |
Messages | Records all incoming and outgoing emails for a service record. This includes automatic emails. |
Modify Time | This is the time the service record was last modified. A service record is considered to have been modified any time an administrator clicks OK/Apply. Adding activities does not update the Modify Time. |
Modify User | This is the user that last modified the service record. A service record is considered to have been modified any time an administrator clicks OK/Apply. Adding activities does not update the Modify Time. |
Notes | This field allows you to add notes to a service record. |
Parent ID | In this field, an administrator can enter the ID number of the service record that he would like to select as the parent of the current incident. The current SR becomes a child SR, and SysAid adds a link to the parent SR. You can't directly change the status of a child SR. The status is changed automatically when the status of the parent SR changes. |
Potential Related problems | Shows any problems and known issues that could have potentially caused the incident, and allows you to attach the incident to any of those problems. For more information, see Matching incidents to problems above. |
Priority | Priority indicates how important the resolution of this service record is to the continued normal operation of the company. A server down issue could have a priority of "Very High," while a toner low message could have a priority of "Low." Priority can be defined directly by a priority rule, or calculated from Impact and Urgency based on the Priority Matrix. You may edit the Priority list under Settings > Customize > Lists. |
Reopen Counter | The number of times a service record has been reopened, i.e. moved from a closed status to an open status. This field is automatically populated. |
Request Time | Displays the time at which the service record was submitted. This field is automatically populated. |
This is the user who asked for the service described in the service record. If you are submitting a service record on behalf of somebody else, make sure to choose that person as the Request User. The person who actually submits the service record is recorded in the Submit User field. | |
| Request User Manager | This field is populated automatically based upon the request user. Each user can have a Manager, who may be selected in Tools > User Management > Administrators/End Users. |
Resolution | This field allows you to record the steps you've taken to resolve a service record. Unlike the solution field, this field is not visible by default to the end user on the End-User Portal. |
Responsible Admin | While the Assigned to administrator works to resolve a service record, the Responsible Admin is ultimately in charge of making sure that the request is resolved. This field is useful for oversight purposes if the Assigned to admin changes as work on the SR progresses. |
Screen Capture | Adding this field displays the screenshot taken when the end user pressed the SysAid hotkey (F11 by default) to open the End-User Portal. If no screenshot is attached to the SR, this field does not appear. |
Solution | This field allows you to record the solution to a service record. This field is visible by default to the end user on the End-User Portal. |
Solution Model | This field displays links to all Knowledge Base articles that are linked to the SR or the SR template, the SR's main CI, main asset, request user, company, SLA, main project, or Main task. Clicking on the link, opens the article in a new window. Note: If there are no relevant Knowledge Base articles, this field is not displayed. |
Source | This shows how the service record was submitted (Self-Service Portal, email, admin, etc.). |
SR Custom Date 1, 2 | These two date fields can be used to record any additional dates relevant to the service record. You can rename these fields from Settings > Customize > Translation. |
SR Custom Integer 1, 2 | These two integer fields can be used to record any additional integer values relevant to the service record. You can rename these fields from Settings > Customize > Translation. |
SR Custom List 1, 2 | These two list fields can be used to record additional information relevant to the service record. You can rename these fields from Settings > Customize > Translation. You can edit the lists from Settings > Customize > Lists. |
SR Custom Notes | This field can be used to record any additional notes relevant to the service record. You can rename this field from Settings > Customize > Translation. |
| SR Custom Text 1, 2 | These two short text fields can be used to record any text relevant to the service record. You can rename these fields from Settings > Customize > Translation. |
If the SR was generated from an incoming email, this field will display the original email in its HTML format. | |
Status | The Status field is used to record progress of the service record through the resolution process. |
Sub Type | This allows you to select the sub type of an incident. You can customize the layout of each sub type by clicking Design Form. Each sub type can have its own layout, so changing the sub type will change the layout of the incident. To add new subtypes, go to Settings > Service Desk Templates> Sub Types. |
This shows the individual who submitted the service record. Unlike the Request User field, you can't change the Submit User. If you submit a service record on behalf of somebody else, please be sure to choose that person as the service record's Request User. | |
Success Rating | This field allows you to rate the level of success you feel you've had in resolving the service record. Before you begin using this field, you should develop a standard Service Desk policy for grading success. |
Survey Status | When a service record is closed, the automatic email sent to the end user includes a link to your survey. This field shows you that either a) the survey was not yet sent, b) the survey was sent, or c) the survey was answered. You may enable/disable the survey from Settings> Service Desk > General. |
Template | This field is only visible on new service records. It allows you to select a template for the service record. By choosing a template, all fields on the service record are automatically populated. This helps you save time when creating service records for recurring issues. For requests, changes, and problems, the correct workflow is also selected. Read more about incident, request, change, and problem templates. |
Title | This is the title of the service record. For service records submitted by email, the email subject is used as the service record title. |
Urgency | Urgency is how soon the SR will have a negative effect on your organization. End users select an urgency when they submit a service record from the End-User Portal. This is in contrast to Impact, which is how big an effect the SR will have on your organization. You may edit the Urgency list under Settings > Customize > Lists. |
Weight | This field allows IT Management to determine the order in which SRs are handled based on true business priority by assigning a weight value for a given SR. An SR's weight can be between 1-1000. When the functionality is enabled, weighted SRs with the following criteria are displayed with a red background in their lists:
A button appears, allowing you to push all weighted SRs to the top of the list, sorted by weight in descending order. |