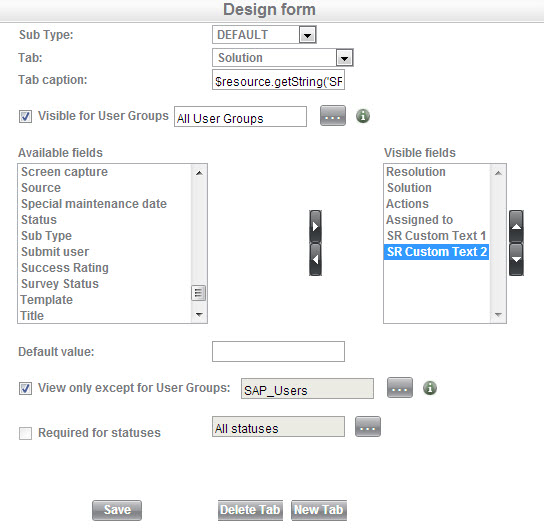
Almost all of the form pages in SysAid can be customized using the Design form window. To open this page, click Design Form on the top right of the form.
Available customization options include:
- Adding or removing fields from a tab
- Reordering the fields on a tab
- Adding or removing tabs from a form
- Adding a default value to a field
- Making a tab invisible, or visible only for certain user groups (ITSM version only)
- Making a field view only, or view only for certain user groups (ITSM version only)
- Making a field mandatory in order to save the form, or when selecting a particular status (SR form only)
- Require unique values for a field (Asset and CI only)
Make sure to click Save after making any changes on this page.
Design form page in SysAid Full Edition, SR form.

Each entity sub type can have its own tabs, and each tab in a sub type can have its own fields. This allows you to create a completely different form for each sub type of a given entity (e.g. one asset form for printers, another for desktops). This is especially useful for creating different submission forms for the different types of incidents and requests that you receive (e.g. one request form for general requests, and a separate one for password reset requests). For more information about customizing the incident and request forms, see Submit Incident and Submit Request.
Add and remove fields from a tab
Fields in the Visible fields list appear on the currently selected tab, and fields in the Available fields list can be added to the tab. Note that each tab has its own Visible fields, while Available fields are the same for all tabs on the form.
To add or remove fields from a tab:
- Select the sub type you would like to edit from the Sub Type drop-down list.
- Select the tab you would like to edit using the Tab drop-down list.
- (Optional) If you would like a field to be visible, move it from the Available fields list to the Visible Fields list using the right arrow button. If you would like to remove a field that's visible, move it from the Visible fields list to the Available Fields list using the left arrow button.
- Click Save when your changes are completed.
Reorder fields
Fields appear on a tab in the same order they appear in the Visible fields list. Select one or more fields in the Visible fields list and use the up/down arrow buttons to move those fields up or down the tab.
Add and remove tabs
To add a new tab:
- Select the sub type you would like to edit from the Sub Type drop-down list.
- Click New Tab.
- Enter a name for the new tab in the Tab caption field.
- Add fields to the new tab.
- Click Save.
To delete a tab:
- Select the sub type you would like to edit from the Sub Type drop-down list.
- Select the tab you would like to delete from the Tab drop-down list.
- Click Delete Tab.
- When prompted, confirm your deletion.
The first tab on any form cannot be deleted.
Add default values for specific fields
If you enter a value into the Default value field, any time a new entity of the selected type is created (e.g. creating a new service record), the selected field contains the value you entered. To add a default value, select a field in the list of visible fields and enter a default value.
Hide tabs
Any tab other than the first tab on the form can be hidden, either from all users (Pro + Full Editions) or from certain user groups only (Full Edition only). To hide a tab from all users, select the tab and clear the Visible for User Groups check box. To hide a tab from only some user groups, select the tab, check the Visible for User Groups check box, and select the user groups who can view the tab by clicking  . Users not in one of the selected groups cannot see the tab.
Designate fields as View Only
There might be times when you don't want your administrators editing a field. An example of this might be the due date field, which you would want to be set automatically by due date rules and not changed after that. Alternatively, you may want to only allow members of a pre-defined Service Desk group access key Service Desk fields such as Status, Priority, etc.
To make a field read only, select it from the list of visible fields and check the box View only . In SysAid Full edition the check box is called View only except for User Groups , and you can select certain user groups that can edit the field. To do this, select the desired groups by clicking  . If no user groups are selected, the field is marked Read Only for everybody.
Designate fields as Required
You can mark any field on the form as required. If a required field is empty, SysAid does not allow admins to save the form. On the SR form, you can also indicate that a field is required only for certain statuses. For example, the solution field is a required field only if the service record status is closed.
Select the desired field in the list of visible fields, and select the Required check box to mark the field as required. On the SR form, you can select specific statuses by clicking  . If one of these statuses is selected for the service record, the field becomes mandatory.
If a field is visible on multiple tabs in the SR form, it is possible that it is required in one tab but not the other. Each occurence of the field must be separately marked as required.
Require unique field values
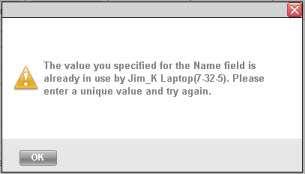
In the Asset and CI forms, you can require certain fields in Default tabs to contain unique values. Unlike Required fields, SysAid validates the unique value of fields with this designation whenever you save a change anywhere in the asset or CI, not just in the tab where the field is located. If the value is not unique, the following error message appears:

To designate an Asset or CI field as unique, highlight the field in the design form and select the Unique check box.
Note: Once a field is marked as unique, its value is checked against that field on all other assets and CIs even if the field is not visible.
Customize the Mobile SR form
You can choose which fields appear on the SR form in the Mobile App, both for administrators editing incidents and for end users viewing their existing incidents (and requests).
To customize the Mobile Administrator SR form
- From the Incident list, click +New.
- Click Design Form on the top-right of the form.
- From the Tab list, select the Mobile tab.
- To choose which fields appear on the Mobile, follow the instructions on the Customize Forms page.
To customize the Mobile End-User SR form
- Navigate to Settings > Self-Service Portal > Incident Submission Form.
- Click Design Form on the top-right of the form.
- From the Tab list, select the MobileEndUser tab.
- To choose which fields appear on the MobileEndUser tab, follow the instructions on the Customize Forms page.
The changes you've made are now reflected in the SysAid Mobile App.