This form allows you to create a new administrator or edit the profile of an existing administrator.
Click OK/Apply to save any changes you make.
The following is a description of the default fields on each tab. You can add additional fields to a tab by clicking ![]() . For more information, see Customize Forms.
. For more information, see Customize Forms.
General Details
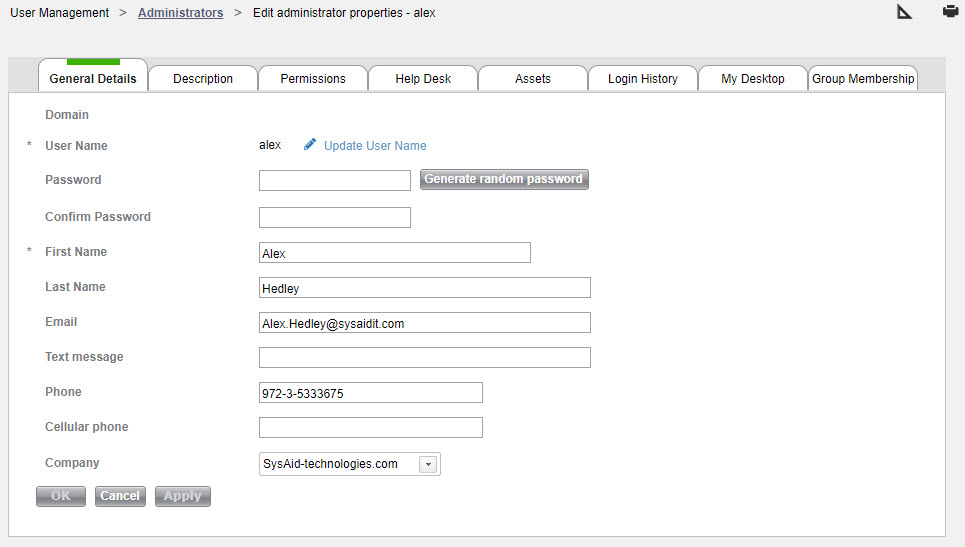
The General Details tab allows you to fill out basic information about the administrator. The following fields appear by default:
User ID
User ID is automatically generated. If a user was imported from LDAP, the User ID is Domain\User Name. If a user was created manually, then the User ID is the same as the User Name.
Domain
If the administrator was imported from LDAP, this shows the admin's domain. If the admin was created manually, this is blank. The domain must be selected when logging into SysAid from the Login page (if the admin is not an LDAP user, the Domain is SysAid local).
User Name
An administrator's username is used for logging into SysAid.
To change the user name, click Update User Name, enter the new name, and click Save.
Please note:
The user name cannot contain the character "é" as it will cause service records assigned to this user name to fail at the point of creation.
Password and Confirm Password
This is the password the administrator uses when logging into SysAid. If the administrator has been imported from LDAP, you won't be able to edit these fields.
SysAid forces users to use passwords that meet the following complexity requirements:
The password must consist of at least eight characters in length and must include at least three of these four conditions:
Numbers (0-9)
Lowercase letters(a-z)
Uppercase letters(A-Z)
Special characters (!@#$%^&*()_-)
(In On-Premises accounts, these conditions are only required if the Enforce password complexity for local users option is checked; for more information, see Account Defaults.)
Click Generate random password to generate a random password. After saving the admin's profile, you can send this password to the admin via email, who then changes it after logging in. If you have not enabled outgoing email integration, it's not recommended to use this option, as there will be no way to know what the password is.
First Name and Last Name
The administrator's first and last name.
Email
The administrator's email address. It's very important to enter an email address so that the administrator can receive emails sent from SysAid.
Text message
This is the phone number of the mobile device on which the administrator would like to receive text messages sent by SysAid. This field requires a complete phone number (country code, area code, and individual number) with no spaces or punctuation. For example, if the mobile phone number is (617) 555-1212 in the US, enter 16175551212.
Phone and Cellular phone
The landline and cell phone numbers of the administrator. The cell phone number can be the same number as in the Text message field above. However, the Cellular phone field is not used for sending text messages, so the format of the phone number can be whatever you like.
Company (Full Edition only)
Each administrator can belong to one company. Once attached to a company, an administrator is included in all reporting that's sorted by company. You can also limit the administrator to view and edit only service records, assets, CIs, etc. that are part of the same company (see Permissions below).
Custom Theme
You can select a Self-Service Portal theme for when the admin accesses the Self-Service Portal. This overrides the theme set to the default or company level.
Description
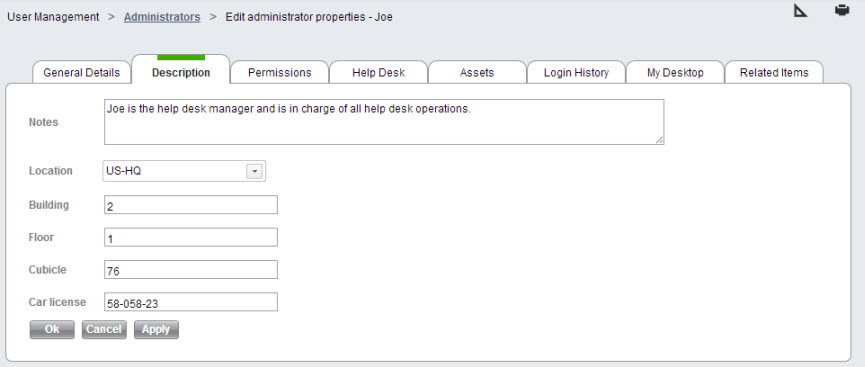
The Description tab includes additional information about an administrator.
The location list can be edited under Settings > Customize > Lists.
Permissions
SysAid gives you a tremendous amount of control over permissions for each individual administrator. The following is an explanation of all permissions available in SysAid.
Permission Type (Full Edition only)
Choose whether the administrator's permissions are determined here or by the settings of that admin's groups. Group permissions are defined per group under Tools > User Management > Groups. For more information about group permissions, see Group Edit.
Permission | Description |
|---|---|
View Inventory, only in group X and their sub groups | Allows the administrator to view assets under Asset Management for the selected groups and their sub groups. Clear the box to prevent the administrator from seeing any assets.
|
Modify Inventory | Allows the administrator to make changes to assets. Administrators can only make changes to assets that they can view. |
Purge Inventory, only in group X and their sub groups | Allows the administrator to delete assets under Asset Management for the selected groups and their sub groups. Clear the box to prevent the administrator from deleting any assets.
|
View Service Records that are assigned to | Choose which service records the administrator can view. Clear the box to prevent the administrator from seeing any service records. |
Create/Modify Service Records that are assigned to | Choose which service records the administrator can create and modify. Clear the box to prevent the administrator from modifying any service records. |
Enable bulk actions from SR list | Enable this option to allow the administrator to update and/or delete tickets from the ticket list. This option is only available in permissions from version 20.4.60 and above. For previous versions, it can be set for all admins or SysAid admins in the general settings. |
Purge Service Records that are assigned to | Check this box if you would like the administrator to be able to permanently delete service records. |
Archive Service Records that are assigned to | Choose which service records the administrator can archive. Clear the box to prevent the administrator from archiving any service records. |
Create/Modify Knowledge base articles | Allow the administrator to create and modify articles for both the Knowledge Base and FAQ or for just the Knowledge Base (Admin only). Clear the box if you do not want this administrator modifying KB/FAQ articles. |
Purge Knowledge base articles | Allow the administrator to delete articles for both the Knowledge Base and FAQ or for just the Knowledge Base (Admin only). Clear the box if you do not want this administrator deleting KB/FAQ articles. |
View Projects that are assigned to | Choose which projects the administrator can view. For admins who can only view their own projects or projects assigned to them and their groups. The admin can only view tasks that are attached to projects that the admin can view; the admin can't view tasks that do not have an associated project. Clear the box to prevent the administrator from seeing any projects. |
Modify Projects that are assigned to | Choose which projects the administrator can modify. For more information, see the explanation for viewing projects (immediately above). |
Purge Projects that are assigned to | Check this box if you want to allow the administrator to permanently delete projects and tasks. |
Access reports | Allows administrators to view reports. |
Manage reports | Allows administrators to create new reports and edit existing reports. |
Remote Control | Check this box to enable the administrator to initiate Remote Control sessions with computers in your network. For more information about remote control, see the Remote Control Guide. |
Limit Agent to only manage service record data associated with their company | This limits the user to only see SysAid entities that are associated with the same company as them. The limitation affects the following fields and entities: Service record:
Action items:
|
SysAid Administrator | Gives the administrator all permissions in SysAid. This includes access to user management and all customization options. If this is checked, all other permissions check boxes are automatically checked as well. SysAid Administrators cannot be restricted to their company data only. Note that there are some permissions that can only be granted by checking this box, such as the ability to access user management and the ability to customize SysAid. |
Can save custom personal views | Allows admins to save personalized custom views in the SR lists. For more information, see the SR List. |
Merge service records | Allow admins to merge service records. Select if you want to allow the admin to change the settings for each individual merge or force the admin to comply with the default merge settings that are defined in the Merge Service Records page. |
Access Dashboard | This option enables administrators to access the dashboard. |
Access BI Analytics | Allows admins to access the BI Analytics module. |
Manage end users/Manage end users and companies | Allows administrators without SysAid Administrator status to make changes to end-user accounts. In the Enterprise edition, this also allows for changes to company accounts. |
Change Manager | Change managers in SysAid can edit sub types, edit request, change, and problem templates, create new changes and problems, and edit all action items for a request, change, or problem. Please see the full Guide to Change and Problem Management for further details. |
Create Changes/Problems | Allows the administrator to create a new change request or problem. This does not include editing Change or Problem templates. Please see the full Guide to Change and Problem Management for further details. |
View other Admins' action items | This permission allows an admin to view (but not edit) action items assigned to other users. Please see the full Guide to Change and Problem Management for further details. |
View calendars of other admins who member in the same groups | Allows an admin to view the calendars of other admins who belong to the same groups as the admin. |
View CMDB | Allows an admin to view CIs in the CMDB. Owner and Owner Group are fields available on the CI form. Clear the box to prevent the administrator from seeing any CIs. |
Modify CMDB | Allows an admin to create and edit CIs, CI templates, and CI types in the CMDB. Owner and Owner Group are fields available on the CI form. Clear the box to prevent the administrator from seeing any CIs. |
Access Chat Console | This option allows admins to open the Administrator Chat Console. If this is unchecked, an admin can't manage chats. To restrict admins to individual chat queues under Settings > Chat > Chat Queues. |
Chat Administrator | Allows an administrator to supervise chat sessions conducted by other administrators. |
Restrict access for | (Full Edition only) You can prevent an admin from accessing selected pages in SysAid in addition to the restrictions imposed by other permissions. Click to open a list of pages in SysAid, and select any pages that the admin should not have access to. |
Create/Modify News for | Allows the administrator to create or modify news items from Settings > Customize > Edit News. |
Access to Password Services | Allows the administrator to access the Password Services module. |
Manage My Desktop | Allows the administrator to access the My Desktop module. This includes registering users from the My Desktop tab on the user form and assigning assets from the Access List tab on the asset form. |
Manage Patch Management | Allows the administrator to approve or deny patches, approve patches using Change Management, apply failed and approved patches, schedule failed patches for redeployment, reassign assets to different policies from the asset form, and edit Patch Management Policies. |
Enable Access Via Mobile App | Allows the administrator to access SysAid via the mobile solution. |
AI Admin | Allows the user to have full access to all AI-related features and settings. For more information, see SysAid Copilot. |
Manage Software Licensing | Allow the user to have full access to the License Manager. For more information, see License Manager Overview. |
Deploy/undeploy TeamViewer Embedded on assets | Allow the administrator to deploy or undeploy TeamViewer Embedded on assets in the system.
|
Start TeamViewer Embedded sessions | Allow the administrator to initiate remote control sessions via TeamViewer Embedded |
You may also view the permissions of all administrators concurrently by navigating directly to http://[your SysAid URL]/PermissionsPerUser.jsp.
Help Desk
The Help Desk tab shows the help desk list, but only shows service records submitted by this administrator. Full instructions for using the help desk list can be found here.
Assets
This tab shows a list of all assets owned by the admin. General instructions for using SysAid lists can be found here.
Login History
This tab shows the login history per computer for this administrator. That is to say, every time that this administrator logs onto a computer in the network that has the SysAid Agent installed, an entry is added to this table.
Computer login history for Josh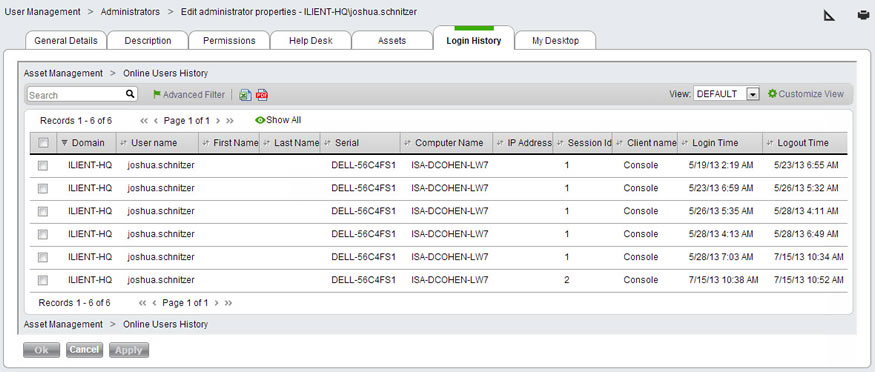
My Desktop
The My Desktop tab allows you to assign assets to this user for SysAid My Desktop. Click  to open a list where you can select your desired assets. Alternatively, click Auto-Match to automatically assign this user any assets they own or use most. For more information about Auto-Match, please see the My Desktop Guide.
Once assets are assigned to this user, the user can initiate a My Desktop session from the Self-Service Portal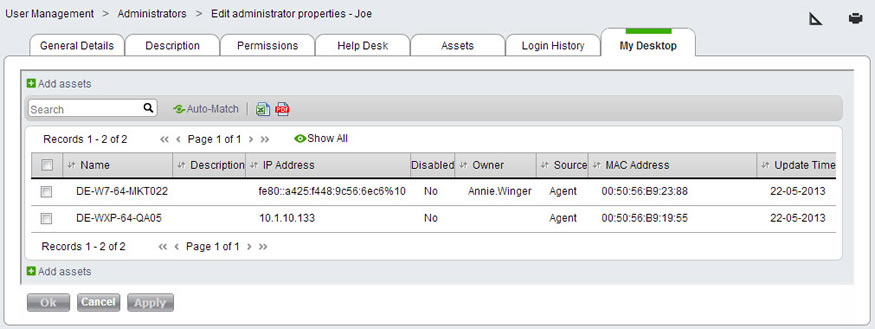
Group Membership
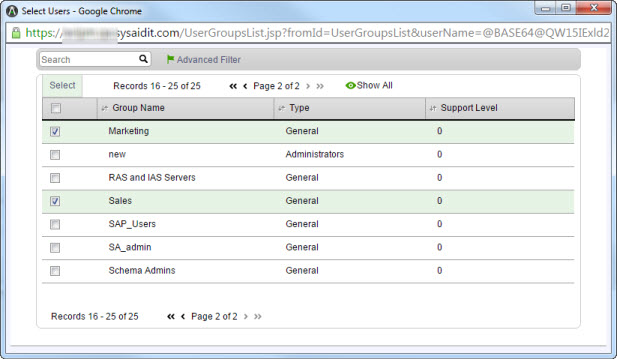
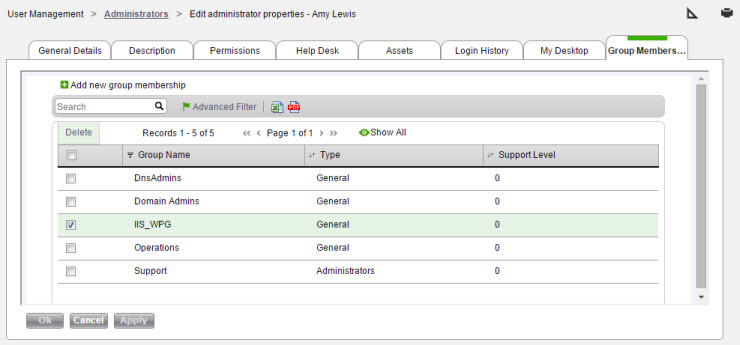
The Group Membership tab displays a list of all the groups that the admin belongs to. You can add the admin to a group or multiple groups simultaneously.
To add the admin to a group or multiple groups
Click
 .
.In the Group list window that opens, select the check boxes corresponding to the group(s) you want to add the admin to.
Above the list, click Select.
To remove the admin from a group or multiple group
In the Group list window that opens, select the check boxes corresponding to the group(s) you want to remove the admin from.
Above the list, click Delete.
Related Items
The Linked Items table shows you a list of all items related to the Administrator. Click on any item to open a new window with details for that item.
Items added to this table also appear in the Linked Items table for the related item. For example, if you add an asset to the Linked Items table on an Administrator, you will see the Administrator in the Linked Items table for that asset.
To add linked items
Ensure that the Links to Other Items field is added to the user form.
Select the type of item you would like to add using the Add a new link, of type drop-down list.
Choose the Dependency type of the linked item.
Click Add. This opens a list of items of the selected type.
From the list, select one or more items using the check boxes at the left end of the rows.
Click Select to save the selected items. This closes the list and attaches the items.
To remove linked items
Select one or more linked items using the check boxes.
Click Delete from the list actions.
Fields Available for the Administrator Form
Following is a complete list of fields available on the Administrator form. Some of these fields do not appear by default and must be added to this form using the design form icon ![]() or Design form button..
or Design form button..
Please note:
You may see fields not listed below. They may be custom fields added to your system, or fields added by a third-party integration.
Field Name | Description |
|---|---|
Active Service Record | Shows you the number of service records in either "New" or "Open" status that have been requested by this administrator. |
Agreement | The agreement chosen here will be applied to all service records where this admin is the request user. If no agreement is chosen, then either the admin's company's agreement will be used or the default agreement will be used. |
Assets | Displays a list of assets for which this administrator is the owner. Allows you to delete assets as well as to perform certain mobile actions on assets that are mobile devices. For more information, see the Assets tab, above. |
Attachments | Allows you to add attachments to the administrator's profile. |
Building | This field allows you to record the building in which the administrator is based. |
Car license | This field allows you to record the administrator's license plate number. |
Cellular phone | The admin's cell phone number. |
Chat Nickname | The administrator's chat nickname appears to end users during chats. If this is left blank, the admin's first and last name will appear instead. |
Chats | Shows a history of all chats where the administrator played the role of the end user (i.e. initiated the chat from the chat icon). |
Company | This is the administrator's company. If an administrator is limited to view their company information only, then the company here determines which company they can view. |
Confirm Password | Used in conjunction with the Password field. After entering a new password, the password must be re-entered into this field for conformation. |
Cubicle | The administrator's cubicle number, if there is one. |
Custom Theme | You can select a Self-Service Portal theme for when the end user accesses the Self-Service Portal. This overrides the theme set to the default or company level. |
Date Input Style | Determines whether this administrator sees dates in Month-Day-Year (American) or Day-Month-Year (European) format. Also determines whether activity times on service records and on tasks will appear in 12 hour (American) or 24 hour (European) clock format. |
Department | This allows you to indicate that an administrator belongs to a particular department. You can create a list of departments under Settings > Customize > Lists by choosing the Department list. |
Disabled | Choose whether or not an administrator is disabled. Disabled admins can't log in to SysAid, can't be chosen as the request user for a service record, and can't be assigned service records. On the other hand, disabled admins also do not count against your license limit. An administrator who is not disabled is enabled. |
Display Name | If User name display method is set to Display name under Settings > Customize > Appearance, the contents of this field will be shown any place the user's name shows up in SysAid. Display Name can be imported from LDAP. |
Domain | If the user was imported from LDAP, this shows the user's domain. If the user was created manually, this is blank. Domain must be selected when logging into SysAid from the Login page (if the user is not an LDAP user, Domain is SysAid local). |
The administrator's email address. Whenever somebody sends an email to an admin, the admin receives the email at this email address. | |
Expiration Date | A user with an expiration date will not be able to log into SysAid after the expiration date passes. This does not mean that the user is disabled, only that they can't log in. |
First Name | The administrator's first name. |
Floor | The floor on which the administrator is located. |
Help Desk | Shows a list of all service records submitted by the administrator. See the Help Desk tab above for more details. |
History | Allows you to see a list of all changes that have been made to this admin's profile. Click on a version number to open a new screen with a snapshot of the admin's profile at that revision. |
Is supervisor | Determines a user's ability to oversee and manage service records submitted by others.
This setting also adds a 'Supervised Requests' tab to the Scoreboard, allowing supervisors to track and assist with relevant service records. |
Language | Allows you to choose the language in which this administrator views SysAid. Only languages selected under Settings > Customize > Account Defaults appear in this list. |
Last Name | The administrator's last name. |
Links | Allows you to add links to websites, FTP, local/network storage, and Lotus Notes items. |
Links to Other Items | This field easily allows you to see if an Administrator is linked to another entity such as an asset, company, etc. For more information, please see the Related Items tab above. |
Location | The administrator's location. You can create a list of locations under Settings > Customize > Lists by choosing the Location list. |
Login History | Shows login history per computer for this administrator. See the Login History tab above for additional information. |
Manager | Allows you to select the administrator's direct manager. This information is used anywhere in SysAid where the administrator's manager is referenced, such an in escalation rules. |
My Desktop | Shows all assets assigned to this user for My Desktop. Also allows you to assign new assets to this user. |
Notes | Allows you to leave any notes that are relevant for this administrator. |
Out of the office, assign all new requests to | Using the ellipses button |
Password | Allows you to create a password for this administrator. You must also enter the password into the Confirm Password field. This field in not available if the administrator was imported from LDAP (the administrator's password is stored in LDAP and must be edited there). |
Permissions | Displays a list of all administrator permissions. For more information about available permissions, please see the Permissions tab above. |
Phone | The administrator's phone number. |
Receive automatic SR email notifications | Allows you to choose whether the administrator receives the automatic email notifications sent out by service records (such as when the end user updates the service record). Go here for more information. |
Secondary Email | This is the email address that's used if an administrator performs a password reset using Password Self Service and the password delivery method is set to email. |
Service Records | Shows two numbers: the first is how many active service records this administrator has requested (i.e., the admin is the request user on the service record), and the second is how many total service records this administrator has requested. |
Text message | This is the phone number that's used to receive text messages sent by SysAid. For more information, see the General details tab above. |
Time Zone | This is the administrator's time zone. The time zone chosen here impacts the time that appears by default whenever an admin logs an activity or uses the calendar icon |
User Custom Date 1 + 2 | These custom date fields allow you to keep track of additional dates relevant for this administrator. |
User Custom Int 1 + 2 | These custom integer fields allow you to keep track of additional integers relevant for this administrator. |
User Custom List 1 + 2 | These custom list fields allow you to keep track of additional information relevant for this administrator. |
User Custom Notes | This custom notes fields allow you to keep track of additional information relevant for this administrator. |
User Custom Text 1 + 2 | These custom text fields allow you to keep track of additional information relevant for this administrator. |
User ID | If a user was imported from LDAP, User ID is Domain\User Name. If a user was created manually, then User ID is the same as User Name. |
User Logged In status | Indicates whether this administrator is currently logged in or not. |
User Name | The administrator's user name. If an admin is imported from LDAP, this is the LDAP user name. |
User groups | A list of all groups the administrator is part of. You can manage groups under Tools > User Management > Groups. |