In an ever-changing IT environment, there is a constant need to deploy software patches on your computers. Such patches may be necessary for bug fixes, security updates, or simply adding functionality. SysAid Patch Management harnesses OEM technology to enable a full and seamless patch management solution right from your desk.
SysAid Patch Management allows IT administrators to:
Acquire an overview of all the patches that are relevant to the active assets in your organization
Customize automatic Patch Management processes
Manually manage patches on multiple or individual assets
Use ITIL Change Management process to approve the patch deployment
Trace the progress of Patch deployments and view their end results
Important!
The target assets must be running Microsoft Windows. For a full list of supported versions of Windows, click here.
Prerequisites for Patch Management
Please note:
SysAid’s Patch Management does not interfere with or affect any other patch update solution you may be running on your computers
Oracle applications are not patched as part of SysAid’s standard process due to an internal Oracle policy. To learn more, see GFI Languard.
There are a few prerequisites for Patch Management in SysAid:
The SysAid agent must be running on the assets you want to deploy patches to. For a list of Agent deployment options, see the Agent Deployment guide.
The RDS, the SysAid server, and the SysAid agents must all be running version 16.3.18 or higher and have internet access.
The RDS must have the SysAid agent running on it, with Patch Management enabled. This can be done directly from the Asset List.
The target assets must be running Microsoft Windows. For a full list of supported versions of Windows, click here.
If you are using a content filtering solution, make sure not to limit access to the web addresses, listed here, that are essential for Patch Management to work properly.
Ensure port 1070 is opened for communication on the RDS(s) and SysAid server for the target assets.
Ensure that FIPS-compliant algorithms are enabled on the target assets.
Important:
If your anti-virus solution maintains a white list of trusted paths, add the directory "C:\ProgramData\GFI" to the list.
Patch Management licensing
The SysAid Patch Management service operates on an annual subscription licensing model. This means that you must have a valid license subscription to retain Patch Management capabilities, and you can designate the quantity of assets covered by your Patch Management license based on your specific needs. Patch Management functionality is only available for assets that have active asset licenses.
Example: Let's say that you are using SysAid to manage 1,000 assets, and 600 of them are qualified for Patch Management (see the prerequisites above). If you purchase a Patch Management license for 400 assets, you can select which assets to enable for Patch Management functionality. Once an asset is enabled, SysAid runs an initial scan on the asset to obtain it's patch data.
To enable Patch Management for a computer
Navigate to Assets > Asset Management > Asset List.
Select the computers you want to enable.
In the List Actions toolbar, click More Actions.
From the first drop-down list, select Patch Management.
From the second drop-down list, select Enabled.
Click Save.
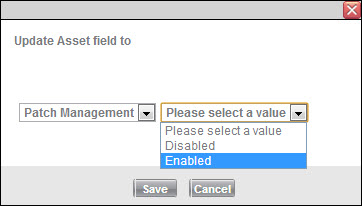
To disable the computers, repeat this process and select Disabled from the second drop-down list.
How Patch Management works
Basic infrastructure
SysAid's Patch Management solution integrates state-of-the-art OEM Patch Management technology to the SysAid environment. Now, every SysAid agent controls an OEM agent and commands it to execute server instructions. To optimize Patch Management-related communications and bandwidth consumption, communication with the OEM cloud is carried out through an OEM agent proxy (now embedded in RDS deployments and SysAid Server installations). The SysAid agent collects the OEM agent's Patch scan results and transfers them to the SysAid server through the RDS. The SysAid server analyzes the results and reacts according to the behavior you define.
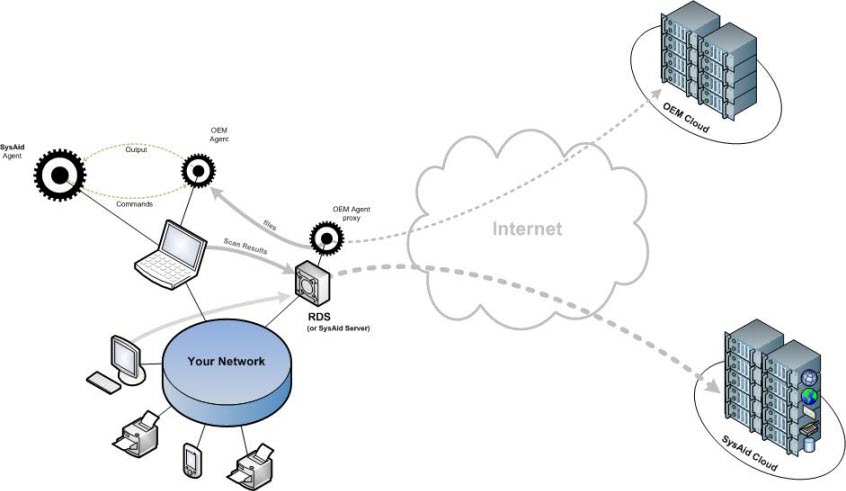
If the OEM agent is unable to communicate with the OEM Agent proxy, an automatic failover is executed. This allows the OEM agent to bypass the proxy, and directly access the OEM cloud environment to run the necessary Patch Management jobs on your computers.
Patch Management process
As an administrator, you can approach the patch management process from the perspective of the patch or the asset. The patch perspective involves applying a specific patch on multiple assets and observing the behavior of the patch. Alternatively, the asset perspective entails focusing on a single asset or asset group and determining which patches are missing. SysAid Patch Management accommodates both of these approaches.
For those who prefer the patch perspective, the Patch Management List allows you to customize your patch view, approve or deny specific patches, and access detailed information for any patch.
For those who would rather work from the asset perspective, which is sometimes the more practical approach, the Asset list now includes a general Patch Management view and a Missing Patches view. In addition, the Asset form now includes a Patches tab with patch data specific to that asset.
SysAid ensures that you can access the relevant data regardless of your preferred perspective.
Review patches
Each patch applies to a specific issue on a given software product. Therefore, a patch is only relevant for assets that have the product installed.
You can assign different statuses to a patch for each of its relevant assets. When an asset is enabled for Patch Management, its relevant patches are either already installed or "missing". SysAid assigns the Pending Approval status to these patches, and you can then choose to approve the patch, approve it with Change Management, or deny it. Only “Approved” patches are deployed on an asset. When a patch is successfully installed, it is assigned the Installed status for that asset. If the deployment is unsuccessful, the patch's status moves to Failed for that asset until you attempt to redeploy it.
SysAid offers multiple ways to review patches, their details, and statuses on relevant assets. The Patch Management list includes all the necessary information about each of the patches for assets that are Patch Management enabled, and the Asset list now includes two dedicated views that provide the patch information from the perspective of each asset.
Review patches in the Patch Management list
The Patch Management list provides an overview of the patches relevant to Patch Management Enabled assets. You can also approve or deny multiple patches from the list.
Navigate to Assets > Asset Management > Patch Management. The following list views are available for reviewing your patches. You can customize them to meet your specific needs.
Patch Management List Views | ||
|---|---|---|
Default | This view provides a general overview of all the patches reported by Patch Management enabled assets including stats on how many assets apply to a specific status for a patch. You can click on the number in each status column to access a list of assets included in the total. | |
Approved | This view displays patches that have been approved for some assets, but not yet installed. | |
Failed | This view displays patches that have been approved for some assets, but the attempts to install them were unsuccessful. | |
Installed | This view displays patches installed on some assets. | |
Missing | This view displays patches that are missing on some assets and stats on how many assets apply to a specific "missing" status for a given patch ("missing" can include failed, pending approval, Change SR, and approved patches). | |
To access a specific view, select an option from the View drop-down menu.

For more information, see Patch Management List.
Review the patches per asset
You can review all the patches associated with a specific asset using the new Patch views in the Asset list. You can also approve/deny patches per asset (See the Manually Approve Patches section below for more information) and scan assets for missing patches.
Navigate to Assets > Asset Management > Asset List, and select one of the Patch views from the View drop-down list.
Missing Patches
Displays the asset's Patch Management policy and the asset's missing patches, broken down by status.
Patch Management
Provides an overview of Patch Management data on Patch Management-enabled assets.
Review and redeploy failed patches
You may want to review all your patches that have a specific status. For example, to review failed patches for all of your assets:
- Navigate to Assets > Asset Management>Patch Management.
- From the View drop-down menu, select Failed Patches.
To redeploy the failed patches
In the Failed Patches list, select the patches you want to redeploy.
From the list of actions, select Apply now to redeploy the patches immediately, or select Apply with policy schedule to redeploy the patches according to the predefined schedule of the asset's associated Patch Management policies.
Approve patches
When patch deployment jobs run, only approved patches are deployed on your assets. You can approve patches to be deployed later, according to the schedule you define in your policies, or until you initiate a manual deployment job. For example, you may want to prevent work disruptions by scheduling server patch deployments during non-working hours and workstation patch deployments during lunch break.
Patches are available for approval based on an asset's most recent scan job results. Each asset is scanned as soon as it is enabled for Patch Management, and you can always schedule later automatic scan jobs or manually run a scan job to update the patch data for that asset.
SysAid Patch Management provides three options for approving patches for your computers:
Automatically approve patches based on their classification or product
Manually approve patches
Approve patches using Change Management
Approve patches by classification or product
With SysAid Patch Management policies, you can automatically approve or deny patches based on their product or classification (classifications only apply to Microsoft patches).
A product is a specific edition of an operating system or application (for example, Windows Server 2003, Google Chrome, Adobe Flash, etc.). The update classification represents the type of update. For any given Microsoft product or product family, updates can be available among multiple classifications (for example, Windows 10 family critical updates and security updates).
Microsoft Patch Classification Definitions | ||
|---|---|---|
Critical Updates | A broadly released fix for a specific problem addressing a critical, non-security-related bug. | |
Feature Packs | New product functionality that is first distributed outside the context of a product release, and usually included in the next full product release. | |
Security Updates | A broadly released fix for a product-specific security-related vulnerability. Security vulnerabilities are rated based on their severity, which is indicated in the Microsoft security bulletin as critical, important, moderate, or low. | |
Service Packs | A tested, cumulative set of all hotfixes, security updates, critical updates, and updates, as well as additional fixes for problems found internally since the release of the product. Service packs may also contain a limited number of customer-requested design changes or features. | |
Update Rollups | A tested, cumulative set of hotfixes, security updates, critical updates, and updates packaged together for easy deployment. A rollup generally targets a specific area, such as security, or a component of a product, such as Internet Information Services "IIS". | |
Updates | A broadly released fix for a specific problem addressing a non-critical, non-security-related bug. | |
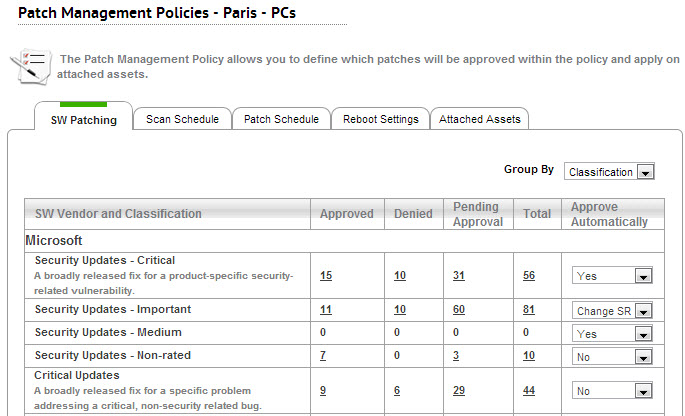
For more information, see Patch Management Policies.
Manually approve patches
You can manually approve patches on assets. Approved patches are deployed when a patch deployment job runs. You can manually run a patch deployment job to run immediately, or schedule an automatic deployment in the Patch Management policy assigned to the asset. Manual approvals override any values automatically set by the policy associated with this asset.
To approve specific patches on your assets, navigate to Assets > Asset Management > Patch Management. For detailed instructions on how to approve specific patches, see Patch Management List.
To approve patches on a specific asset, navigate to Assets > Asset Management > Asset List. Click the asset you want to approve patches on, and open the Patches tab in its Asset form. For detailed instructions on how to approve patches on a specific asset, see Asset Form.

Approve patches using Change Management
The Change Management process allows you to approve certain patches for certain assets. SysAid Patch Management provides a predefined, out-of-the-box template that conforms to ITIL Patch Management best practices. Patch Management applies the default Change method and template, defined in Patch Management Settings, for approving the patches. Change Management is available for both manual approval and automatic approval within Patch Management policies.
This feature is only available in editions of SysAid that include the ITIL module.
For example, to manually approve patches on a specific asset with Change Management
Navigate to Asset Management > Asset List, and click on the asset you want to approve patches for.
In the Patches tab, select the patches you want to approve (see screenshot above).
From the list actions, select Approve using Change Management.
There are four methods for approving patches using Change Management.
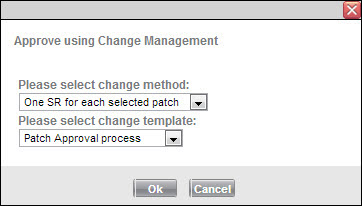
One SR for each selected patch
This option creates one Change ticket for each patch. The approval or denial of a patch applies to all the attached assets.
One SR for each enclosed asset
This option creates a Change ticket for each asset; the approval or denial of a change applies to all the associated patches for that particular asset.
Single SR for all selected patches
This option creates a single Change ticket. Once the change is approved or denied, all the patches and assets associated with this change receive the decision. For example, if the change is approved, all the associated patches are approved to be deployed on all the attached assets.
Separate SR for each patch for each asset
This option creates a Change SR for each patch for each asset, meaning that every patch must be approved or denied per asset. For example, if you have 2 patches on 4 assets, this option creates 8 separate Change service records.
Deploy patches
You can schedule a patch deployment job to run automatically in a Patch Management policy, or you can manually initiate a patch deployment job to run immediately. Only approved patches are deployed.
Schedule an automatic patch deployment job
You can schedule an automatic patch deployment job within a Patch Management policy to run on all of the policy's attached assets. Within a Patch Management policy, select the Patch Schedule tab, and schedule the job for the time you want. For more information, see Edit a Patch Management Policy.
Manually run a policy's patch deployment job
You can run a patch deployment job, immediately, for all assets attached to a specific policy even if that policy already has a set schedule for running deployment jobs.
To manually run a policy's patch deployment job
Navigate to Settings > Asset Management > Patch Management Policies.
Click the policy you want to run a patch deployment job for.
In the Patch Schedule tab, click Run now.
Manually deploy patches on a specific asset
You can manually deploy patches per asset. Only approved patches are deployed.
To manually deploy patches on a specific asset
Navigate to Assets > Asset Management > Asset List, and click on the asset you want to deploy patches on.
In the Patches tab, select the Missing Patches or Approved Patches view from the View drop-down list.
Select the approved patches you want to deploy.
From the list actions, select Apply approved patches now.

Patch Management Policies
SysAid Patch Management uses policies to specify key settings for attached assets. You can create as many policies as you need, giving you tremendous flexibility and control in managing your patches.
A policy is a type of knowledge base that contains status values for known patches. A known patch is any patch that has been processed by the policy. The policy processes all patches that are relevant to its attached assets. An unknown patch is either a recently published patch reported by a currently attached asset, or a patch that is relevant to a newly attached asset. A policy begins as an empty knowledge base, but you can set general automatic behavior for incoming patches based on their product and/or classification. Every time a policy encounters a new patch, it assigns it a status based on this predefined behavior and adds the patch to its knowledge base. Once a patch is recorded in a policy, administrators can modify its predefined status. The next time the policy comes across that patch, it recognizes it and knows what status to assign it without checking the patch's product or classification.
Example: Let's say you add a new laptop to your Patch Management policy that is well matched for a specific Microsoft Office patch, and the patch is unknown to your policy. The policy detects that its general status for Microsoft Office is Approve Automatically, so it records the new patch in its knowledge base and sets the patch's status on the laptop to Approved. As an administrator, you later decide to manually modify the status for this particular patch to Deny. The following week, another laptop is added to the policy that is missing the same Microsoft Office patch. The policy now recognizes the patch as a known patch and assigns it the Denied status that you set in the policy's knowledge base.
Important:
Whenever you change an asset's Patch Management policy the asset receives all status values of the new Patch Management policy. This means that any previous status values assigned to the assets patches are overridden by the values in the new policy.
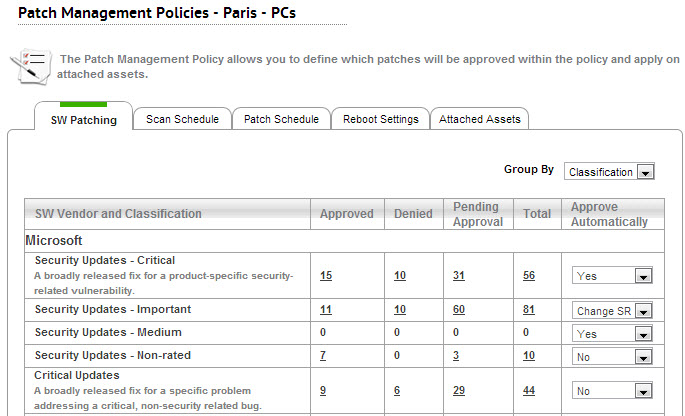
Note: Administrators must have Patch Management permission enabled on their user account to access Patch Management policies.
Contents of a Patch Management Policy
Each policy allows you to determine the following:
Which new patches are automatically approved?
How often and at what times are the attached assets scanned for missing patches?
How often and at what times are approved patches deployed to the attached assets?
What method does the policy use to restart the computers after the patch deployment job?
Which assets are attached to the policy?
Create Patch Management Policies
To create a new patch management policy, navigate to Settings > Asset Management > Patch Management Policies and click New (on the right). For detailed instructions on creating a Patch Management policy, see Patch Management Policies.
Create as many policies as you need for your computers. When you assign a computer to a policy, it overrides the status of all missing patches according to the predefined policy values. Remember that each computer can be attached to only one policy at a time.
Modify Patch Management Policies
From Settings > Assets > Patch Management Policies, click on any policy in the list to modify it. Note that as soon as you modify a Patch Management policy, the changes affect all computers attached to that policy.
For detailed instructions on modifying a Patch Management policy, see Edit a Patch Management Policy.

Settings
Patch Management settings allow you to configure default settings for SysAid Patch Management.
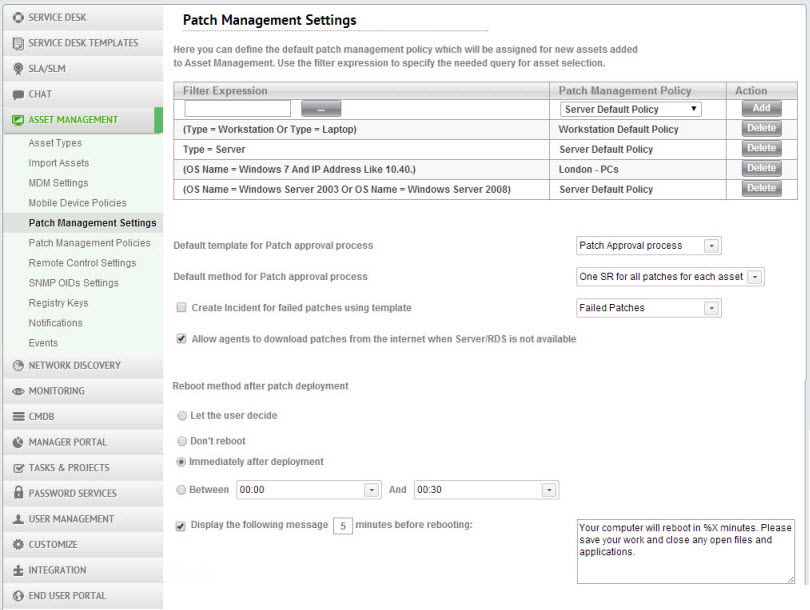
Automatically assign computers to Patch Management Policies
SysAid can use filters to automatically assign newly created assets to the appropriate Patch Management policies.

To create a new asset assignment filter
Click
 . This opens the Expression Builder.
Create a filter that selects the appropriate assets for the desired policy. When you are finished, click Create Filter. This adds your filter and closes the Expression Builder.
In the Policy column, select the default policy for the assets specified in the filter.
Click Add to save the filter.
Note: You cannot edit existing filters. To change a filter, you must delete and recreate it.
Other settings
You can also use Patch Management settings to define the default patch approval template and method, generate an incident for every failed patch, and decide how and when a computer reboots after a patch deployment job runs independently of any policy. For detailed instructions, see Patch Management Settings.