The Patch Management Policy form allows you to specify the following key settings for computers attached to a given policy:
- Which new patches are automatically approved?
- At what time frame and recurrence patterns are the attached computers scanned for missing patches?
- At what time frame and recurrence patterns are approved patches deployed to the attached computers?
- What method does the policy use to restart the computers after the patch deployment job?
- Which computers are attached to the policy?
The Patch Management Policy form is split into multiple tabs.
SW Patching
In the SW Patching tab, you can specify which types of patches are automatically approved for the selected Patch Management policy, and view the automatic approval status of individual patches.
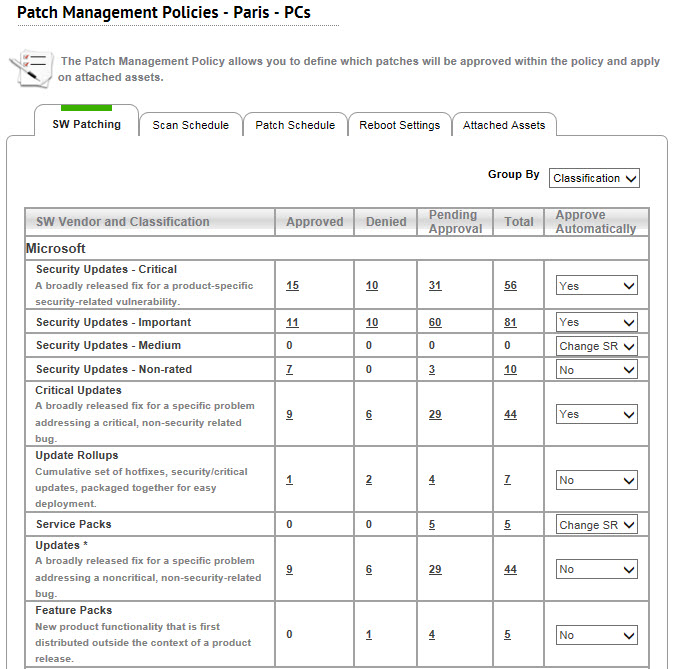
The following options are available on this tab:
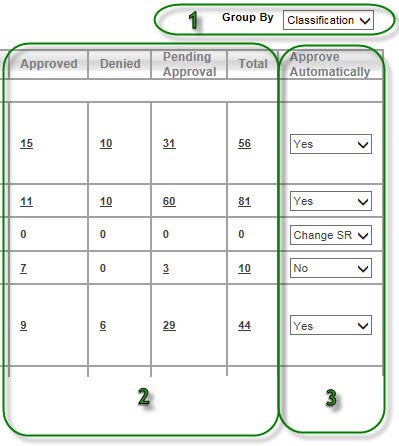
1 View patches by classification or by product
Use the Group By filter to view patches by Classification or by Product. Note that classifications are only relevant to Microsoft patches.
2 View patch status
For each classification or product, you can see the number of patches that were Approved, Denied, or are Pending Approval. You can also see the total number of patches for that classification/product.
Click on the number in one of the columns to view the relevant patches.
These numbers are stats that describe the policy's designated statuses for patches for different products or classifications. They do not indicate the actual statuses of the patches on the attached assets. The status of each patch may be different as it applies to each asset attached to the policy.
Example: Let's say a patch for Mozilla Firefox was marked as Denied on the policy level, it may already be installed on one of the attached assets and, therefore, remains installed on that asset. Alternatively, if you manually approve the patch on a specific asset, the approval overrides the patches Denied designation in the policy.
To view the actual statuses of a patch on its assets, navigate to Assets > Asset Management > Patch Management and search for the desired patch.
3 Set automatic approvals for patches
Choose whether to automatically approve patches in the given classification/product. Options are: Yes (automatically approve), Change SR (automatically open a Change service record using the default method for patch approval process as defined in Patch Management Settings), or No (require manual approval). Click Save at the bottom of the page to save your changes.
Change the automatic approval status for specific patches
For any given patch, you can select an automatic approval status different from the policy default:
- For the classification or product that contains the relevant patch, click the number in either the Approved, Denied, or Pending Approval column. This opens a list of patches and their automatic approval statuses for the selected Patch Management policy.
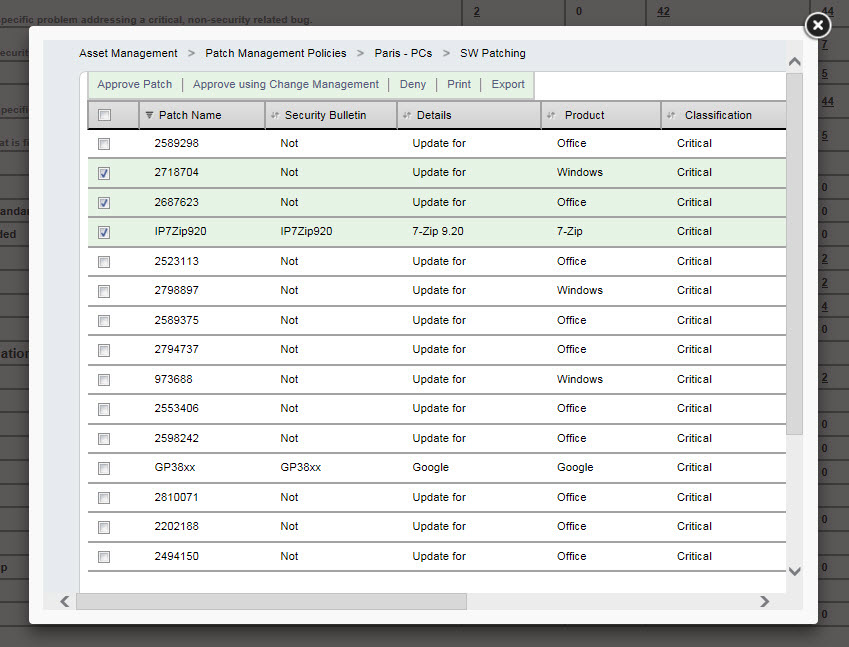
- Select the appropriate patches.
- Select an automatic approval status from the list actions: Approve, Approve using Change Management, or Deny.
- Click Save at the bottom of the page. This updates the automatic approval status of the selected patches for the selected Patch Management policy.
Scan Schedule
In the Scan Schedule tab, you can specify the time frame and recurrence patterns for scanning your assets for missing patches.
Be sure to click Save after you finish making changes to this page.
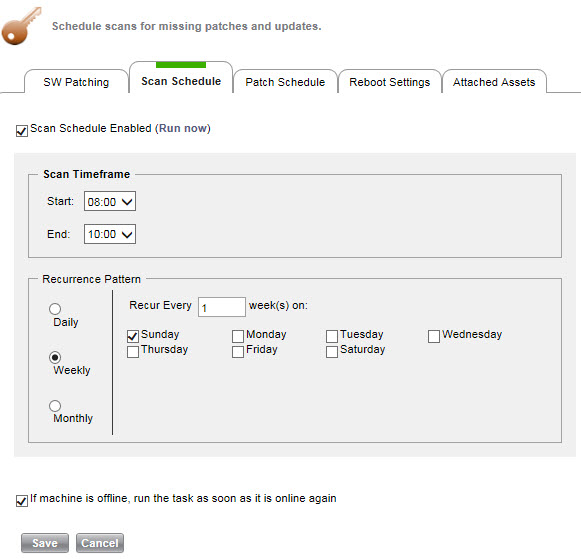
Scan Schedule Enabled
Select this check box to enable scheduled scanning. If this box is disabled, the computers attached to the policy are never scanned for missing patches, unless you click Run now. Click Run now to immediately initiate a patch scan.
Scan Time Frame
Specify the frequency of patch scanning. Scanning can be daily, weekly, or monthly. The patch scan begins at the specified start time and ends either when the last attached asset is scanned or when the end time is reached. If the end time is reached before all assets are scanned, the remaining assets are not scanned.
The schedule reflects the local time zone of each attached computer. This means that if the policy covers computers in multiple time zones, the scan results can be spread over a 24 hour period. All scan results are stored in the log as the scan jobs are completed in the various locations.
If machine is offline, run the task as soon as it is online again If this box is checked, if one or more of the computers to be scanned are offline (either the computer is off or the SysAid agent is not running), these computers are scanned as soon as they are online again (and the SysAid agent reports to the SysAid server). If this box is not checked, computers are only scanned if they are online at the time of the scan.
Patch Schedule
In the Patch Schedule tab, you can specify the time frame and recurrence patterns for deploying approved patches to your computers.
Be sure to click Save after you finish making changes to this page.
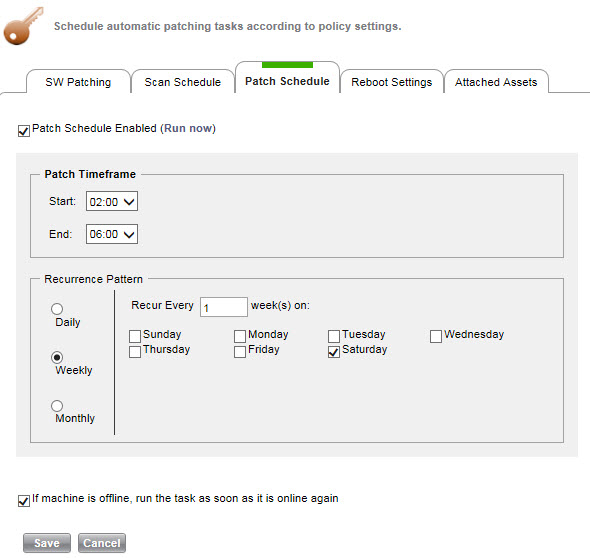
Patch Schedule Enabled
Select this check box to enable patch deployment. If this box is disabled, approved patches are never deployed to the computers attached to the policy, unless you click Run now . Click Run now to immediately initiate a patch deployment job for all approved patches on assets attached to the policy.
Patch Time frame
Specify the frequency of patch deployment. Patches can be deployed daily, weekly, or monthly. The patch deployment begins at the specified start time and ends either when the patches are deployed on the last attached asset or when the end time is reached. If the end time is reached before the patches are deployed on all assets, the remaining assets are not patched.
The schedule reflects the local time zone of each attached computer. This means that if you have computers in multiple time zones, the patch deployment results can be spread over a 24 hour period. All patch deployment results are stored in the log as the patch deployment jobs are completed in the various locations.
If machine is offline, run the task as soon as it is online again
If this box is checked, if one or more of the computers attached to the policy are offline (either the computer is off or the SysAid agent is not running), the patches are deployed on these computers as soon as they are online again (and the SysAid agent reports to the SysAid server). If this box is not checked, patches are only deployed on these computers if they are online at the time of the deployment.
Reboot Settings
A system reboot is generally needed upon completion of each patch deployment job. In the Reboot Settings tab, you can set the method that the policy uses to restart the attached assets. Note that the computers are not rebooted after each applied patch, but rather after the last patch in the job is deployed.
For instructions on how to set the reboot method for assets not assigned to a specific policy or for manual deployment jobs, see Patch Management Settings.
Be sure to click Save after you finish making changes to this page.
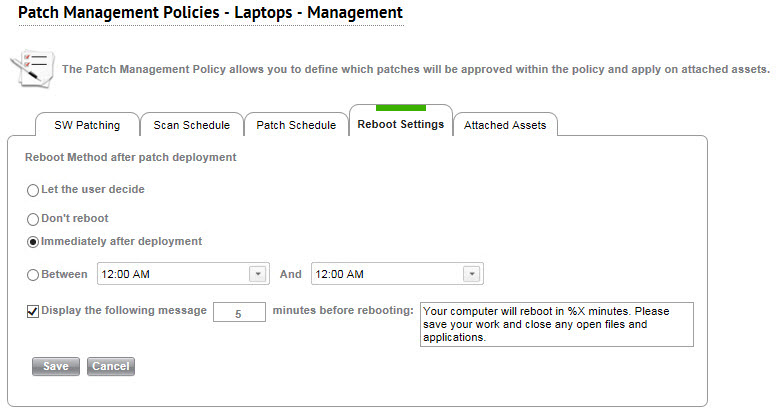
Let the user decide
If a user is logged in, a pop-up window informs the user that new software updates have been installed and the computer must be restarted. The user can select from the following options: Restart now, Remind me in (minutes), Restart at (a particular time), or Don't bother me again.
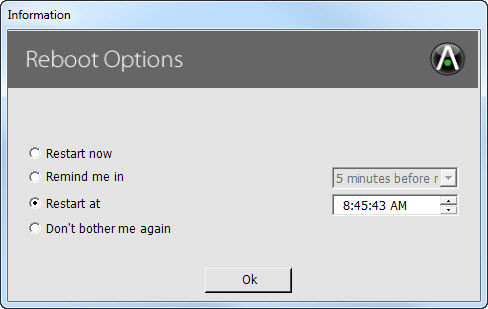
If no user is logged in, the computer restarts immediately.
Don't reboot
SysAid does not automatically reboot the computers attached to this policy. Patches that require a restart to take effect, are installed pending a manual reboot.
Immediately after deployment
As soon as the patch deployment job is complete, the systems reboots. If a user is logged in and the option "Show notification X minutes before rebooting" is enabled, the user receives a pop-up notification that the computer will reboot so that there will be time to save all work and close any open applications.
Between X and Y
The computer automatically reboots as early as possible within the selected timeframe. If there is a logged-in user and the option "Show notification X minutes before rebooting" is enabled, the user receives a pop-up notification that the computer will reboot so that there will be time to save all work and close any open applications.
Display the following message X minutes before rebooting
If this option is enabled and reboot method is set to either "Immediately after deployment" or "Between X and Y", then end users receive a warning of X minutes before their computers are rebooted. This gives the users time to save all work and close any open applications. If this option is disabled, users' computers are rebooted without warning.
Attached Assets
In the Attached Assets tab, you can view all assets attached to a patch Management policy, add assets to the policy, and reassign assets to a different policy.
You can click on any asset to view its details.
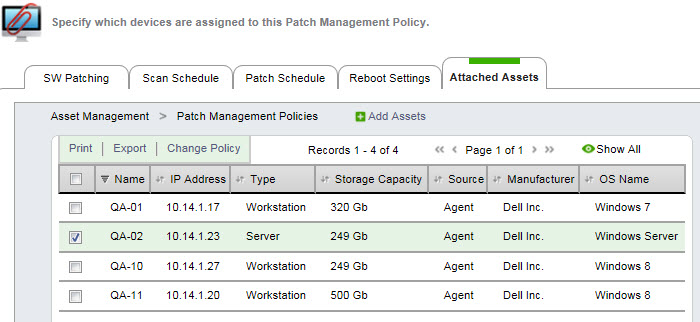
For general instructions for using list pages in SysAid, see Using SysAid Lists.
Add an asset to a Patch Management Policy
To add a new asset:
- Click
 . This opens the Select Asset page.
 - Select the assets that you want to add to the selected Patch Management policy.
- Click Select. This closes the Select Asset page and adds the selected computers to the policy.
List actions
You can perform a number of actions with list actions. To display the list actions, select one or more assets.

Print
Export the selected assets to .pdf. You can then easily print them.
Export
Export the selected assets to .csv. You can then print them, or use the data for further calculations.
Change Policy
Change the Patch Management policy for the selected assets.
When you click Change Policy, the system displays a list of all configured policies: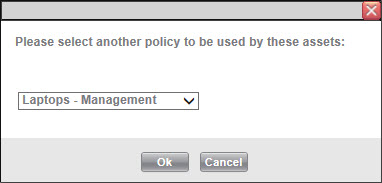
Select a policy, and click OK. This removes the existing policy settings from the selected assets and applies the settings from the new policy. If you select None, then the Patch Management policy is removed and the selected assets are no longer attached to a policy.
Whenever you change the Patch Management policy of a computer, the computer receives all default settings of the new Patch Management policy. For example, a patch that was previously marked as Denied for the computer may now be marked as Approved!