Introduction
The Tasks and Projects module is designed to help you be proactive in your IT management. Whereas the helpdesk is a very responsive process, the Tasks and Projects module helps you to plan your future IT objectives and to ensure that they are implemented smoothly and on time. You can also stay on top of your maintenance tasks using the recurring notification feature of Tasks and Projects.
As its name suggests, the Tasks and Projects is organized into two components, namely, tasks and projects:
Projects
Projects are composed of tasks. Each project has a manager, a status, a completion percentage, and a timeframe. You can easily view a Gantt chart of your project's tasks to get an overview of timeframes and dependencies.
For the Project List help page, click here. For the Project Form help page, please click here.
Tasks
Tasks are the individual work items in a project, and each task belongs to one project. Tasks have assigned users, statuses completion percentages, and timeframes. You can also log activities on a task. The activities are your notes about what work has been done and how long it's taken.
For the Task List help page, click here. For the Task Form help page, please click here.
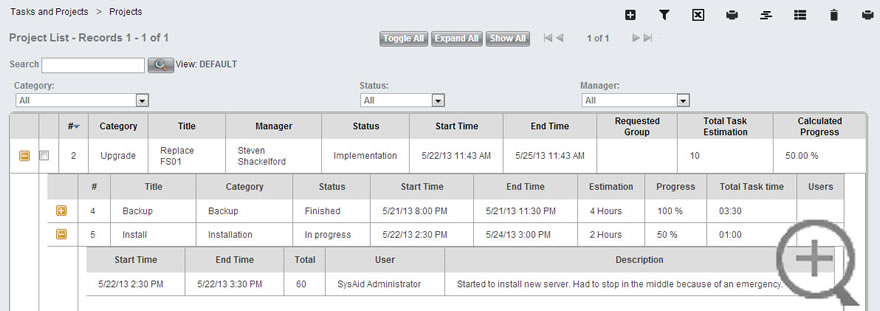
Project list-- project overview
Creating Projects and Tasks
Go to Tools > Tasks and Projects > Projects. This takes you to the projects list. The project list allows you to view a list of your projects with their associated tasks. You can also view a Gantt for the timeline of all of your projects (once you've created some projects).
- Click the New icon
 to create a new project. This opens the General Details tab of the Edit Project screen.
 - Enter a project title and click Apply. This gives your new project a number, and enables the Tasks tab.
- Fill out the rest of the General Details tab, and then fill out the Description tab. Go here for a description of the fields on the project form. When you are done filling out the form, click Apply again.
- Click on the Tasks tab. The Tasks tab shows the tasks list embedded in a frame.
- Click the New icon
 to create a new task. This opens the General Details tab of the Edit Task screen.
 - Fill out the General Details, Description, and Users tabs. Go here for a description of the fields on the task form. When you are done filling out the form, click OK (make sure to click the OK button inside the task frame).
- Repeat steps five and six until you've created all tasks for the project.
Creating and Sending Custom Task Notifications
The Task and Project module can send out custom notifications regarding your various tasks. Notifications are created independently of your tasks and then chosen from within a particular task. Projects send only automated notifications, not custom notifications.
- Go to Settings > Tasks & Projects > Notifications and click the New icon
 to create a new notification. For complete instructions on creating a notification, please click here.
 - Go to Tools > Tasks/Projects > Tasks and click on the task that will send the notification.
- Go to the Notification tab.
- Select the desired notification from the drop-down list.
- From here, there are three ways you can send the notification. Continue by choosing option A, B, or C :
- Click Send once; now to immediately send the notification.
- Choose a start time and choose the frequency that the notification should recur, then click OK/Apply. The notification will be automatically resent each time the specified time occurs (e.g. every Monday). This is a great option to use for recurring tasks such as maintenance.
- The third option is as follows:
- Uncheck Enable a notification and click OK/Apply.
- Open the parent project for that task and go to the Notification tab.
- Enter a Notification Title (this will be inserted in the title field of the SR or subject field of the email) and click Apply.
- Click Send notifications for all tasks. This will send out the assigned notification for each task in the project, including the one you just configured. If this is a recurring project, you might use this button each time the project restarts to resend all notifications. On the other hand, if this is a one-time project with many tasks and notifications, it might be better not to use this button, as you will be spamming all of your administrators with emails/SRs/SMSes.
Automatic task and project notifications
Go to Settings > Tasks & Projects > Settings. This page allows you to determine if automatic task and project notifications are sent or not. Please click here for a description of the options this page offers you.
Using Tasks and Projects
After creating tasks, projects, and notifications, it's time to start using the Tasks and Projects module.
Recording activities
Open a project that you've created, and then open one of that project's tasks. As you can see, the task specifies a particular job or amount of work that must be done for the project to progress. You will do the work outside of SysAid, and when you are finished, you will record what you've done in SysAid.
- Click on the Activities tab for the task you have just finished working on.
- Enter the start and end times for the work that you've done. This automatically calculates the total activity time.
- Enter a description of the work you've done.
- Click Add to save your new activity. Activities and activity times appear on task progress reports, viewable from Analytics > Overview > Reports.
After recording the activity time, go back to the General Details tab of the task. Make sure to update the Progress % field to reflect the work you've done, and update the status of the task if it has changed.
Viewing task and project progress using a Gantt chart
As you progress through your various tasks and projects, you may find it useful to view a visual progress report. You can do this using a Gantt chart. A Gantt chart shows start and end times and completion percentages for the tasks/projects shown. Note that tasks/projects must have both a start and end time to appear on a Gantt chart.
There are three Gantt layouts:
All projects Gantt
- Go to Tools > Tasks and Projects > Projects.
- Click the Gantt icon
 .
. - You will see a Gantt chart for all of your projects.
Note: The completion percentages for the projects in this Gantt chart can be determined by either the Progress or Calculated Progress field on the project form. You may choose which of these two fields to use under Settings > Tasks & Projects > Settings.
All tasks Gantt
- Go to Tools > Tasks and Projects > Tasks.
- Click the Gantt icon
 .
. - You will see a Gantt chart for all of your tasks. Tasks are grouped by task category.
Single project Gantt
- Open a project that has associated tasks.
- Click on the Gantt tab.
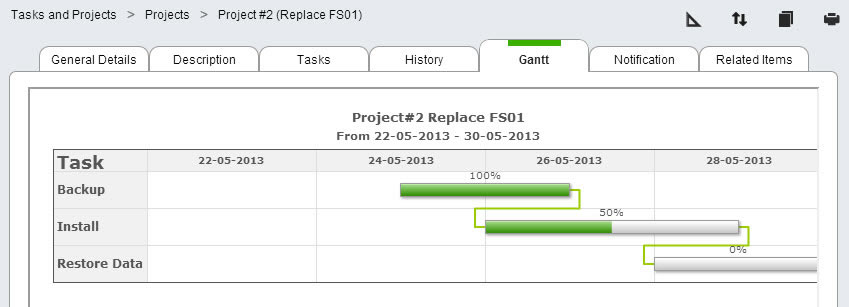
- You will see a Gantt chart of all tasks for that project, as well as task start/end time dependencies.
Single project Gantt chart