The task form allows you to view and edit details for an individual task. You can also see all activities that have been logged on a task. The task form is divided into tabs, each with its own purpose. Following is a description of the default fields on each tab.
Also on this page: Available Fields for the Task Form
General Details
This tab contains general details for the task, including its name, parent project, category, status, and start and end times. Fill out as many of these fields as are necessary for you to effectively manager the task.
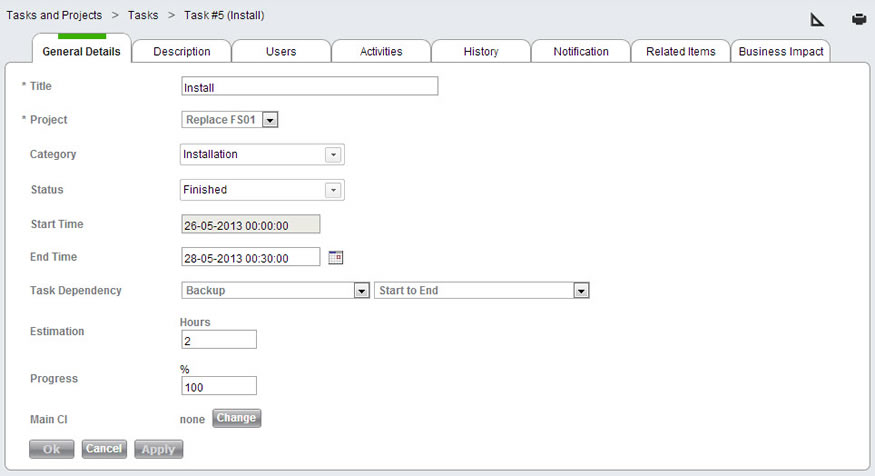
Default fields on the General Details tab include:
Title
The task's title.
Project
The name of the project the task is part of. Changing the project here will attach the task to a different project, including for reporting purposes.
Category
The category of the task. Task category is used to sort tasks on the task Gantt, viewable from the Task list.
Status
The status of the task. Unlike service record status, task status is for reference purposes only.
Start Time
This is the task's start time. The time input here will be used for the project Gantt chart.
End Time
This is the task's end time. The time input here will be used for the project Gantt chart.
Task Dependencies
You can choose to have the start or end date of a task dependent upon the start or end date of another task. This is useful in cases where a particular task cannot be done until after another task is completed.
Task Dependency: Choose the task that the current task will be dependent upon. In order for a task to show up in this list, it must be attached to the same project and it must have a start and end time.
Task Dependency Type : You have four options here, so that each task dependency can be configured according to your needs:
- Start to End: The start time of this task is dependent upon the end time of the target task.
- Start to Start: The start time of this task is dependent upon the start time of the target task.
- End to End: The end time of this task is dependent upon the end time of the target task.
- End to Start: The end time of this task is dependent upon the start time of the target task.
Estimation (hrs)
The number of hours that you estimate this task will take to complete. This is used to build the Total Task Estimationfor the parent project.
Progress (%)
The percentage of progress accomplished on this specific task. This field is used in both the Project Gantt chart and in the parent project's Calculated Progress.
The following two icons appear on the upper menu bar:
| Print to .pdf | This icon allows you to print the contents of the form to .pdf. This gives you the ability to easily print your form. | |
Design Form | This icon allows you to customize the form by adding and removing fields, customizing fields, and more. Please read about customizing forms for further information. This icon is only available to administrators with the SysAid Administrator permission. |
Description
On this tab you can add a task description and any applicable notes. You can also upload attachments to the task. Each attachment is timestamped so that you know exactly when it was added.

Users
This tab allows you to add users to a task.

To add users:
- Click the Add users button. This opens a list of your users.
- Navigate the list and find the user(s) you want to add.
- If you want to add one user, click on the user's row. If you want to add more than one user, select the users using the tickboxes at the left end of the rows. Then click the Select button. The selected users now appear in the list of users.
- For each user you've added, select the User Role using the drop-down list.
- Click OK/Apply to save your changes.
The specific User Role chosen does not grant any additional priviledges within Sysaid. However, anybody who appears on this list will receive notifications as defined underSettings > Tasks & Projects > Settings , even if the User Role is set to "None." You can modify the User Role list under Settings > Customize > Lists .
Activities
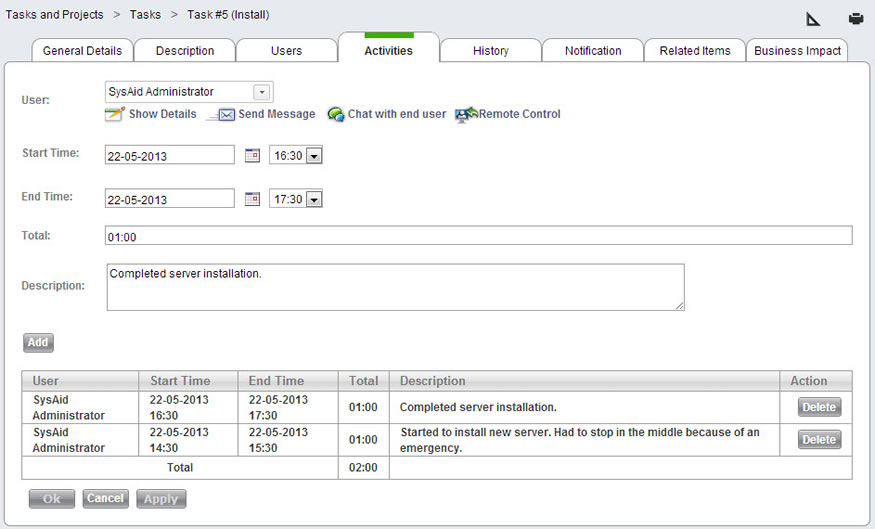
This tab allows you to record activities for your task. Activities logged here appear in task activities reports.
To record an activity:
- Enter the Start Time for the activity. The default start time is the current time.
- Enter the End Time for the activity. This manually calculates the total time. Alternatively, you may manually enter the Total time in the format XX:XX.
- Enter a Description for the activity.
- Click Add. Your activity appears in the table below the Add button. You can delete an activity at any time using the Delete button.
Note that the activity is logged against whichever user appears in the User field. If you use the Change button to change the user, you can log an activity for a different user.
History
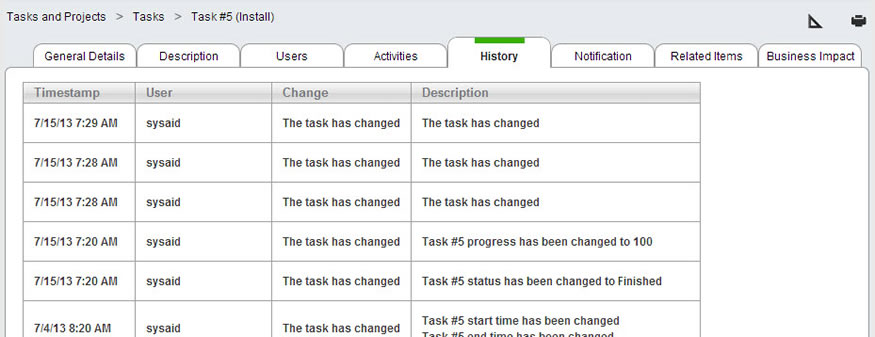
Any time an administrator saves changes to a task, the changes are recorded here. This allows you to see what changes have been made to a task, when they were made, and who made them. Click on The task has changed to open a snapshot of how the task looked at that revision.
Notification
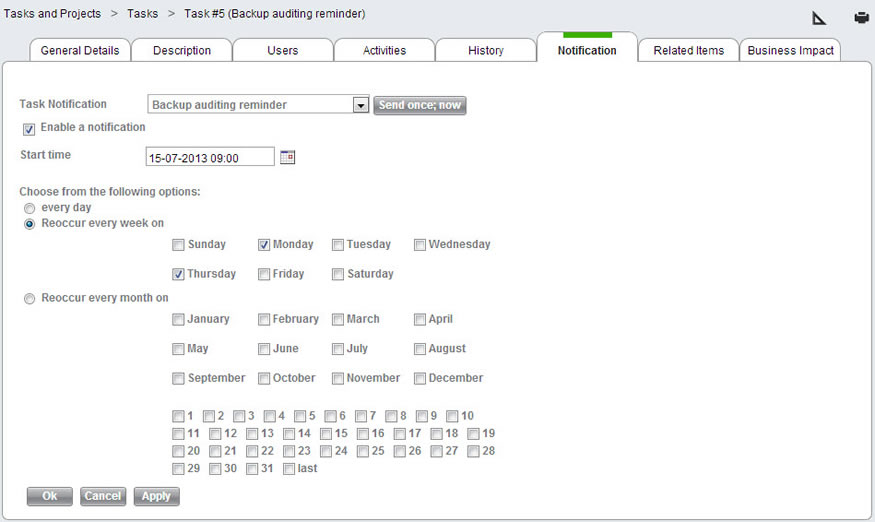
The Notification tab allows you to send or schedule notifications for your tasks. To send a notification:
- Select the desired notification from the drop-down list. In order to show up in this list, you must first create your notifications under Settings >Tasks & Projects > Notifications.
- From here, there are three ways you can send the notification. Continue by choosing option A, B, or C :
A. Click Send once; nowto immediately send the notification.
B. Choose a start time and choose the frequency that the notification should recur, then click OK/Apply . The notification will be automatically resent each time the specified time occurs (e.g. every Monday and Thursday). This is a great option to use for recurring tasks such as maintenance.
C. The third option is as follows:
1. Uncheck Enable a notification and click OK/Apply.
2. Open the parent project for that task and go to the Notification tab.
3. Enter a Notification Title (this will be inserted in the title field of the SR or subject field of the email) and click Apply .
4. Click Send notifications for all tasks . This will send out the assigned notification for each task in the project, including the one you just configured. If this is a recurring project, you might use this button each time the project restarts to resend all notifications. On the other hand, if this is a one time project with many tasks and notifications, it might be better not to use this button, as you will be spamming all of your administrators with emails/SRs/SMSes.
Every Monday and Thursday at 9:00 AM, the "Backup auditing reminder"notification will be sent
Related Items
This tab shows you a list of all items associated with the task. When you select a task as the Main task for a item (from the item's form), that item is automatically added here.
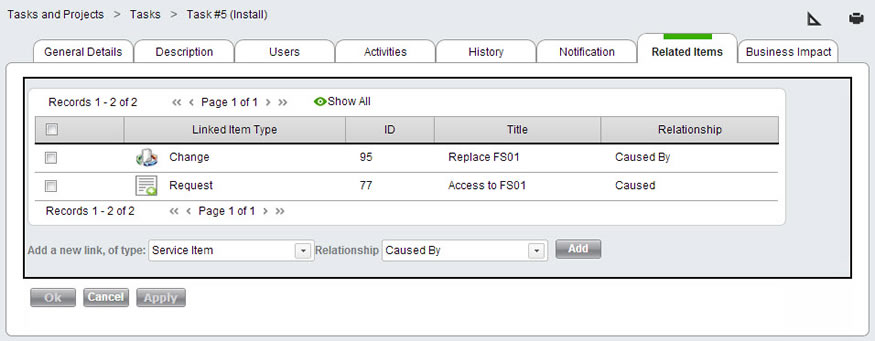
To manually add a new relationship:
- Select the type of item you would like to add using the Add a new link, of type drop-down list.
- Choose the dependencey type of the linked item.
- Click Add. This opens a list of items of the selected type.
- From the list, select one or more items using the check boxes at the left end of the rows.
- Click Select to save the selected items. This closes the list and attaches the items.
To remove linked items:
- Select one or more linked items using the check boxes.
- Click Delete from the list actions.
If you then open the Related Items tab on any attached item, this task will appear.
Business Impact
The Business Impact tab shows you which CI this task is connected to. This allows you to predict the impact progress on this task could have on your IT environment.
For example, in the training task shown in the screenshot below, the relevant CI is the Training Process CI. The graph shows that this CI is connected to the Training Center, and the Training Center in turn is connected to the computers that are located within. After viewing this graph, it's clear that in order for the training to be successful, you must remember to reserve the training center.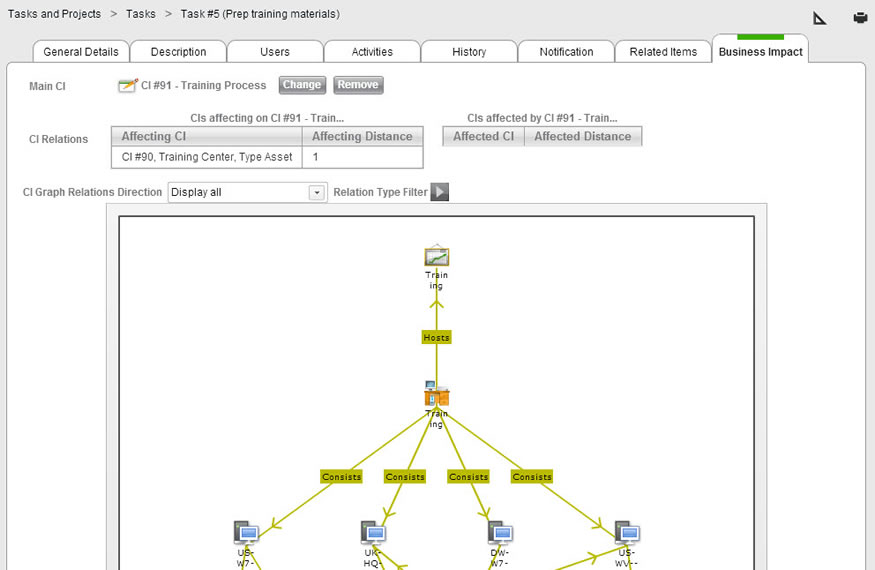
By default, a task does not have an attached CI. To attach a task to a CI:
- Click Change to open a list of CIs in the CMDB.
- Search for the desired CI, and click on it to attach it to the task.
- Click OK/Apply after attaching the CI.
You can now see the Business Impact of this task on your network.
Available fields for the Task form
Note: You may see fields not listed below. They may be custom fields that were added to your system, or fields added by a third-party integration.
| Field Name | Description |
| Activities | Allows you to record task activities. See the activities tab above for more information. |
| Attachments | Allows you to upload attachments to the task. |
| CI Relations | Shows you which CIs are related to the task's Main CI, and shows you whether they're directly connected or connected through other CIs. |
| CI Relations Graph | Shows a graphical display of which CIs are related to the Main CI of the current task. |
| Category | Allows you to select a category for the task. The task category list can be edited from Settings > Customize > Lists by selecting the Task Category list. |
| Description | Record the task's description here. |
| End Time | The planned end date and time of the task. |
| Estimation | The number of hours that you estimate this task will take to complete. |
| History | Shows a history of all changes made to the task. See the History tab above for further information. |
| Links | Allows you to add links to websites, FTP, local/network storage, and Lotus Notes items that may be relevant to the task. |
| Links to other Items | Shows you any service records linked to this task. You can attach additional service records, if you like. If a task is the Main Task for a service record (this can be selected on the SR form), then that SR appears in this list automatically. For more information, see the Related Items tab, above. |
| Main CI | This is the primary CI affected by the service record. Read more about this field on the Business Impact tab, above. |
| Manager's Notes | This field allows the project's or task's manager to record any relevant notes. |
| Notes | Allows you to record general notes about the task. |
| Payment Date | If any payment is due to be payed or received for this project, you can use this field to enter the date that the payment will be made. |
| Progress | Completion percentage of the current task. Entered manually. |
| Project | This is the parent project. This is an important field, as tasks are grouped by project both in reports and in Gantt charts. |
| Start Time | The start date and time of the task. |
| Status | Allows you to select a status to indicate the progress of a task. The task status list can be edited from Settings > Customize > Lists by selecting the Task Status list. |
| Task Custom Date 1 + 2 | These two date fields can be used to record any additional dates relevant to the task. You can rename these fields from Settings > Customize > Translation. |
| Task Custom Int 1 + 2 | These two integer fields can be used to record any additional integer values relevant to the task. You can rename these fields from Settings > Customize > Translation. |
| Task Custom List 1 + 2 | These two list fields can be used to record additional information relevant to the task. You can rename these fields from Settings > Customize > Translation. You can edit the lists from Settings > Customize > Lists. |
| Task Custom Notes | This field can be used to record any additional notes relevant to the task. You can rename this field from Settings > Customize > Translation. |
| Task Custom Text 1 + 2 | These two short text fields can be used to record any text relevant to the task. You can rename these fields from Settings > Customize > Translation. |
| Task Dependency | Allows you to connect a task's start and end times to the start and end times of another task. See the General Details tab above for more information. |
| Task Notification | Allows you to select a notification for this task, and to choose when this notification will be sent. For more information, see the Notification tab. |
| Title | Record the project's title here. |
| Users | Allows you to indicate which users are involved in the completion of this task, and what their roles are. See the User tab above for more information. |