Because requests are standard procedures that occur on a regular basis, there should be a predefined process for handling each request of a given type. In SysAid, each request is based upon a request template. By choosing the appropriate template for each request, administrators ensure that the correct procedure is followed for every request.
Creating and Modifying Request Templates
Following is the process for creating a new request template from scratch. If your intent is only to modify an existing template, perform only those steps necessary to achieve the modifications you desire. Note that only Change Manager s can create or modify request templates.
Here is a list of the steps needed to create a new request template from scratch:
- Choose a sub type for the request template
- Fill out any prepopulated values on non-workflow tabs
- Choose the contents of the workflow tabs
- Add action items and configure them
- Choose attributes for each of your action items
- Fill out any prepopulated fields on workflow tabs and action items
Below is an explanation of what to do in each of these steps.
If you have not already, go to Settings > Service Desk Templates> Request Templates and click  .
.
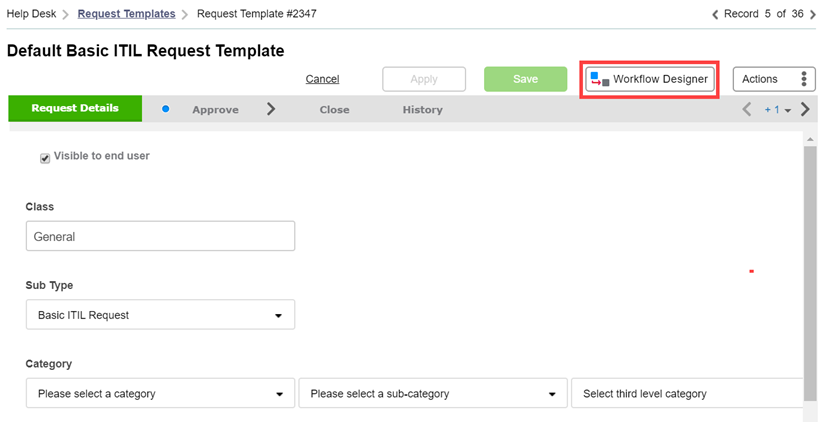
SysAid's Workflow designer allows you to quickly and easily add and edit Workflow tabs and action items. This is available from release 20.2.10 and is being gradually rolled out. To access the workflow designer, click  on the top of a template's form. For more information, see Workflow Designer.
Note : In SysAid, Change, Problem, and Request templates are all created in the same way. While changes and problems typically have advanced workflows, requests are usually much simpler. Therefore, while the instructions provided below document all functionality available to you for designing request templates, you will not necessarily need to perform all of the steps described.
Note2 : If you would like to create a new template that is similar to an existing template, you can open an existing template and use the duplicate icon ![]() to create an exact duplicate. You then make any changes you need to the duplicate so that you have the second request template exactly as you need it.
to create an exact duplicate. You then make any changes you need to the duplicate so that you have the second request template exactly as you need it.
Important : Editing a request template does not affect requests that have already been created using that template. Only future requests created from the template are affected.
1 Choose a sub type
Each request template is based upon a sub type. A sub type determines two things: 1) which fields appear on the non-workflow tabs, and 2) how many workflow tabs there are and in what order. To configure sub types, please go to Settings > Service Desk Templates > Sub Types. Instructions may be found here.
When you first create the template, choose the sub type from the drop-down list.
2 Fill out fields on the non-workflow tabs
Workflow and non-workflow tabs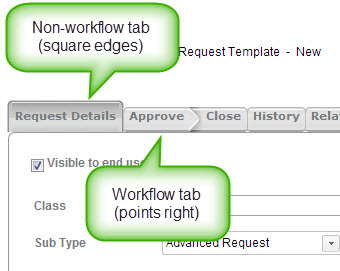
When you create a new request from a request template, all fields on the non-workflow tabs are copied from the request template*. Therefore, if there are any fields that should be filled out exactly the same for each request created from the template, you should fill these fields out on the template. Examples could include Priority, Urgency, Process Manager, and any notes or text fields. Also be sure to specify if the template should be visible to end users from the End-User Portal. To make it easier to locate a template in the Template drop-down list when creating a new request, give the template a class (e.g. Printers, User Accounts, etc.).
Make sure to save the template after filling out these fields by clicking Apply.
*There are four fields that are exceptions: Request User defaults to whoever is creating the request, and can of course be selected. Title and Category are taken from a linked incident (note that if a request template has a predefined category, you may only create a linked request from an incident with the same category). Description is also taken from a linked incident, but only if the Description field on the template is blank. If it's not, the Description field from the template will be used instead of the description field from the incident.
Add linked items
You can use the Linked Items table, located in the Related Items tab, to link a variety of items to SRs that use the template. The table displays a list of all items related to the template. Click on any item to open a new window with details for that item.
Items added to this table also appear in the Linked Items table for the related item. For example, if you add a Knowledge Base article to the Linked Items table on a template, you will see the template in the Linked Items table for that article.
To add linked items:
- Select the type of item you would like to add using the Add a new link, of type drop-down list.
- Choose whether the linked item caused the SR, was caused by the SR, or neither.
- Click Add. This opens a list of items of the selected type.
- From the list, select one or more items using the check boxes at the left end of the rows.
- Click Select to save the selected items. This closes the list and attaches the items.
To remove linked items:
- Select one or more linked items using the check boxes.
- Click Delete from the list actions.
When you are finished creating the incident template, click OK/Apply.
3 Choose the contents of your workflow tabs
When you create a new template, all workflow tabs are blank. For each workflow tab, you must choose the header section.
To select a workflow tab header (image below):
- Click the design form icon
 on the top of the form. This opens the Change Action Item view.
 - Click the Change button next to the name field to open the Select Action Item view.
- Select an action item from the list by clicking on it. This closes the Select Action Item view. Keep in mind that this action item will be for the workflow tab header and is not a part of the request fulfillment process, so pick an action item that is used primarily to give instructions or information. If you need to create a new action item for this purpose, see instructions in the next section for creating and editing action items.
- Click Save. This closes the Change Action Item view.
Your workflow tab now has a header. As you can see, the first action item has been added as well. The next steps are to choose how many and which action items you need.
Adding the header section to a new workflow tab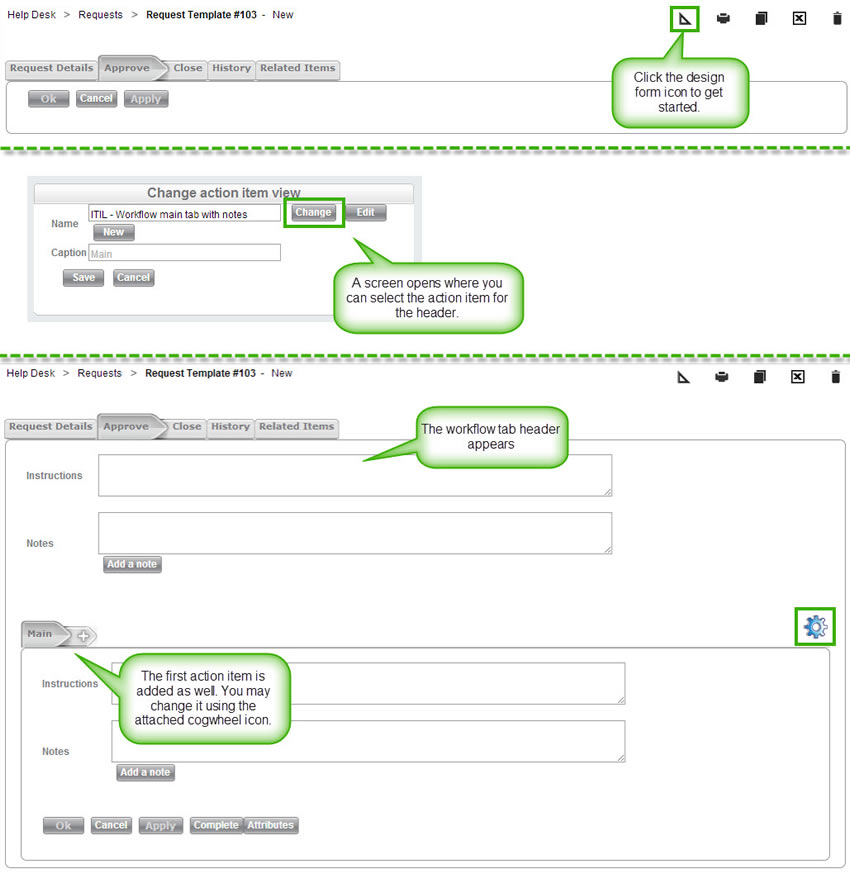
4 Add and configure action items
For requests that involve predefined workflows, action items are where the main work of the request is recorded. Each workflow tab is composed of one or more action items. When you planned out your request fulfillment process, you should have decided how many action items you need and what work needs to be recorded on each action item.
Adding action items
You will most likely want to have more than one action item for each workflow tab. To create a new action item, click the + icon found to the right of the rightmost action item tab:
This duplicates the action item before it. As each action item is designed to record specific work done in the request fulfillment process, you must now configure your action items to contain the fields you need to record this work.
Customizing action items
Each action item in a request is based upon an action item template. This means that you do not create action items for only one request, but rather create reusable action item templates and simply select the ones necessary for a given request. SysAid comes with a number of preconfigured action item templates that you can use and edit, and you can also add your own.
If you choose to edit an existing action item template, please be warned: Editing an action item template will immediately change every action item in SysAid that is based upon that action item template.
To select the action item template you need or to create a new action item template, start by clicking on the cogwheel icon  on the lower menu bar (see screenshot above). This opens the Change Action Item view.
Change action item view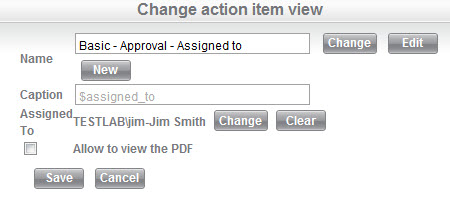
The Change Action Item view gives you four options:
Change action item If an action item template with the fields you need for your current action item already exists, click here. This opens a list of all action item templates, and you may then select the desired template from the list.
Edit action item Click here to modify the currently selected action item template. Refer to the customize form help page for instructions. If you would like to modify an action item template other than the currently selected item, please use the Change button to first select your desired action item. Important: Editing an action item template will immediately change every action item in SysAid that is based upon that action item template.
New action item If the action item template you need does not exist, you can create a new template. Click the New button and follow the instructions for customizing forms. Once you are finished, your new action item template will be automatically selected. Any future request template you create can now make use of this new action item.
Change assigned to user Select the user who the action item will be assigned to. A user may only work on action items that are assigned to them, unless they are a Change Manager.
Click Save when you are done to save changes and add your chosen action item to the request template.
5 Action item attributes
In a request fulfillment process, one step frequently depends upon the completion of one or more steps before it, and in turn, that step is the basis for the steps that come afterwards. Furthermore, participants in the request fulfillment process must be notified when their step becomes active, and must sometimes be notified about the results of previous steps. Therefore, after you have finished creating all of your action items for all of your workflow tabs, you must create dependencies and notifications for your action items. In SysAid, this process is done using action item attributes.
Attributes are configured separately for each action item, and are not connected to action item types. Therefore, you can have three different action items of the same type, each with its own unique attributes configuration. On the other hand, all SRs created from a template use the attributes specified for each action item in that template.
Edit action item attributes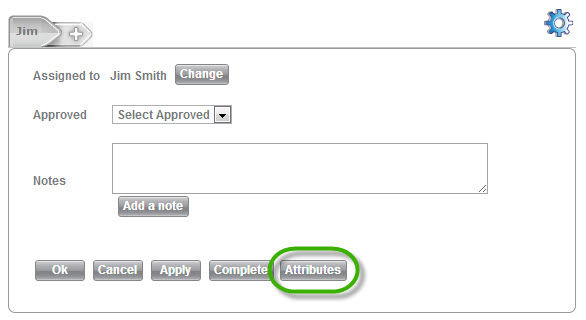
To edit attributes for an action item, click Attributes in that action item. This opens the Attributes and Dependencies page. This page gives you a number of different options:
Action item Attributes & Dependencies page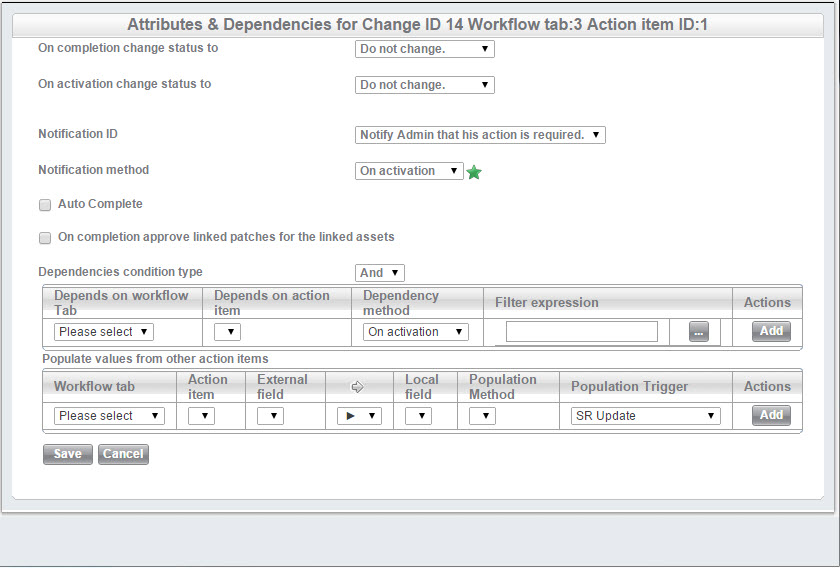
On completion change status to
When this action item is completed, the status of the request will update to the chosen status.
On activation change status to
When this action item is activated, the status of the request will update to the chosen status.
Notification ID
This is the notification sent by the action item. Each action item can send one notification. These notifications are configured under Settings Service Desk Templates > Workflow Notifications.
Notification method
Choose whether the notification for this action item will be sent when the action item is activated or when it is completed.
Auto Complete
If this is checked, the action item will automatically be marked as complete at the moment it activates. This option is useful if you need to have a specific notification sent during the request fulfillment process, but that notification is not part of any of the other action items.
On completion approve linked patches for the linked assets placeholder
Dependencies table
Choose which action items must be completed before the current action item is activated (prerequisite action items).
- Use the And/Or drop-down filter to determine if all conditions in the table must be met or if only one of the conditions must be met before the action item is activated.
- Choose the workflow tab with the prerequisite action item. You may only choose the current workflow tab or a workflow tab that precedes it.
- Choose the prerequisite action item on the selected workflow tab. If you have chosen the current workflow tab, you can only choose action items that precede the current action item.
- Choose whether the current action item will activate on activation or completion of the prerequisite action item.
- (Optional) Using the ellipses button
 , enter a desired value for a chosen field on the prerequisite action item. The current action item will only activate if the entered value is detected on the prerequisite action item.
 - Click Add.
- Repeat steps 2 - 6 as necessary.
- Click Save . The Attributes and Dependencies page closes, and your changes are saved.
To delete one or more dependencies:
- Check the delete box at the right end of any row you would like to delete.
- Click Save to delete the dependencies.
Populate values from other action items table
Not all participants in a request fulfillment process will be able to see all action items, but there are times when they will need to be able to view the contents of a field on another action item to complete their own work. Using this table, you can set fields on an action item to automatically populate with the contents of one or more fields from different action items.
For information on how you can use this function to run escalation rules on action items, see Run Escalation Rules on Workflow Action Items.
- Select the workflow tab with the action item to take data from. You may only choose the current workflow tab or a workflow tab that precedes it.
- From the selected workflow tab, choose a previous action item to take data from or push data to. If you have chosen the current workflow tab, you can only choose action items that precede the current action item.
- Select the field whose value you would like to copy or change.
- Select if you want to pull data from the external field to the local field (
 ), or if you want to push data from the local field back to the external field
( ).
). - Choose the local field in the current action item that you want to populate or copy from.
- From the Polulation Method drop-down, select one of the following methods to populate the data in the selected field:
- Overwrite - Replaces the value of the target field with the value of the selected field.
- Append - Adds the content of the selected field, to the content of the target field.
- Overwrite if not completed - Replaces the value of the field with the value of the field you selected only when this action item is not marked as completed.
- Append if not completed - Adds the value of the selected field, to the value of the target field only when this action item is not marked as completed.
- From the Population Trigger drop-down, select one of the following event triggers to automatically populate the specified field:
- SR Update - The field populates every time any update anywhere in the SR is saved.
- Action Item Update - The field populates every time an update in this action item is saved.
- Action Item Activated - The field populates when this action item is activated or reactivated.
- Action Item Completed - The field populates when this action item is completed.
- Repeat steps 1 -7 as necessary.
- Click Save.
Make sure to go through each of your action items and set the appropriate attributes. You may edit these dependencies if you like.
6 Write instructions and prepopulate fields on the workflow tabs
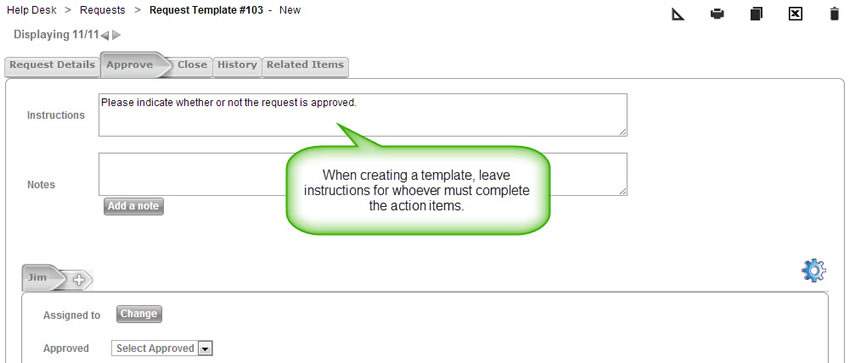
Now that you've created the complete request fulfillment process and workflow that you need for your template, it's time to add the finishing touches. Any values you enter into the template fields will be prepopulated when a request is created from that template. Go through your new workflow tabs and action items and write down any necessary instructions in the text fields, and enter any other default field values. When you are finished, click OK/Apply. Your request template is now ready to be used.
Leaving instructions on an action item