Click on the tab you would like instructions for:

General note: All notifications mentioned on this page refer to notifications created under Settings > Monitoring > Notifications.
General Details
This tab shows general details for your monitoring configuration, including the name of the asset and any connected template. It also allows you to enable or disable monitoring for the asset.
Monitoring data is reported to the asset's designated Remote Discovery Service every five minutes.
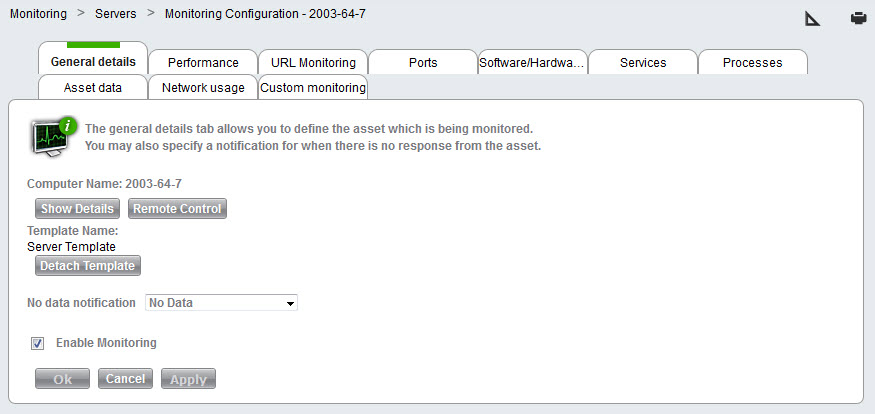
Create a new monitoring configuration
When you click  from the Monitoring Configuration list, the General Details tab is displayed.
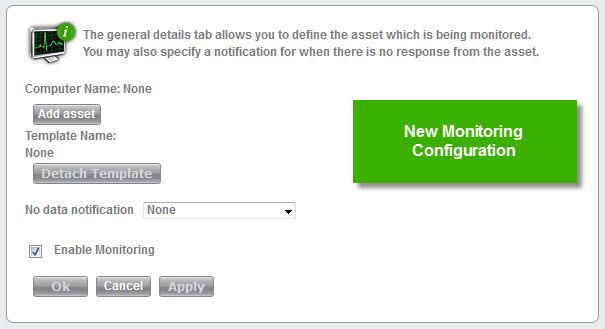
To select the asset for the monitoring configuration:
- Click Add asset.
- Select the asset you want to monitor.
- Click Apply.
You may now add monitoring rules to the asset using the various tabs on this page. See below, for further instructions.
General settings for a monitoring configuration
No data notification
Choose a notification from the list. If no data is received from the agent in the amount of time specified under Settings > Monitoring > Monitor Settings, SysAid sends the notification you specify here. Please note that this notification also runs on computers that have been turned off, so it's usually best to use this notification only for computers that are always on (such as servers).
Detach template
If this monitoring configuration was created from a template, the attached template is displayed here. Note that you can't change any monitoring rules on an asset that's connected to a template. If you would like to make changes, you must either change the template itself or detach the template by clicking Detach Template.
Enable monitoring
If this is selected, monitoring is enabled for this asset. If unchecked, all monitoring configurations are disabled.
Performance
Under this tab you can configure four different monitoring tests: hard disk (HD) usage, Central Processing Unit (CPU) usage, memory usage, and memory in use/RAM ratio.

To add a new performance rule
- Select the test you wish to configure for this asset from the Description drop-down menu.
- Enter values for the warning and the error thresholds. If a threshold is passed, SysAid sends the corresponding notification.
- Click Add.
- Repeat steps 1 - 3 for each monitoring rule you would like to add here.
- Once you've added all the performance rules you need, click Apply.
Below is an explanation of each of the performance monitoring tests (all thresholds are in %):
- Hard Disk Usage - Use this test to receive a notification if you exceed your specified threshold for hard disk usage.
- CPU Usage - Use this test to receive a notification if CPU usage exceeds your specified threshold.
- Memory Usage - Use this test to receive a notification if total RAM usage exceeds your specified threshold.
- Memory in Use/RAM Ratio - This test calculates (total RAM usage + total page file usage) / (total available RAM). Use this test to receive a notification if the calculated ratio exceeds your specified threshold.
To edit a rule
- Click
 .
. - Make any desired changes.
- Click Save.
To delete a rule
- Click
 .
. - When prompted, click OK.
URL Monitoring
The URL Monitoring tab allows you to monitor the availability of any web page or web application accessible to the SysAid Server. You will be notified if the web page/web app is unavailable.

To monitor a particular URL:
- In the URL field, enter the URL of the web page or web app to be monitored.
- In the Search for String field, enter a string that can be found in the html source code of the web app home page or web page.
- Select an error notification from the drop-down list.
- Click Add to save your URL monitoring rule.
Once you've added all the URL monitoring rules you need, click Apply.
Ports
This tab allows you to create rules for monitoring communication ports. All port testing is performed directly from the asset's designated Remote Discovery Service.
Monitoring of ports is available for servers and network devices only.
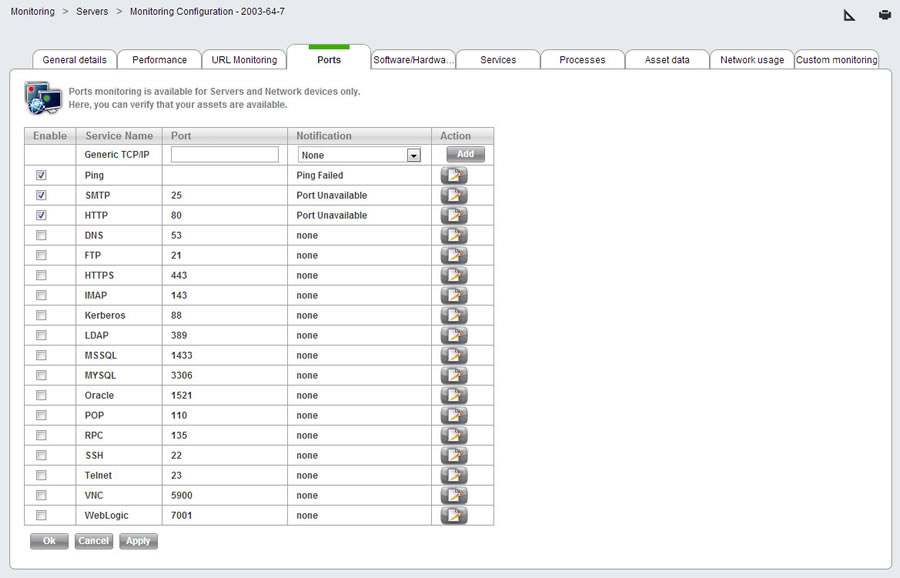
Activating a predefined port monitor
For ease of configuration, a number of commonly used ports are already included on this page. To begin monitoring one of these ports:
- Check the Enable box next to the desired port.
- Click
 .
. - Select a notification from the Notification drop-down list and click Save.
- Click OK/Apply.
Creating a new port monitor
You may monitor any port for the chosen asset. To monitor a port that's not already in the list
- In the Port field, insert the number of the port for which you wish to check availability.
- Select an error notification from the Notification drop-down list.
- Click Add to save your Generic TCP/IP monitoring rule.
Ping testing
You may perform a ping test on this asset. The Ping test pings the monitored asset three times. If all three pings fail, the notification is triggered.
To enable ping testing for this asset, check the box next to Service Name Ping and click OK/Apply.
Software/Hardware Updates
This tab allows you to create rules that will tell you if changes to a specific hardware, software, or device type is detected on an asset.

To add a new software/hardware update rule:
- From the drop-down menu, select whether the test is for software, hardware, or device updates.
- For software, enter part or all of the install name for the software into the Filter field. If you are unsure of the install name, check the list of installed software on a computer with the software installed.
- For hardware, enter part or all of the device name into the Filter field.
- For device updates, select the Device Type from the drop-down filter.
- Choose an appropriate Error notification from the drop-down list.
- Click Add.
- Repeat steps 1 - 7 for all Software/Hardware update rules you need.
If a change is detected to software or hardware with a name matching the filter you enter, SysAid will send you the notification you specify. If a change is detected to a device of the type you've specified, SysAid will also send you a notification.
Example of software update detected: An employee installs iTunes onto their computer, and iTunes is not allowed by company policy. You receive a notification.
Example of device update detected: Somebody plugs in a removable storage device, which is not allowed by company policy. You receive a notification.
Once you've added all the Software/Hardware Update rules you need, click Apply.
Services
This tab allows you to monitor operating system services for a computer.
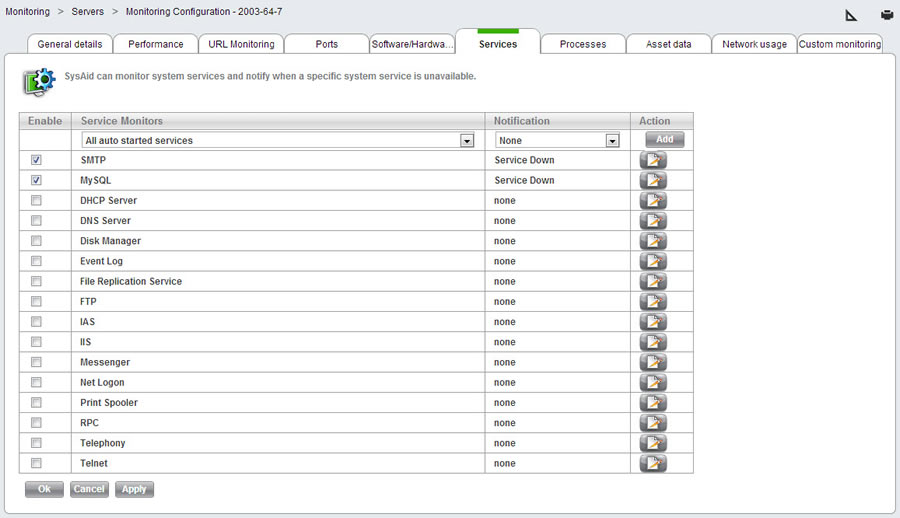
Activating a predefined service monitor
For ease of configuration, a number of commonly used services are already included on this page. To begin monitoring one of these services:
- Check the Enable box next to the desired service.
- Click
 .
. - Select a notification from the Notification drop-down list and click Save.
- Click OK/Apply.
Creating a new service monitor
Choose the name of the service you wish to monitor from the Service name drop-down menu, select an error notification, and click Add. If the service you've specified stops running, you'll be notified.
If you choose the Service name "All auto started services," SysAid will check to see that all services that should have started up when the computer booted did in fact start. You will be notified if anything failed to start correctly.
Once you've added all the Operating system services rules you need, click Apply.
Note: Workstation monitoring configurations allow only two Operating system services to be monitored at a time.
Processes
This tab allows you to monitor operating system processes for a computer. If you would like to monitor a process that is running but does not appear in the list, click Refresh List to reload the list of processes from the target computer.

Choose the name of the process you wish to monitor from the Process name drop-down menu, select an error notification, and click Add. If the process you've specified stops running, you'll be notified.
Once you've added all the Operating system process rules you need, click Apply.
Note: Workstation monitoring configurations allow only two Operating system processes to be monitored at a time.
Asset Data
This tab allows you to monitor the content of any asset field.

To monitor an asset field:
- Click Select Field. This opens the Expression Builder.
- Specify a condition using the Expression Builder. If at any time this condition is found in the monitored asset, the notification is triggered.
- Choose an appropriate Error notification from the drop-down list.
- Click Add.
- Repeat steps 1 - 4 for all fields on the asset that you want to monitor.
Example: The IP address of a particular workstation is 10.1.10.27. You can create a monitoring rule that will notify you if at any time the IP address changes to something else, letting you know that the computer was moved.
Other uses include monitoring fields imported from SNMP, as these can dynamically update when you perform an SNMP scan.
Once you've added all the Asset data rules you need, click Apply.
Network Usage
This tab allows you to monitor incoming and outgoing data rates for a particular network adapter on one of your assets. If the incoming or outgoing rates exceed the specified threshold, SysAid sends a notification. The list of Adapter Names is automatically populated after the SysAid agent is installed on a computer.

To create a network activity rule:
- Choose the network adapter to monitor from the Adapter Name drop-down list.
- Enter an incoming data rate threshold and an outgoing data rate threshold. Incoming and outgoing data rates represent the amount of data received or sent by the network adapter.
- Choose an appropriate Error notification from the drop-down list.
- Click Add.
- Repeat steps 1 - 4 for all network adapters that you want to monitor.
Once you've added all the Asset data rules you need, click Apply.
Custom Monitoring
This tab allows you to import into SysAid the results of any monitoring scripts that you write.

Customized monitoring supports two types of monitoring tests: On/Off (Binary) and Graph (Float). If the Result Type is Graph (Float), you can view a graph of the data by clicking on the measurement from the Monitoring Configuration list.
An example of an On/Off test would be checking to see if a certain custom application is running. An example of a Graph test would be charting the amount of free memory a computer has at any given time. See below for a sample script.
Important : The script your write should return only one line with only one number. If you have chosen a binary result, the number should be 0 or 1 . If you've chosen a float result, the result can be any number. SysAid will take the number and automatically build a table of the results.
To create a new custom monitoring configuration
- Write the monitoring script that you would like to run.
- Log in to the computer that you will be monitoring.
- Open the SysAid Agent directory. By default, this is C:\Program Files\SysAid\scripts. If you are running RedHat, the default the path is /usr/lib64/SysAid/CustomScripts/.
- Create a new folder within this directory called scripts. Please make sure to use this exact spelling.
- Put your script into this folder.
- Open SysAid and go to Assets > Monitoring > Workstations/Servers > Customized.
- Choose theResult Type for your data (Float/Binary).
- Give your monitoring configuration a name using the Description field.
- Enter the script file name in the Script File Name field. No path information is required, as SysAid will only search in the scripts directory you've created.
- Input any applicable warning or error thresholds, and choose your desired notification(s).
- Click Add.
- Click Apply/OK.
Sample custom monitoring script (freemem.vbs)
strComputer = "."
Set objWMIService = GetObject("winmgmts:" _
    & "{impersonationLevel=impersonate}!\\" _
    & strComputer & "\root\cimv2")
Set colSettings = objWMIService.ExecQuery _
    ("Select * from Win32_OperatingSystem")
freemem = 0
For Each objOperatingSystem in colSettings
    freemem = freemem + objOperatingSystem.FreePhysicalMemory
Next


Set objFSO = CreateObject("Scripting.FileSystemObject")
Set objFSO = objFSO.CreateTextFile("c:\Program Files\SysAid\scripts\freemem.dat", True)
objFSO.Write freemem
objFSO.Close
Notice that as part of the script, you must use a .dat file to store the results of the script. Please make sure that the .dat file you use has the same name as the script file.
Traps
A trap is a message sent by an SNMP device that has not been requested first by the SysAid Server. This tab allows you to manage the notifications you receive when one of your SNMP devices sends you a trap.
Note: By default, this tab only appears on the Network Devices configurations page. However, it can be added to servers or workstations by clicking ![]() .
.
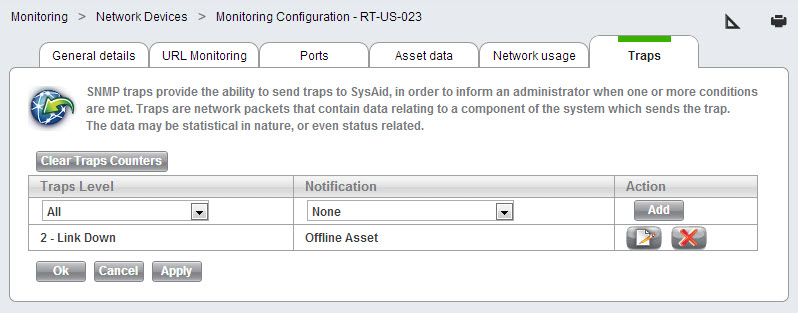
These traps can generate the following types of data:
Cold Start
The SNMP device has reinitialized itself and its configuration may have changed.
Warm Start
The SNMP device has reinitialized itself and its configuration has not changed.
Link Down
One of the communication links in the SNMP device goes down.
Link Up
One of the communication links in the SNMP device that was down is no longer down.
Authentication Failure
The SNMP device received a request from a source that couldn't be properly authenticated.
EGP Neighbor Loss
An EGP (Exterior Gateway Protocol) peer of the SNMP device has gone down and can no longer be reached.
Enterprise Specific
A condition or error specific to the individual SNMP device.
To create notifications for traps received from an SNMP device:
- Choose the desired Traps Level. If you would like to receive notifications for all traps, select All.
- Choose an appropriate Error notification from the drop-down list.
- Click Add.
- Repeat steps 1 - 3 for all trap levels that you want to receive notifications for..
Once you've added all the trap notifications you need, click Apply.