Introduction
Welcome to SysAid My Desktop! My Desktop allows your end users to access computers on your network easily from wherever they are. With SysAid My Desktop, there's no need to configure a VPN connection or to install a client-- all an end user needs to get started is an internet connection and their SysAid username and password. End users can even use My Desktop from their smart phones! As an IT administrator, you choose which computers each end user can access so that there won't be any surprises.
Examples using SysAid My Desktop
How can your company benefit from My Desktop? Here are two examples:
Example 1
A project manager and her family go to stay with her parents for a weekend. On Sunday, she gets an urgent phone call from a customer regarding one of her projects. From her parents' computer, she's able to log into her work computer using My Desktop and email the customer a particular PowerPoint presentation that they desperately need for Monday morning.
Example 2
One of the managers in the finance department goes on vacation in South America. He does a three day trek and has no regular internet access. One night, he stops in a small village where he is able to log in and check his email from his smart phone. One email catches his attention as critical, and he needs an application on his work computer in order to provide an answer. He logs into his computer using My Desktop, opens the application, and after about 15 minutes of work, answers the email with the required information.
Granting permission for My Desktop
Administrators must have permission to access the admin portions of My Desktop. You may grant administrator permissions under Tools > User Management > Administrators > (open an individual admin's profile) > Permissions (tab). Check the box Manage My Desktop to give access to the My Desktop module.
Note: You do not need permission in order to perform a My Desktop session from the Self-Service Portal.
Enabling My Desktop
Before your end users begin using My Desktop, you must enable it. To enable My Desktop:
- Go to Assets > My Desktop > Main.
- Click the checkbox Enable My Desktop found at the bottom of the page.
- Click Save.
You may also allow your end users to log into My Desktop from anywhere in your company website. SysAid includes HTML that you can insert anywhere in your website that allows users to log in directly to My Desktop and begin controlling a computer remotely. You can find this HTML script under Assets > My Desktop > Main.
Registering Users and Assigning Assets
End users must be registered on computers* before they can use My Desktop. As an IT administrator, you choose which computers each end user can access. Note that a computer must be running the SysAid Agent in order for a user to control it using My Desktop.
Note on the usage of "registered on" and "assigned to": If you register a user on a computer, the computer is assigned to that user. If you assign a computer to a user, the user is registered on that computer.
There are several ways to register users on computers.
Registering a single user on one or more computers
You can register an individual user on one or more computers from that user's profile.
- Go to Tools > User Management > Administrators/End Users > Open an individual admin/end user profile.
- Open the My Desktop tab.
- Click
 . This opens the Select Asset list where you can select your desired computers.
 - Select the desired computers using the checkboxes at the left end of each row and click Select. This closes the Select Asset list and registers the user on all selected computers.
The end user can now connect to any of the selected computers using My Desktop.
Assigning a single computer to one or more users
You can assign a single computer to multiple users at once from that computer's profile.
- Go to Assets > Asset Management > Asset List > Open an individual computer profile.
- Open the Access List tab.
- Click
 . This opens the Select Users list where you can select your desired users.
 - Select the desired users using the checkboxes at the left end of each row and click Select. This closes the Select Users list and assigns the asset to all selected users.
Any of the selected end users can now connect to the assigned computer using My Desktop.
Registering users with Auto-Match
You can automatically register end users on their associated computers using Auto-Match. Please read the next section for more information about this feature.
Un-registering users and un-assigning assets
In any list that allows you to register users or assign assets, you may remove a user or asset from the list. To do so:
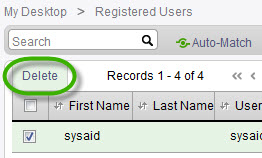
- Select the appropriate user or asset using the tickbox at the left end of the row. This shows the Action Item menu.
- Click Delete on the Action Item menu. This un-registers the user or un-assigns the asset.

Important: If you delete a user under Assets > My Desktop > Registered Users, you un-register that user from all assets. If you delete an asset under Assets > My Desktop > Accessible Assets, you un-assign that asset from all users.
Using Auto-Match
If your organization has many users who can benefit from My Desktop, the process of registering them all on the correct computers can take some time. The Auto-Match feature allows you to quickly and easily register your users on the computers they use the most.
How does Auto-Match work?
Auto-Match uses a simple algorithm to match users to the assets they use the most. This algorithm has two steps:
- Any user that appears in the Owner field on a computer is registered on that computer.
- For each computer, SysAid counts the last 30 login records. The user that appears the most in those records is then registered on that computer.
You can run Auto-Match from the following locations in SysAid. Each place has a slightly different effect:
| Location | Effect |
|---|---|
| Assets > My Desktop > Registered Users | Searches through all users and assets to register all users on the appropriate assets |
| Assets > My Desktop > Assigned Assets | Searches through all assets and assigns them to the appropriate users |
| The My Desktop tab on any user's profile | Searches for all assets appropriate for the selected user |
| The Access List tab on any asset's (computer's) profile | Searches for all users relevant to the selected asset |
Using Auto-Match
You can use Auto-Match from any of the four locations listed in the chart above. To use Auto-Match:
- Navigate to the desired location (refer to the chart above).
- Click the Auto-Match button. This runs the Auto-Match algorithm.
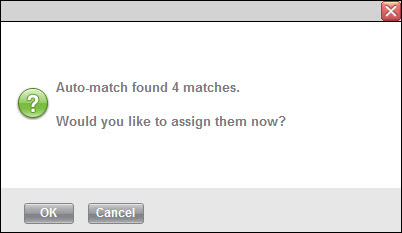
- Auto-Match displays the number of matches found. Click OK to accept these matches and complete the Auto-Match process.

The list you've run Auto-Match from now shows you the appropriate registered users or assigned assets. Be sure to review the results of Auto-Match to make sure that all matches are acceptable. You may now register any users or assign any assets that Auto-Match did not match.
Using My Desktop
Initiating a My Desktop session
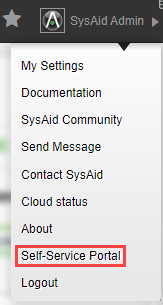
End users access My Desktop from the Self-Service Portal. Administrators who want to use My Desktop may also do so from the Self-Service Portal . An administrator can access the Self-Service Portal by clicking My Menu > End user Portal on the Navigation Bar.
Administrator access to the Self-Service Portal
Helping end users with error messages
There may be times when end users tell you that they are unable to use My Desktop and ask for your help. The following are the most common reasons that a My Desktop session is not successful, and what you can do to fix the problem.
| Reason that end user can't use My Desktop | How to solve the problem |
|---|---|
Desired computer is showing the offline icon . This can be for several reasons: . This can be for several reasons: | |
| You must upgrade the Agent on the target computer to version 8.5 or above. |
| You have registered the user on an asset whose source is not "Agent". If this is a computer, you must install the Agent. If this is not a computer, it's recommended to unregister the user from the asset to avoid further confusion. |
| You must make sure that the Agent is running on the target computer. The most common reason for the Agent to be offline is because the computer is off. Alternatively, the Agent may have been disabled manually. |
| All My Desktop licenses in use | Either the end user must wait for an active My Desktop session to end or you can manually terminate any active My Desktop session (see details in the next section). |
| Browser does not support HTML 5 | The end user must open My Desktop in a browser that supports HTML 5, such as IE9 or Chrome. If the end user does not have such a browser installed, you must help the end user install one. |
Viewing and terminating active My Desktop sessions
Go to Assets > My Desktop > Active Sessions to view a list of all active My Desktop sessions. This page shows you information about each active session, such as who initiated it, the source computer, and the target computer. You may also manually terminate any active session. For more information, please go here.
Please use caution when terminating an active session, as it could frustrate the affected end user.