You can now perform Service Record Actions in Spaces — Convert SRs, Duplicate, Archive, Create Related Items, and export for printing
Learn how to perform these actions in Spaces
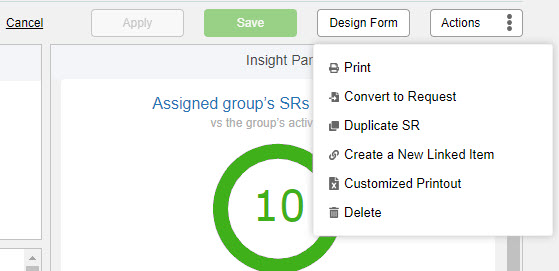
There are several actions that you can perform on a service record using the “Actions” dropdown menu in the top right of the Service Record Header:

Service Record Form Customization
SysAdmins can customize Service Record Forms by clicking “Design Form”
Learn more
Print to PDF
Click Print the SR form to PDF.
Convert an Incident to a Request
When this option is enabled in the Service Desk settings, you can convert an incident to a request and a request to an incident.
In the Incident form, click Convert to Request /Convert to Incident. SysAid converts the incident to a request, applies the associated workflow, and initiates the workflow as if the request had just been submitted.
If you want to revert the request back to an incident, click the option again. An alert appears, warning you of possible data loss. If you still want to revert the request back to an incident, click OK.
For instructions on how to simultaneously convert multiple service records in the list view, see Help Desk > All.
Duplicate
Sometimes it is convenient to duplicate a service record, for example, when two different departments need to work on the same issue.
Click Duplicate SR. An exact copy of the service record is created.
Notes:
Save your service record before you duplicate it.
The message log is not duplicated, so copy any important correspondences into one of the Notes fields before duplicating the service records.
Activities are not duplicated, so copy any important notes into one of the Notes fields before duplicating the service record.
Delete
Click Delete to delete the ticket. You must have permission to purge service records for this icon to be visible.
Archive
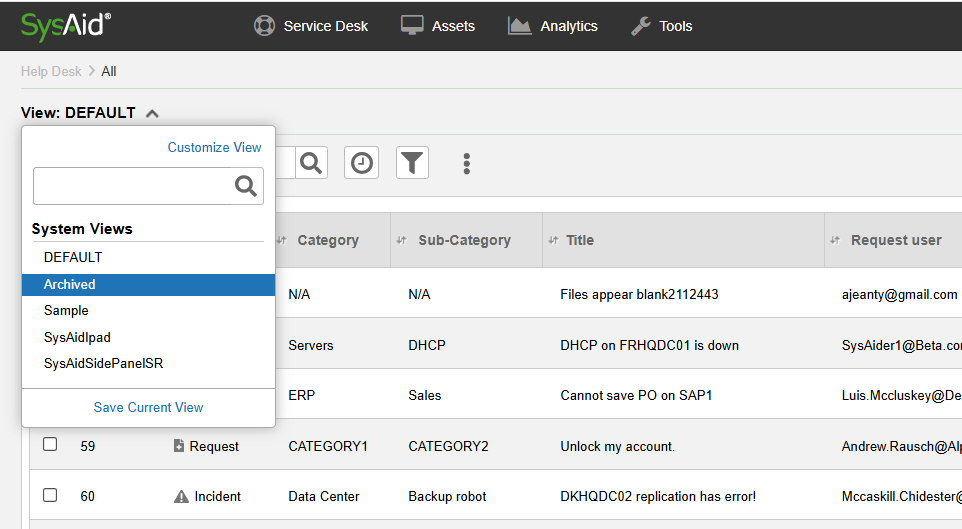
It can be helpful to archive old tickets so that they no longer appear in your Service Desk work queues. Once archived, a ticket may no longer be modified by anybody in any way. Additionally, an archived service record only appears in the Service Desk list if you are using a view that shows archived records (see Customize Lists ).
SysAid automatically archives tickets that have not been updated for 12 months or more. This applies to all closed, and deleted tickets of all types, as well as open Incident tickets.
To archive a ticket
Select the ticket or tickets you wish to archive from the queue view.
Click the 3-dot menu at the top of the queue.
Select More Actions.
Select Archive from the drop-down on the right side and Yes from the drop-down menu on the left side.
Click Save.
To restore an archived ticket
Change the view of the queue to Archived.

Select the ticket or tickets you’d like to restore to the active queue.
Click the 3-dot menu at the top of the queue.
Select More Actions.
Select Archive from the drop-down on the right side and No from the drop-down menu on the left side.
Click Save.
Note:
The Archive button is only available for Service Records whose Status Class = “Closed”
Create a Related Item
Service records are frequently related to other components of the helpdesk. These other components could include tasks, projects, Knowledge Base items, and more. From within a service record, SysAid allows you to create a new item which is linked to the SR you are looking at. After the new linked item is saved, it appears in the Related Items list.
Click Create a New Linked Item.
Select the appropriate type of linked item.
Select whether the current item caused the new linked item, was caused by the new linked item, or neither. If you have selected an incident, request, change, or problem, you must select the desired template.
Note : When creating a new linked item from an incident, only request, change, or problem templates with the same category as the incident or without a category are available in the list.Click Create New to create the new linked item.
SysAid creates a new item of the selected type, and this item is linked to the service record from which you created it. You may view and edit the relationships between linked items from the Related Items tab.
Create a Customized Printout
Click Customized Printout to create a customized printout of your ticket. For more information, see the Customized Printout tab.