As with any management process, Service Level Management involves two components: providing the service and measuring performance. You have already learned how to use SLAs to provide the service you require. The following sections explain how SysAid allows you to measure your performance against your SLAs. For a detailed explanation of any SysAid page referenced below, please click on the associated hyperlink.
Measuring Service Levels
Measuring service levels in SysAid involves creating data lists and then specifying the measurements to be performed on those lists. As this is a multi-step process, we will walk through one of SysAid's predefined measurement so that you can see how everything ties together. In our example, we will assume that our company has one SLA for everybody.
Choosing a measurement
The first thing we must do is choose a component of our SLA to measure. Let's say that our SLA specifies that we must have a technician review all new incident service records within 30 minutes of the time they're received. During this review process, the technician assures that the priority and category is correct, attaches any related asset or CI, and then changes the ticket status from New to Open. We now want to review all of our closed incidents and measure our compliance with this component of our SLA.
Start by going to Settings > SLA/SLM > Measurements. Here you will see a list of all the predefined measurements that come with SysAid, as well as any others you may have added. Click on the Average time to respond measurement.

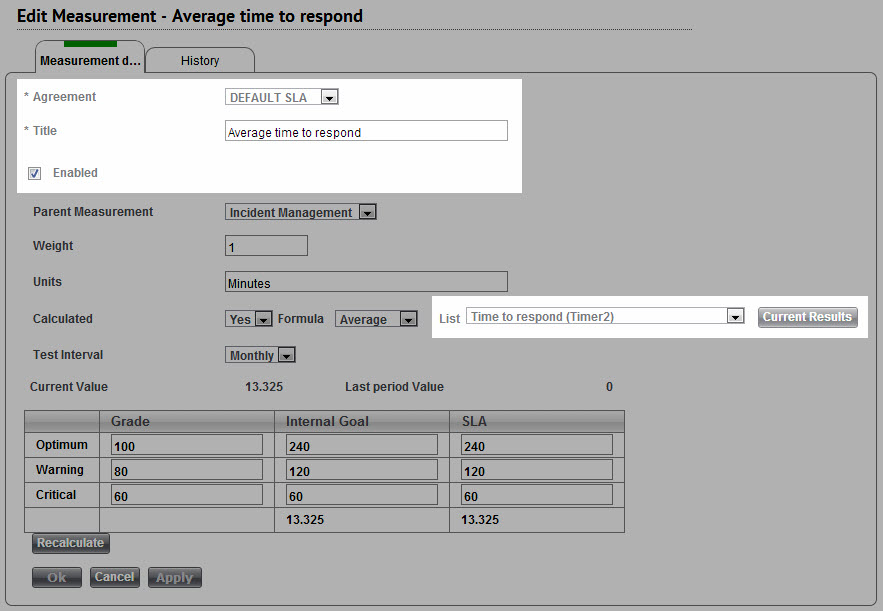
You will now be at the Edit Measurement screen with the Average time to respond measurement open. As you can see in the screenshot below, this predefined measurement is already titled, enabled, and attached to the Default SLA. The first thing we need to do is to create a data set, called a Measurement list, which will reflect what we are looking to measure.

Defining a data set to measure
As you recall, we've decided to measure the time it takes for technicians to first review new service records. How can this be accomplished? Note that the final step of this review process is to change the service record status from New to Open. If you remember, SysAid has timers that can track the amount of time a ticket spends in any given status (or combination of statuses). One of the default SysAid timers is Time to respond (Status = New). Therefore, the time the service record has spent in status New (before the technician changed it to open ) has already been measured for you! When the technician changes the status from New to Open at the end of his initial review, it will stop the timer, giving you exactly the data you need. All that's left to do is to create a list that will pull the Time to respond from all of your service records. Fortunately, this list has already been created for you. Let's take a look at it now.
Go now to Settings > SLA/SLM > Measurement Lists. Click on the Time to respond list.

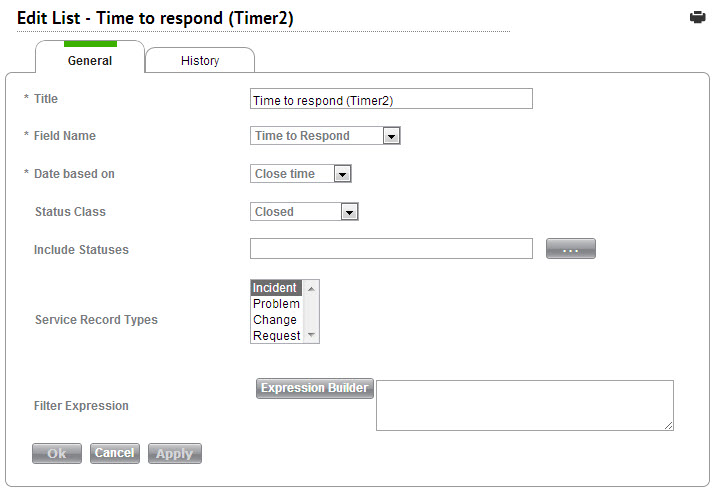
You should now be looking at the edit screen for the Time to respond list (see screenshot below). As you can see, this screen allows you to choose the data to report on.
We decided that the Time to respond timer would have the data we need, so we've chosen that database field. For reporting, we want to see results for closed tickets, so we've chosen reporting date based on Close time and service record status class Closed. We want the report to run on all tickets with a closed status class, so there is no need to list specific statuses. Lastly, this specific SLA applies only to incidents. If it were necessary, the Expression Builder could be used to filter the data even further, but in our example it's not necessary.

You now have a list of all data values from the Time to respond timer for closed incidents. Return now to the Average time to respond measurement we looked at above.
Configuring a measurement
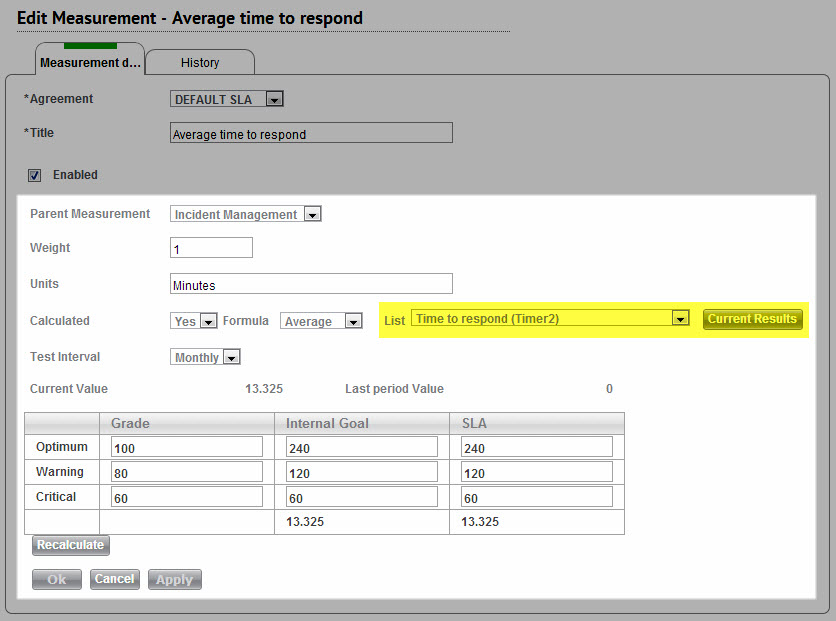
As you can see, you now have a list available to run measurements on. The question now is which calculation to use. For measuring overall technician response time, it makes the most sense to use an average, so that's what we've chosen. Timers report their values in minutes, so the units listed is Minutes. We would like to see results on a monthly basis, so we've chosen Monthly for our test interval. Parent measurement and weight affect overall reporting and are covered more in-depth on the measurement edit page.
At this point, you can hit the recalculate button. If you have any closed service records in your SysAid**, you will see the average time to respond listed here in minutes (values will be calculated automatically once a day, so there's no need to use this button on a regular basis). Congratulations! You've now measured your helpdesk time to respond, as indicated by the amount of time your incident service records spend in status New. All that remains is to measure this value against your SLA.
Only service records created after you added the SLA/SLM module to your SysAid have an attached agreement and are included in measurements.

Measurements Vs. SLAs and internal goals
Let's recall now that our SLA specified that time to respond should be 30 minutes or less. In addition to our SLA, we also have an internal goal used to motivate performance. Our internal goal is time to respond of 15 minutes.
As you can see in the screenshot above, SysAid gives you three columns for you to record your SLA performance, your internal goals, and the corresponding grades. The SLA column should have values that correspond to your SLA, such as optimum time of 30 minutes, warning time of 40 minutes, and critical time of 50 minutes. The internal goals column will have similar figures, although they should be more aggressive to motivate performance (e.g. 15 minutes, 25 minutes, 35 minutes). The grade column simply has a percentage grade corresponding to the internal goal or SLA on that line. A measurement that falls between two of the listed values (e.g. average time to respond of 35 minutes) will fall somewhere between the two corresponding grades. Your current grade is on the fourth line of the chart.
Service Level Management
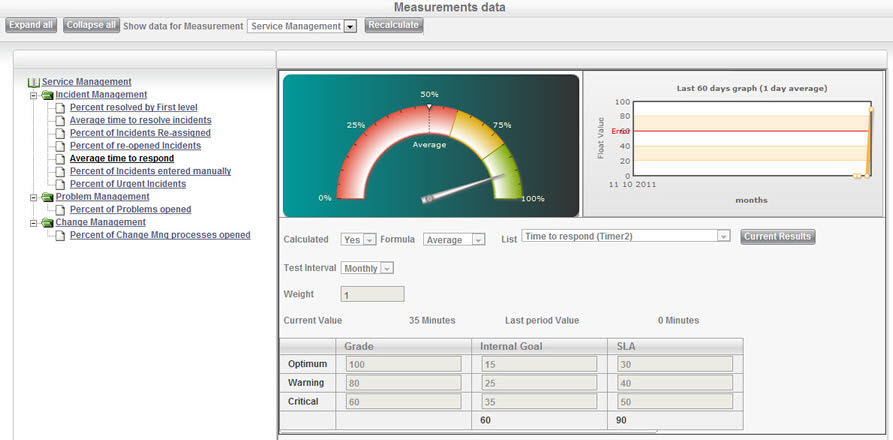
Now that we've configured the measurement and put in appropriate SLA and internal goal values, SysAid will automatically measure your helpdesk performance versus your SLAs and give you a grade based upon your result. Let's take a step back now, and remember that we've configured only one measurement to measure one element of your SLA. In your company, you will likely have many components of your SLA, such as time to repair (time from when a ticket is opened to when it's closed), percentage of tickets resolved by first level support (should be high!), and more. Go now to Analytics > SLA/SLM > Service Management, and you will see the Service Management Dashboard.
Here, you can quickly and easily go through your different measurements to see individual performances against your SLA and internal goals, and to look for problems or exemplary performance. You can also click on a parent folder to see average performance of all measurements within. In short, SysAid gives you the ability to easily measure SLA performance against all individual components of your SLA, and against your SLA as a whole. You now have at your fingertips the information you need to maintain service level excellence.

This walk-through was designed to be an overview of measuring SLA performance in SysAid. For specific details about all features and options on each of the pages shown above, please see their individual help pages in the help files.