If this is your first time using the SLA/SLM module, it's recommended to read the help files in the order specified in the How to use these help files section.
Defining SLAs
The following series of tabs allow you to build your service level agreement according to your required specifications. Depending upon your specific SLA, you may or may not need to configure each of these tabs. Read below to find a short description of each tab followed by instructions for configuring that tab.
After you have finished configuring your SLAs as described below, make sure you have attached your users and companies to the appropriate SLA as described in Creating and modifying SLAs. You're then ready to configure measurements so you can track your SLA performance.
Details
This tab allows you to give your SLA a name, or to modify the name of an existing SLA. Click OK or Apply after entering the new agreement name.

Routing Rules
Routing rules allow you to have specific service records automatically assigned to administrators or admin groups without having to even look at them. This is useful in cases where you know in advance who will work on a specific service record.
Routing can be based on:
Company : This is the company the request user of the service record belongs to.
User group : This is the user group the request user of the service record belongs to.
Category : This is the category of the service record.
You can route to administrators and/or administrator groups.
Note : Under Settings > Service Desk > General, there is an option to Reroute Service Records, based on routing rules, when the details of the request change. If this option is checked, then any time either the category or request user of a service record changes, routing rules are applied again.

To create a new routing rule:
- Select whether the rule is enabled or not using the check box. If a rule is disabled, it has no effect.
- Select the trigger for the rule (refer to list above for your choices).
- Select the desired administrator and/or administrator group.
- Click Add at the end of the row.
To modify a rule:
- Click
 . The line you are modifying becomes active allowing you to make changes, and the icons change to Save and Cancel.
 - Make any necessary changes. To save the changes, click Save. To discard changes without saving, click Cancel.
To delete a rule, click ![]() . Please note that there is no delete confirmation, so make sure you are certain you are deleting the correct line.
. Please note that there is no delete confirmation, so make sure you are certain you are deleting the correct line.
Priorities
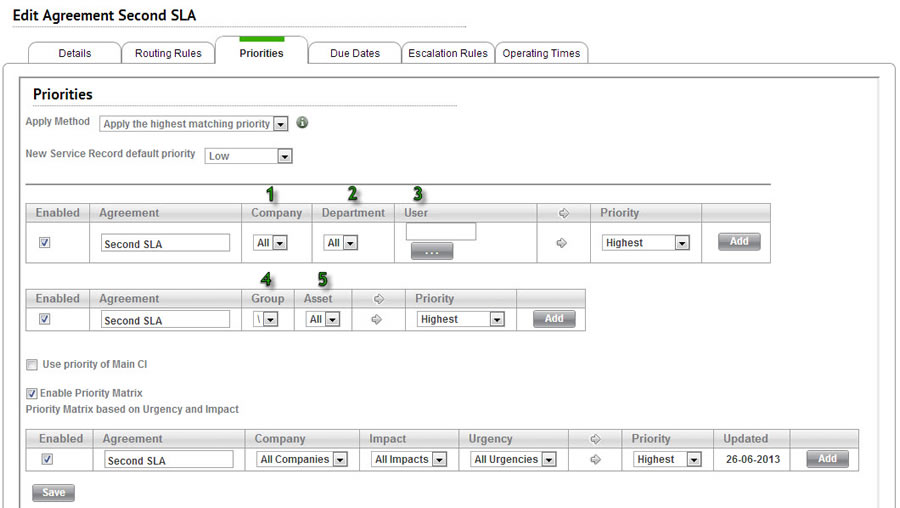
The priorities tab allows you to specify certain conditions under which a service record receives a priority other than the helpdesk default priority. You may create a priority rule based upon:
(See screenshot for corresponding numbers)
- Company : Company is determined by request user
- Department (e.g. Finance): You can modify your list of departments from Customize > Customized Lists
- Individual user (e.g. your CEO)
- Asset group (e.g. servers): Asset groups can be configured under Asset Management.
- Individual asset (e.g. your mail server)

You can also use the Priority Matrix to specify priority. For more information about using the Priority Matrix, please go here . Please note that entries in the Priority Matrix only appear while editing an SLA if they are attached to the selected SLA; entries attached to all SLAs do not appear.
To create a new priority rule:
- Select whether the rule is enabled or not using the check box. If a rule is disabled, it has no effect.
- Select the trigger for the rule (refer to the list above for your choices).
- To select an individual user, click on the ellipses icon under the user field.
- This opens the select user screen, allowing you to choose a user.
- Select the desired priority. See customized lists for setting up your priorities. See below for an explanation of priority = urgency and similar options.
- Click Add at the end of the row.
To modify a rule:
- Click
 . The line you are modifying becomes active allowing you to make changes, and the icons change to Save and Cancel.
 - Make any necessary changes. To save the changes, click Save. To discard changes without saving, click Cancel.
To delete a rule, click ![]() . Please note that there is no delete confirmation, so make sure you are certain you are deleting the correct line.
. Please note that there is no delete confirmation, so make sure you are certain you are deleting the correct line.
Priority = Urgency, etc.
When setting up priority rules, you have the option to choose Priority = Urgency, Priority = Urgency + 1, Priority = Urgency -1, etc. As you remember, urgency is chosen by the end-user, so selecting one of these options means that the priority is also determined by the end-user. Keep in mind that Priority = Urgency + 1 results in a priority that is lower than urgency, and Priority = Urgency -1 results in a priority that is higher than urgency. Refer to the charts below for a visual representation of your options.
| Priority = Urgency | Priority = Urgency + 1 (priority is lower than urgency) | Priority = Urgency - 1 (priority is higher than urgency) | ||||||
| Urgency | = | Priority | Urgency | > | Priority | Urgency | < | Priority |
| Urgent | = | Highest | Urgent | = | Very High | Urgent | = | Highest |
| Very High | = | Very High | Very High | = | High | Very High | = | Highest |
| High | = | High | High | = | Normal | High | = | Very High |
| Normal | = | Normal | Normal | = | Low | Normal | = | High |
| Low | = | Low | Low | = | Low | Low | = | Normal |
These options behave in the same manner if you add or remove entries to your priority and urgency lists.
Due Dates
Due date rules automatically assign due dates to your service records. Any service record that matches all of the requirements in one of your due date rules automatically receives the due date you specify here.
Please note that the calculation of due dates is based on the operating times of the specific agreement (see operating times below). If, for example, a ticket is submitted with a due period of 6 hours, but there are only 3 hours of operating time left in the day, then the due date is 3 hours after the start of the next operating day.

To create a new due date rule:
- Select whether the rule is enabled or not using the check box. If a rule is disabled, it has no effect.
- Select the trigger for the rule. You can use any combination of category, urgency, priority, and company.
- Enter a due period in hours.
- Click Add at the end of the row.
To modify a rule:
- Click
 . The line you are modifying becomes active, allowing you to make changes, and the icons change to Save and Cancel.
 - Make any necessary changes. To save the changes, click Save. To discard changes without saving, click Cancel.
To delete a rule, click ![]() . Please note that there is no delete confirmation, so make sure you are certain you are deleting the correct line.
. Please note that there is no delete confirmation, so make sure you are certain you are deleting the correct line.
Escalation Rules
For a full description of escalation rules, please go here.
Operating Times
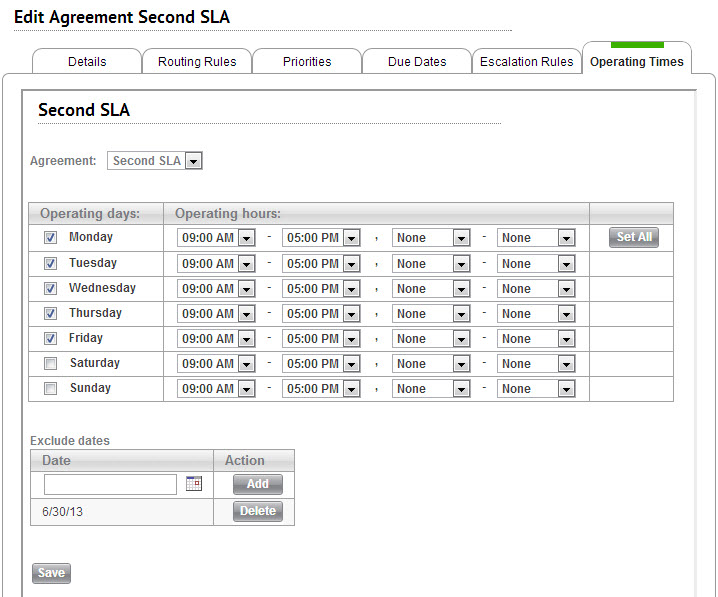
The SLA operating time configuration specifies the operating days and hours of the help desk for your SLA. Holidays can be specifically excluded. Due dates, escalation rules, and timers use these definitions.

Modifying an operating time configuration
- Choose the days and hours that your helpdesk operates for the currently selected company or SLA.
- You are allowed one break in the middle of the day, as denoted by the times before and after the comma.
- For ease of configuration, you can copy your operating times for Monday to all the other days of the week by clicking Set All.
- If your helpdesk is closed on any days of the week, you can uncheck the box next to that day so that timers won't run.
- The exclude dates list allows you to input any dates where you do not work your normal operating hours (such as a holiday). Click Add after inputting a date.
- Make sure to click Save when you are done saving your changes.
Related Items
The Linked Items table shows you a list of all items related to the agreement. Click on any item to open a new window with details for that item.
Items added to this table also appear in the Linked Items table for the related item. For example, if you add a company to the Linked Items table on an agreement, you will see the agreement in the Linked Items table for that company.
To add linked items:
- Select the type of item you would like to add using the Add a new link, of type drop-down list.
- Choose the dependency type of the linked item.
- Click Add. This opens a list of items of the selected type.
- From the list, select one or more items using the check boxes at the left end of the rows.
- Click Select to save the selected items. This closes the list and attaches the items.
To remove linked items:
- Select one or more linked items using the check boxes.
- Click Delete from the list actions.