Click on the tab you would like information for:
Also on this page: Available Fields for the CI Form
General Details
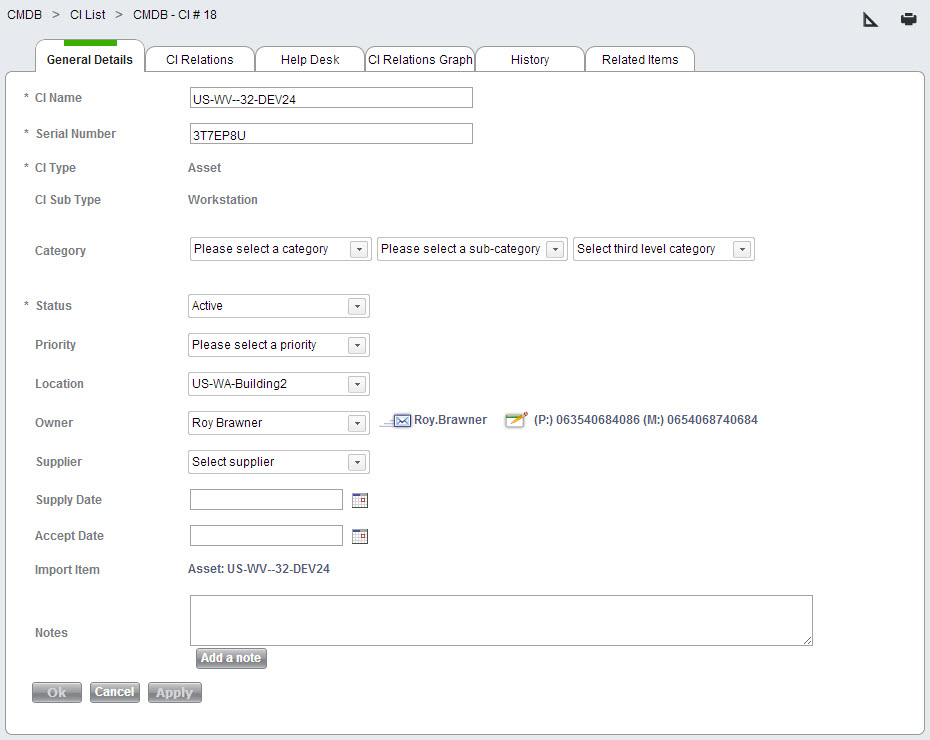
The General Details tab allows you to enter and view details about your CI.Use this page to keep track of any CI information that is relevant to your network map.
Because CIs can vary so greatly in type, the CI form allows you to create unique views for each CI Type and Sub Type. For example, a cell phone CI might have a drop-down list related to cell phone manufacturer, whereas a CI for a computer monitor might have an integer field with the monitor's size in inches.
In order to customize this form, click the design form ![]() icon. To learn more about designing different views, go here.
icon. To learn more about designing different views, go here.
Note: The user who appears in the Owner field will be able to select this CI when submitting a service record from the End-User Portal if your Submit Incident form contains the Main CI field.
CI Relations
Here you can view and create relations between the current CI and the other CIs in your network.

To see more details for the destination CI, you may click on its name.
To add CI relations:
- Select the relationship type you would like from the drop-down list.
- Click Add destination CIs. This opens the "Select a CI" window.
- Use the various filters to find the CIs you would like to attach. You can use the Show All option to show all CIs visible using the currently active filters.
- Click the tick box at the left end of each row that you would like to add. You can also click Toggle All to select all items that are currently visible.
- Click the Select button, found at the very bottom of the list. The "Select a CI" window closes and the relationships are created.
Note : If you have a lot of CIs and have clicked Show All, you might need to scroll down to find the Select button.
Help Desk
Here you can view a list of all the Service Records connected to this CI. For a service record to appear under this CI's Incidents tab, the SR must be connected to that CI. This can be done using the Main CI field on the SR form.
If you would like SysAid to automatically attach incidents to CIs, go to Settings > CMDB > Import Settings and check the box Automatically attach SR to the CI of its asset. After enabling this setting, any time an end user submits a service record with an attached asset, SysAid will attach the incident to the CI of that asset as well.

CI Relations Graph
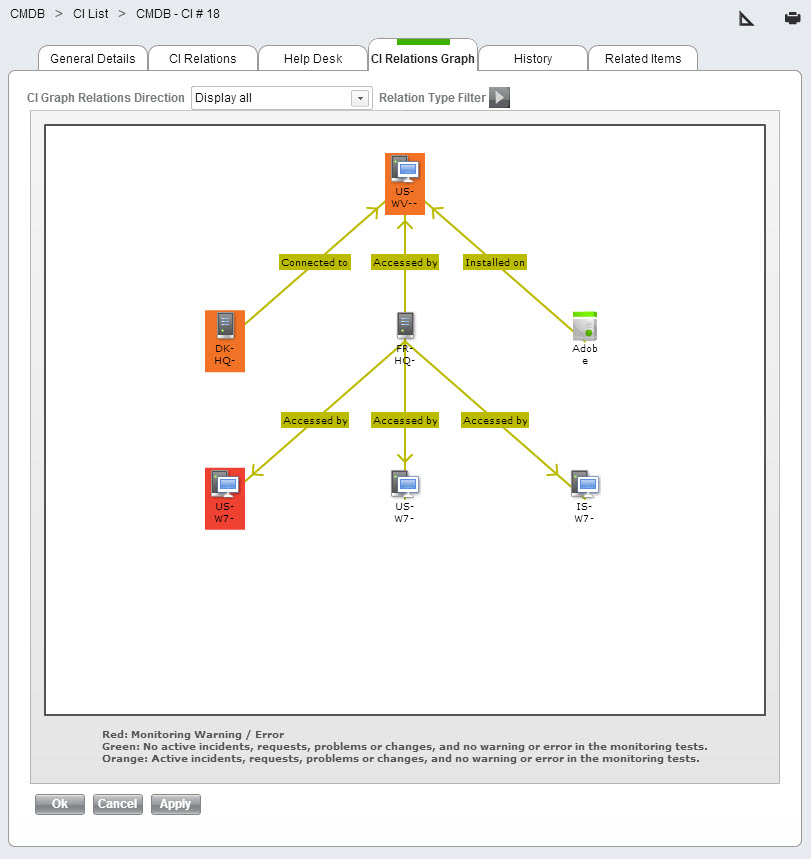
The CI Relations Graph shows you the connections between the currently viewed CI and other CIs on your network. Using the drop-down list, you can choose to view CI relationships affecting the CI, affected by the CI, or in both directions.
You may also use the Relation Type Filter to show only certain types of relationships in the graph. For example, if you want to see only software installed on a workstation, you would create a filter that shows only CIs connected by the Installed on/Contains SW relationship.

History
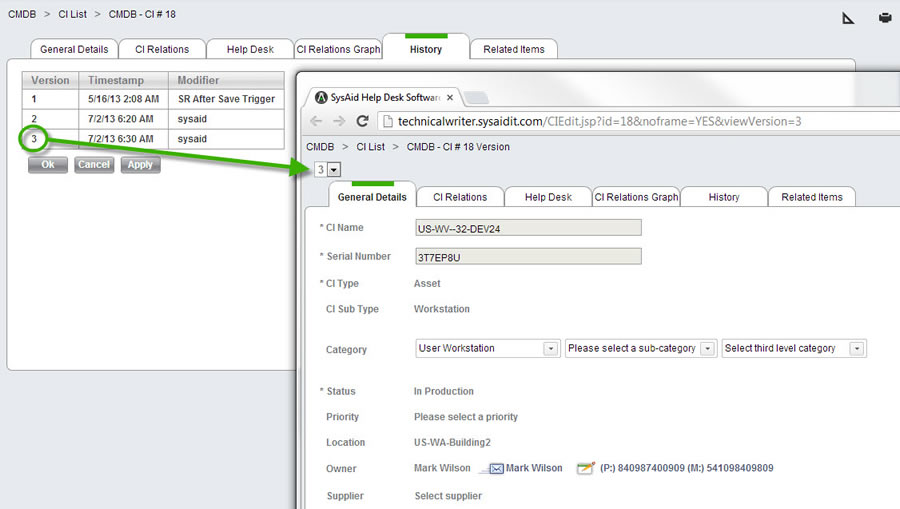
Here you can view a complete history of all changes made to the CI. Click on a version number to open a snapshot of how that CI looked in that version.

Related Items
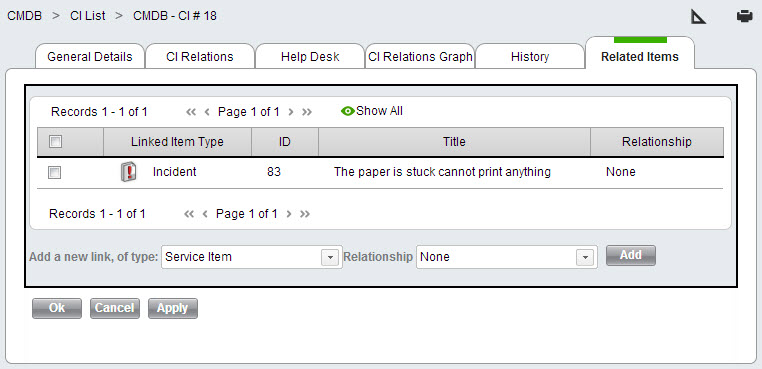
Under this tab you can create and manage relationships between this CI and other items on your Service Desk.

To manually add a new relationship:
- Select the type of item you would like to add using the Add a new link, of type drop-down list.
- Choose the dependencey type of the linked item.
- Click Add. This opens a list of items of the selected type.
- From the list, select one or more items using the check boxes at the left end of the rows.
- Click Select to save the selected items. This closes the list and attaches the items.
To remove linked items:
- Select one or more linked items using the check boxes.
- Click Delete from the list actions.
Note that linking to an SR here does not cause the SR to be listed on the Incidents tab. Only service records that list a CI as their Main CI appear on the Incidents tab.
Available fields for the CI form
You may see fields not listed below. They may be custom fields that were added to your system, or fields added by a third-party integration.
| Field Name | Description |
|---|---|
| Accept Date | The day the CI was accepted into inventory. |
| Attachments | Allows you to upload attachments to the CI. |
| CI Custom Date 1 - 50 | These date fields can be used to record any additional dates relevant to your CIs. You can rename these fields from Settings > Customize > Translation. |
| CI Custom Int 1 - 50 | These integer fields can be used to record any additional integer values relevant to your CIs. You can rename these fields from Settings > Customize > Translation. |
| CI Custom List 1 - 50 | These list fields can be used to record additional information relevant to your CIs. You can rename these fields from Settings > Customize > Translation. You can edit the lists from Settings > Customize > Lists. |
| CI Custom Long Text 1 - 50 | These fields can be used to record any additional notes relevant to your CIs. You can rename this field from Settings > Customize > Translation. |
| CI Custom Text 1 - 50 | These short text fields can be used to record any text relevant to your CIs. You can rename these fields from Settings > Customize > Translation. |
| CI Name | The name of your CI. |
| CI Relations | Allows you to view and build the relationships between this CI and other CIs in your CMDB. For more information, please see the CI Relations tab, above. |
| CI Relations Graph | Shows you a graph of the connections between the currently viewed CI and other CIs on your network. For more information, please see the CI Relations Graph tab, above. |
| CI Sub Type | The CI's sub type. Sub type determines which fields appear on the CI form. |
| CI Type | The CI's type. Type determines which fields appear on the CI form. |
| Category | The category of the CI. This is used for filtering purposes when selecting a service record's Main CI from the SR form. |
| Company | Allows you to attach a CI to a particular company. This is useful for reporting purposes, and it can also allow admins who are restricted to their company to access the CI. |
| History | Shows a history of all changes made to the CI. See the History tab above for further information. |
| Import Item | If the CI was imported to the CMDB automatically from an asset, software product, or catalog item, you will see a link to the associated item here. |
| Incidents | Shows a list of service records related to the currently viewed CI. This is a great place to check if the problem you are currently working on has ever previously happened to the device. |
| Links | Allows you to add links to websites, FTP, local/network storage, and Lotus Notes items that may be relevant to the CI. |
| Links to other Items | Shows you any service records linked to this CI. You can attach additional service records, if you like. If a CI is the Main CI for a service record (this can be selected on the SR form), then that SR appears in this list automatically. For more information, see the Related Items tab, above. |
| Location | The physical location of the CI. You can build this list yourself from Settings > Customize > Lists. |
| Notes | Allows you to record any notes relevant to the CI. |
| Owner | The person this CI belongs to. If you allow end users to attach their CIs to their SRs on the End-User Portal, whoever the owner is will be able to submit a service record for this CI. |
| Owner Group | Allows you to indicate that this CI belongs to a particular group of users. |
| Priority | Allows you to indicate how important the functioning of this CI is to the continued well-being of the company. |
| Serial Number | The CI's serial number, if it has one. |
| Status | Allows you to select a status to indicate the current state of the CI. The CI status list can be edited from Settings > Customize > Lists by selecting the CI Status list. |
| Supplier | The supplier you acquired the CI from. Suppliers can be set up under Assets > Asset Management > Supplier List. |
| Supply Date | The date you are supposed to receive the CI. The day you actually receive the CI is the Accept Date. |
| Users | Individuals registered as users of this CI. If the CI form appears on the Submit Incident form on the End-User Portal, whoever is listed as a user in this field will be able to submit a service record for this CI. |