Welcome to SysAid Cloud edition!
As SysAid's Cloud servers are not on the same network as the rest of your computers, there are several steps that you need to take in order to fully use SysAid's integration and asset management capabilities. The following short guide explains how to enable:
Incoming email integration
Exchange integration for syncing your SysAid Calendar to Outlook
LDAP/AD integration
Network scanning (SNMP, WMI) and Agent deployment for Asset Management
Required network access
To enable communication between the SysAid Cloud Edition servers and the computers on your network (Exchange server, LDAP server, etc.), you must grant access to your network. The first step in this process is determining which environment your SysAid account resides in. SysAid has cloud environments in the United States, Canada, Europe, Israel, Italy, and Australia.
Please note:
You can use the SysAid RDS to bridge communication between your LDAP server and the SysAid Cloud Edition Servers, eliminating the need to give access to your network on the LDAP ports.
To identify your SysAid account's Cloud environment:
Log in to SysAid.
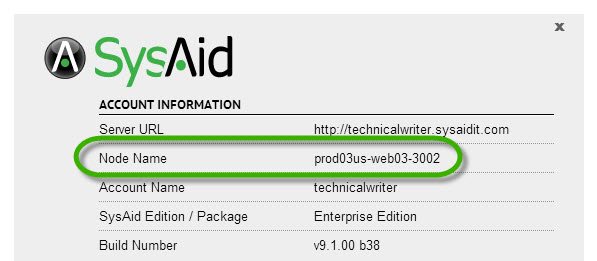
Click on your user name in the top right corner and select About.
Check the Node Name field. If the node name contains "us", your account is in the United States Cloud environment, "eu" is for the European Cloud environment, "il" is for the Israeli Cloud environment, "it" is for the Italian Cloud environment, and "au" is for the Australian Cloud environment.

Please note:
If you cannot determine which cloud environment your SysAid account is on, please allow communication from all cloud environments, or contact Customer Relations for assistance.
Now that you have determined which cloud environment your SysAid account is on, open your firewalls to the corresponding SysAid application servers (Last updated: May 2021)
United States (West) Cloud Environment |
|---|
54.68.189.242 |
54.68.28.126 |
52.24.33.109 |
52.26.255.228 |
54.69.19.240 |
54.69.121.146 |
52.25.48.210 |
52.24.100.226 |
52.25.217.9 |
54.69.231.77 |
54.189.202.152 |
34.215.216.35 |
52.10.217.71 |
45.136.240.0/22 |
2a0e:9dc0:7::/48 |
United States (East) Cloud Environment | |
|---|---|
Primary Data Center | 54.85.63.33 |
54.85.158.57 | |
54.85.61.137 | |
54.85.250.59 | |
54.85.33.107 | |
54.85.43.166 | |
54.86.65.25 | |
54.85.146.185 | |
35.171.43.198 | |
34.195.59.8 | |
54.156.214.132 | |
35.168.196.223 | |
54.86.41.2 | |
54.209.166.65 | |
34.235.193.43 | |
18.235.90.168 | |
52.206.11.186 | |
54.164.184.28 | |
52.7.196.90 | |
34.197.71.134 | |
52.7.18.143 | |
45.136.240.0/22 | |
2a0e:9dc0:4::/48 | |
Trial Data Center | 54.86.28.144 |
45.136.240.0/22 | |
2a0e:9dc0:4::/48 | |
Canadian Cloud Environment |
|---|
3.97.233.242 |
3.98.135.157 |
3.98.156.114 |
3.98.61.128 |
3.98.152.163 |
52.60.246.253 |
3.98.36.6 |
35.183.168.171 |
3.97.178.25 |
52.60.73.145 |
45.136.240.0/22 |
European Cloud Environment | |
|---|---|
Primary Data Center | 18.203.193.231 |
54.194.120.197 | |
54.194.152.168 | |
54.194.82.162 | |
54.229.87.79 | |
54.229.87.34 | |
34.249.83.117 | |
63.35.129.150 | |
63.35.31.184 | |
54.229.87.39 | |
45.136.240.0/22 | |
2a0e:9dc0:15::/48 | |
54.194.126.199 | |
52.210.224.240 | |
54.72.51.192 | |
Trial Data Center | 54.72.88.174 |
54.72.134.87 | |
45.136.240.0/22 | |
2a0e:9dc0:15::/48 | |
Italian Cloud Environment |
|---|
15.161.10.0 |
15.161.253.103 |
15.161.34.220 |
18.102.100.181 |
18.102.113.221 |
15.160.53.9 |
15.160.79.156 |
15.161.2.4 |
15.161.254.122 |
18.102.110.168 |
45.136.240.0/22 |
2a0e:9dc0:16::/48 |
Australian Cloud Environment |
|---|
54.206.46.146 |
54.206.54.103 |
54.206.49.244 |
52.65.115.230 |
3.104.87.102 |
54.153.183.46 |
54.206.131.76 |
54.252.98.194 |
54.253.132.119 |
13.237.28.69 |
54.206.43.60 |
45.136.240.0/22 |
2a0e:9dc0:13::/48 |
You only need to give access to your network on certain ports, depending on the integration you enable.
The relevant ports are as follows:
Unsecured Port | SSL Port | |
|---|---|---|
IMAP | 143 TCP | 993 |
POP3 | 110 TCP | 995 |
LDAP* | 389 TCP | 636 |
SSO (NTLM) | 139 and 445 | |
Once these hosts have been given access to your network, you can proceed with the SysAid Integrations described below.
Please note:
If your Firewall has outgoing traffic limits, open ports 80 and 443 to all public IP addresses.
Incoming Email Integration
The procedure for enabling incoming email integration with SysAid Cloud Edition depends on your Protocol.
Note that MAPI is not an option for Cloud. (Complete instructions for configuring SysAid email integration may be found here)
Go to Settings > Integration > Email and click Modify on the email address of your choice. This opens the Email Account page. Find the section for incoming Email Integration.
Note: While it's possible to use your SMTP server for outgoing emails, it's recommended that you use the SysAid server.
The SysAid server will send emails using the email address you specify in the Email address field at the top of the Email Account page.
IMAP/POP3 integration
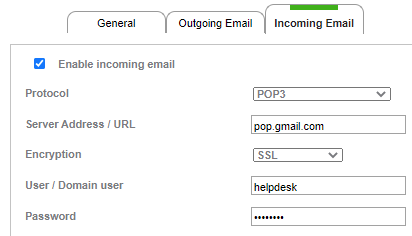
Choose either the IMAP or POP3 protocol. For IMAP or POP3 to work, you must ensure that the appropriate ports for your mail server are available from outside your network. You may choose how to do this, whether by using a DMZ, port forwarding, or any other method you choose.
The following are the default ports used by IMAP and POP3:
Type | Unsecured Port | SSL Port |
|---|---|---|
IMAP | 143 | 993 |
POP3 | 110 | 995 |
Once the appropriate port is accessible, enter the external IP address or hostname where your mail server is accessible in the Mail Server field.
Incoming email using POP3 (example using Gmail)
Exchange Integration for SysAid Calendar
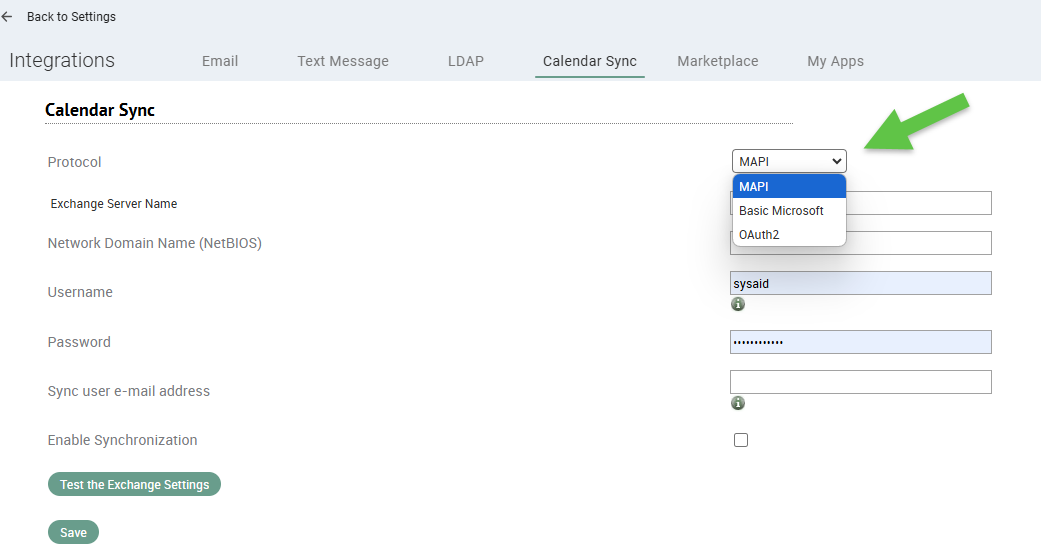
Exchange Integration allows you to export your SysAid Calendar to your Outlook calendar. Go to Settings > Setup > Calendar Sync.
Select OAuth2, EWS, or MAPI as the protocol for integration with your external calendar.
No additional ports must be opened. Instructions for filling out the rest of this page may be found here.
LDAP Integration
SysAid Cloud Edition can integrate with your company's LDAP/AD for importing users and for login authentication.
There are two options for allowing communication between your LDAP server and the SysAid Cloud Edition Servers:
Install the SysAid RDS within your local network, which will be used to bridge the communication between your LDAP server and the SysAid Cloud Edition Servers. You can find the RDS installation instructions here.
--or--
Make your LDAP server available externally to the SysAid IP addresses listed above, typically using port forwarding on your firewall or a similar solution. If you are using non-SSL LDAP, the default port is 389. The default port for SSL LDAP is 636.
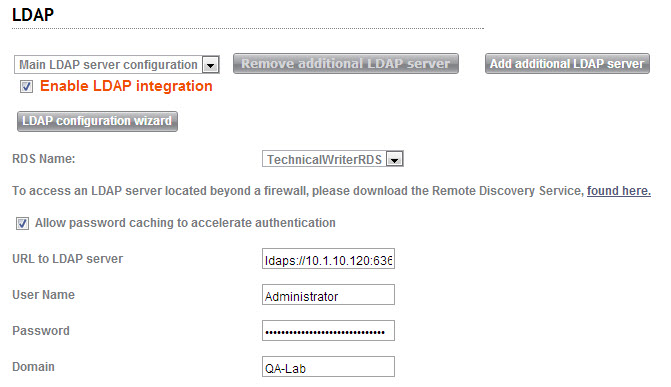
You may then configure LDAP from Settings > Integration > LDAP, either manually or using the LDAP Configuration Wizard.
Integrating SysAid with LDAP
Network discovery and agent deployment
SysAid Cloud Edition can scan your network to discover all SNMP and WMI-capable devices on your network. Furthermore, you can deploy the SysAid Agent for advanced asset management.
Network discovery
To use Network Discovery with SysAid Cloud Edition, you must install the SysAid Remote Discovery Service (RDS) onto a machine within your network.
SysAid RDS then scans your network from within, allowing you to deploy the SysAid Agent, discover all of your SNMP devices, and discover all Windows-based computers using WMI.
SysAid RDS then transmits the list of discovered devices and computers to your SysAid Cloud Edition, where you can manage them using SysAid Asset Management.
Please note:
For optimal performance, we recommend using an RDS node and adding an additional node for every 2,000 assets in your system. For more information, see the SysAid Remote Discovery Service Guide.
You can download SysAid RDS here and find installation instructions here.
Once you've installed SysAid RDS, you can perform Network Discovery from within SysAid, from Settings > Network Discovery.
Please see the full Network Discovery Guide for further details.
Agent deployment
There are many ways to deploy the SysAid Agent for advanced asset management. The complete Agent Deployment Guide details all of these.
As a SysAid Cloud Edition user, you must install SysAid RDS if you intend to deploy the Agent from Settings > Network Discovery > Deploy Agents.
The instructions for installing RDS are the same as in Network Discovery, immediately above.
Alternatively, you can install the SysAid Administrator Tools on your network for Agent Deployment.
The SysAid Administrator Tools can be found under Settings > Network Discovery > Downloads.
Refer to the Agent Deployment Guide for further instructions for deploying the SysAid Agent.