This page allows you to integrate SysAid with your Exchange O365 or Google for the purpose of synchronizing your SysAid calendar with your Outlook or Google calendars. The synchronization process exports data from SysAid to your integrated server. Items are not imported from the integrated server to SysAid.
To enable the synchronization, fill out each field using the descriptions below for assistance. After you have entered the necessary information, individual administrator must enable synchronization from Tools > Calendar > My Calendar Settings to complete the synchronization process.
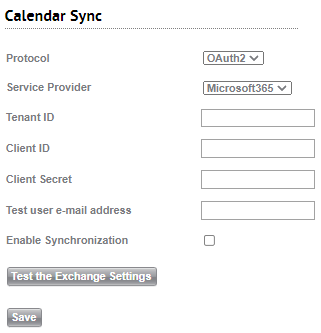
Fields overview:
Protocol
Select OAuth 2, EWS, or Mapi, as the protocol for integration with your external calendar.
Exchange Server Name
This is the name or IP address of the computer that hosts your calendar.
Network domain name (NetBIOS)
This is your network domain name.
Username
The Exchange, O365, or Google user whose account is used for the synchronization. For Exchange, the user must have permission in Exchange to create events on employees' Outlook calendars. See below for full instructions on configuring this user.
Password
Password for the username you've used.
Sync user email address
The email address of the username you've used.
Important:
If your company uses multiple email domain formats (e.g., @sysaid.com, @internal.sysaid.com, @dev.sysaid.com), please use an email address that uses the most common format (i.e., @sysaid.com). Any user on your exchange who has an email address with a different email domain than that of the email address you use here will not be able to synchronize their SysAid calendar with Outlook.
Enable Synchronization
This allows synchronization with Exchange, O365, or Google for all administrators who choose to do so. To complete the synchronization with Exchange, O365, or Google and import SysAid calendar data into Outlook, administrators must enable synchronization on an individual basis from Calendar > Calendar Settings.
Test Exchange Settings
Click here and SysAid attempts to connect to your Exchange/Office 365/Google server using the credentials you've supplied. You receive a notification if the connection is successfully established.
Sync Exchange, O365, or Google's user calendar with SysAid
Below are instructions for configuring a user for synchronization with SysAid for:
Sync the calendar with the OAuth 2.0 protocol
You can set up calendar sync with the OAuth 2.0 protocol with Microsoft 365 or Google.

Microsoft 365
To set up calendar sync with the OAuth 2.0 protocol with Microsoft 365
From the Protool drop-down, select OAuth 2.0.
Select Microsoft 365.

Register your application in Azure:
In your Microsoft 365 account, navigate to Azure Active Directory > App registrations.
Click New registration.
Enter a name for your application.
In the supported account types, select the single tenant option.
(optional) Select a platform configuration.
Click Register.
Client secret:
In App registrations, navigate to Certificates & secrets.
Click New Client secret.
Enter a description.
In the Expires area, select Never.
Click Add.
Copy the generated secret from the Value column.
Back in the calendar sync form, paste the secret in the Client secret field.
Set up API permission:
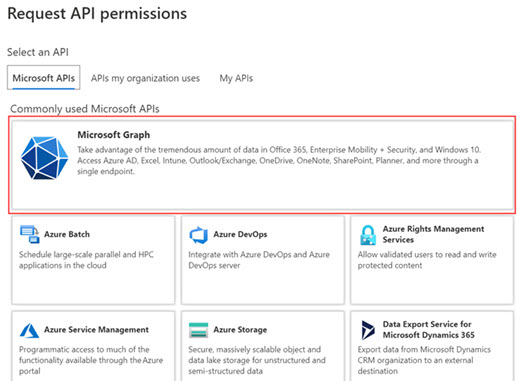
Back in Azure, navigate to API permissions and click Add a permission.
Choose Microsoft Graph.
Click Delegated Permissions.
Check the User.Read permission.
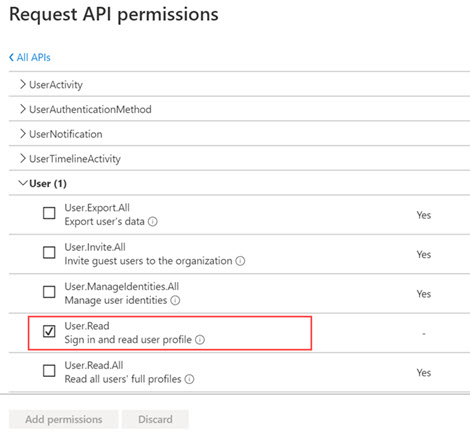
Click Add Permissions.
Click Application Permissions.
Check the following permission.
Calendars.ReadWrite
Mail.ReadWrite
Mail.Send
User.Read.All
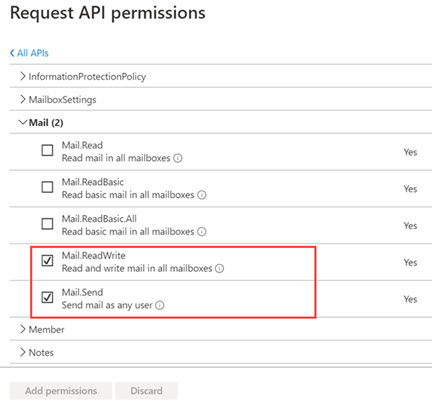
Click Application Permissions.
Click Grant admin consent for <domain name>.
Click Yes to confirm.
Copy the Tenant ID and Client ID:
In Azure Active Directory, navigate to App registrations and select the app you just set up.
Copy the Application (client) ID and paste it into the Client id field in the SysAid calendar sync form.
Copy the Directory (tenant) ID and paste it into the Tenant id field in the SysAid calendar sync form.
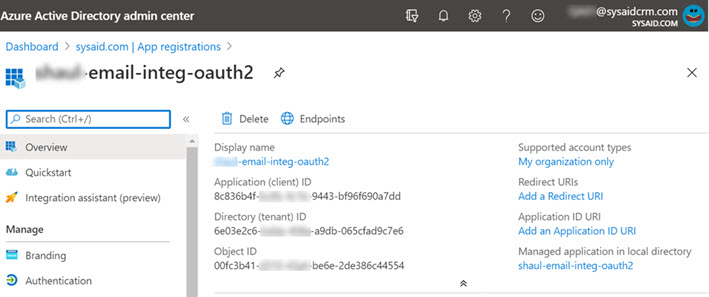
Follow the instructions above for configuring the rest of the calendar sync form.
To set up calendar sync with the OAuth 2.0 protocol with Google
From the Protocol drop-down, select OAuth 2.0.
Select Google.
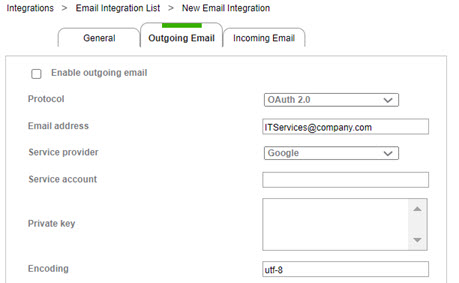
Create a project in Google:
Navigate to Google Cloud Platform Console. If you haven't used this Google Cloud Platform Console yet, agree to their terms and conditions.
Click Select a project.
Click New Project.
Add Gmail API and Google Calendar API scopes:
From the Navigation menu, select APIs & Services > Library.
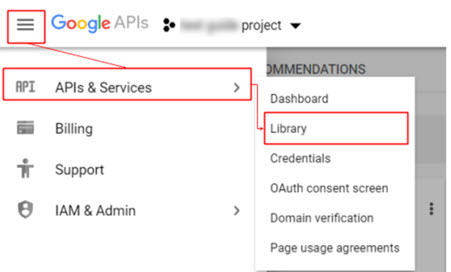
Search for "Gmail API" and select it from the search results.
Click Enable.
Search for "Google Calendar API" and select it from the search results.
Click Enable.
Create a service account
From the side menu, click Credentials.
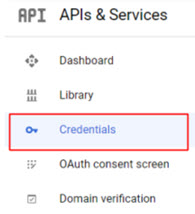
Click Create Credentials.
Click Service Account.
Enter any name for your service account.
Click Create.
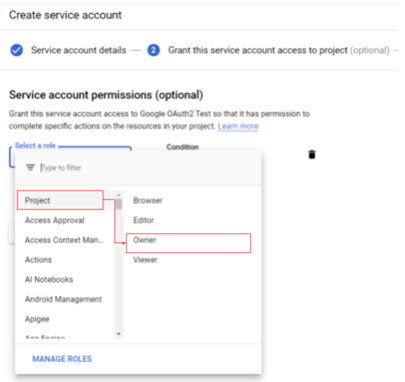
In the service account permission page, click Project, and select Owner.
Configure the OAuth consent screen:
From the side menu, click OAuth consent screen.
Select Internal.
Click Create.
Enter an application name (e.g, SysAid).
Click Add Scope.
Enter https://mail.google.com/.
Click Add.
Repeat the Add Scope process and add https://www.googleapis.com/auth/calendar.
Generate a JSON credentials file:
Click your new Service account.
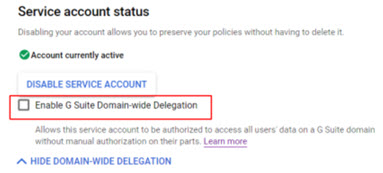
Select the check box for Enable G-Suite Domain-wide Delegation.
Click Add Key.
Click Create new key.
Select JSON.
Click Create.
Save the downloaded JSON file to a location on your PC where you can access it later.
Click Save.
Configure the Google Admin console :
Navigate to the Google Admin console (https://admin.google.com/):
Click Security.
Select Advanced settings.
Click on Manage Google Services.
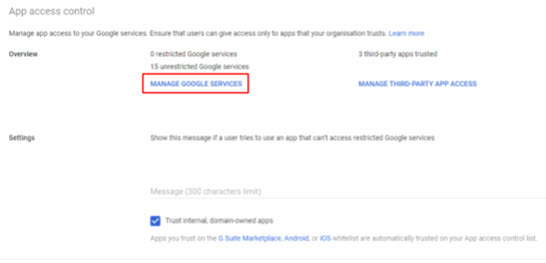
Make sure Gmail and Calendar are marked as unrestricted.

Return to the Advanced Settings screen and select Manage Third-Party App Access.

Click Configure new app.
Select OAuth App Name Or Client ID.
In the search box, enter the value of the 'client_id' parameter from your JSON file.
Select the application you created.
Select both Client ID check boxes and click Continue.
Under App Access, select Trusted Can Access All Google Services.
Click Configure.
Return to the Advanced Settings screen and select Manage Domain Wide Delegation.
Click Add New.
In the client ID field, enter the value of the 'client_id' parameter from your JSON file.
In the OAuth scopes field, enter https://mail.google.com/ and https://www.googleapis.com/auth/calendar.
Click Authorize.
Enter the generated values in SysAid:
Open the JSON file you generated.
Copy the value of the "client_id" parameter.
Paste the value into the Service Account field in SysAid.
Copy the value of the "private_key" parameter.
Paste the value into the Private Key field in SysAid.
Follow the instructions above for configuring the rest of the calendar sync form.
Configure Sync with Office 365 Calendar (OWA Protocol)
Fill out the Calendar Sync fields:
Field | Value |
|---|---|
Protocol | OWA |
Exchange Server URL | https://sn2prd8004.outlook.com |
Network Domain Name (NetBIOS) | None |
Username | User from the sync account |
Password | Password of the user from sync account |
Sync user email address | Email address of the sync account |
Select the Enable Synchronization check box.
Click Save.
Click Test the Exchange Settings.
Navigate to Tools > Calendar > My Calendar Settings.
Select the Enable synchronization with the Exchange server check box.
Click Save.
Configure Sync with Exchange 2010 calendar
Create a new User Mailbox (ie: SysAidSync)
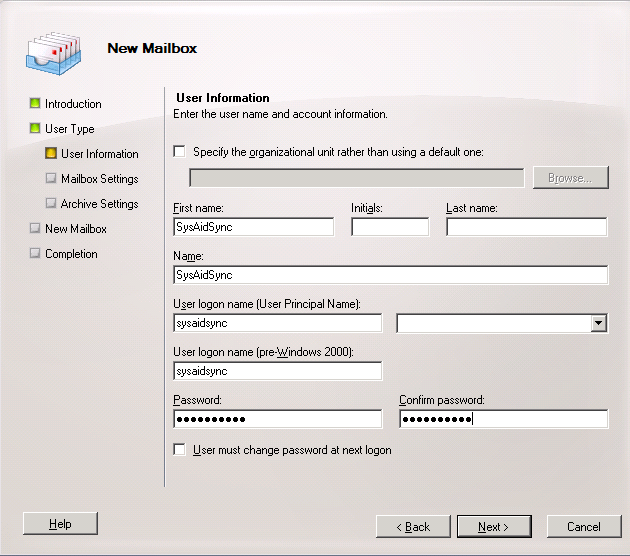
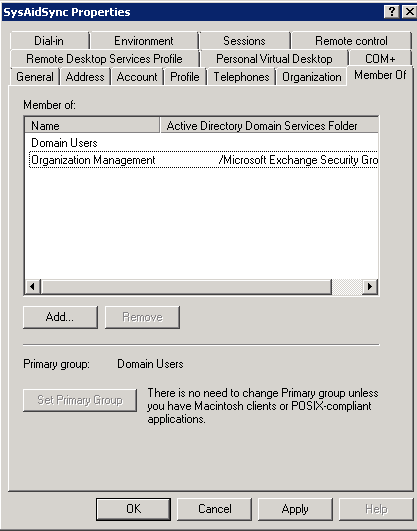
Navigate to Active Directory and make this new user member of the Organization Management group. (This group is inside the Microsoft Exchange Security Groups OU.)
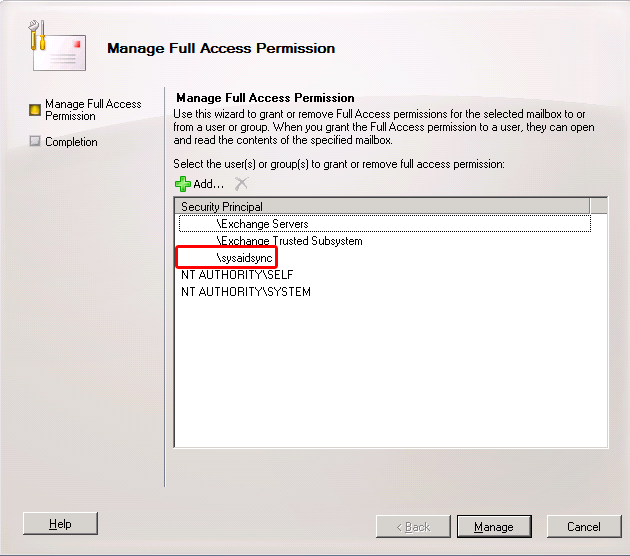
Give Full Mailbox Access Permission to each admin that wants to sync their calendar.
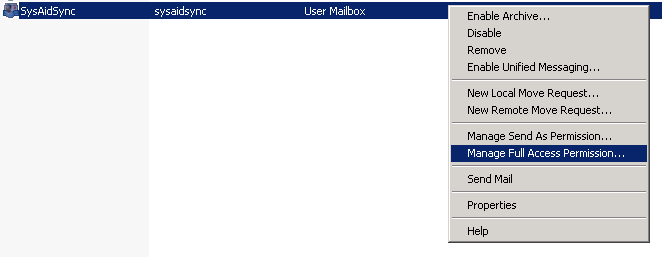
From the Exchange Management Console, navigate to Recipient Configuration > Mailbox, right-click on your admin mailbox and click Manage Full Access Permission... and add your SysAidSync to the list.
Configure Sync with Exchange 2007 calendar
It's recommended to create a new user for SysAid integration with Exchange.
Create your Exchange synchronization user:
Create a new account.
Right-click Organization Configuration.
Add Exchange Administrator.
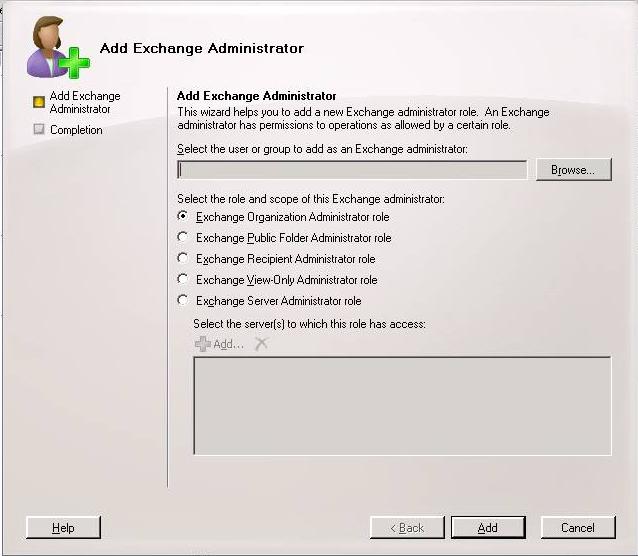
Click Browse and select your new account.
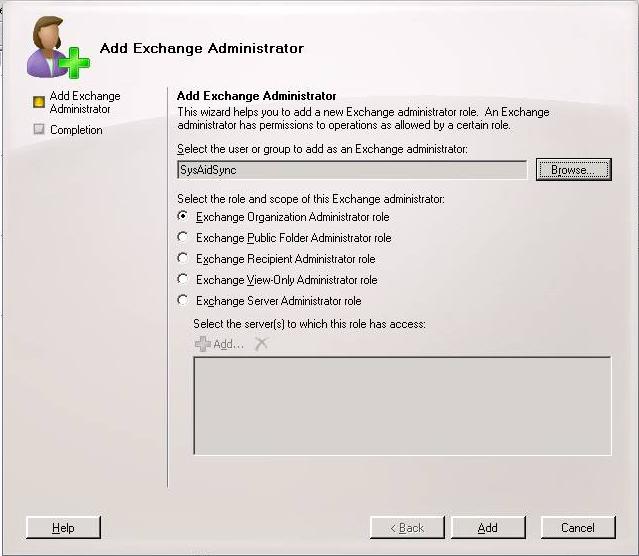
Click Add.
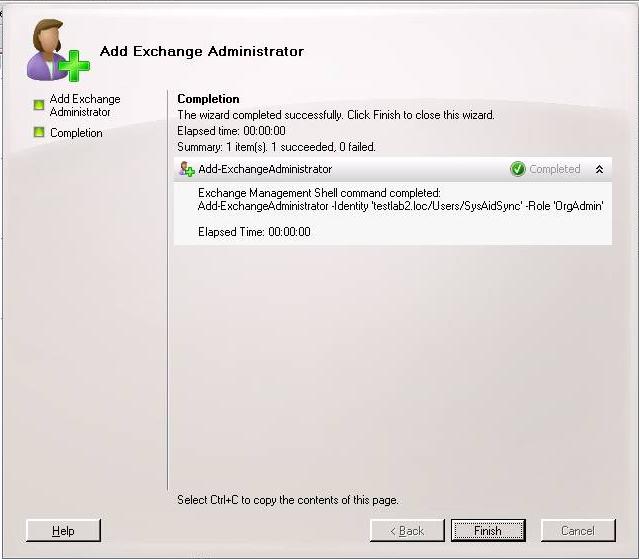
Click Finish.
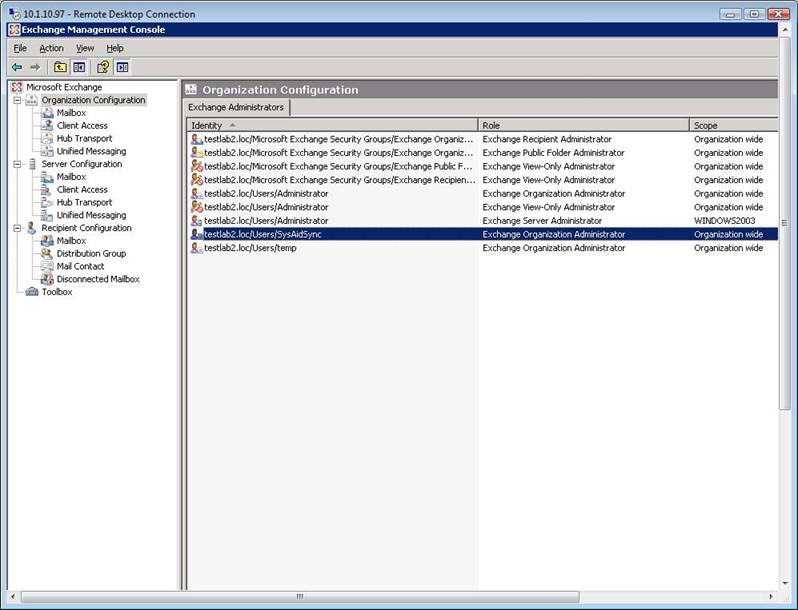
Configure Sync with Exchange 2003 calendar
It's recommended to create a new user for SysAid integration with Exchange.
Create your Exchange synchronization user:
Create a new Active Directory/LDAP user for Exchange Synchronization
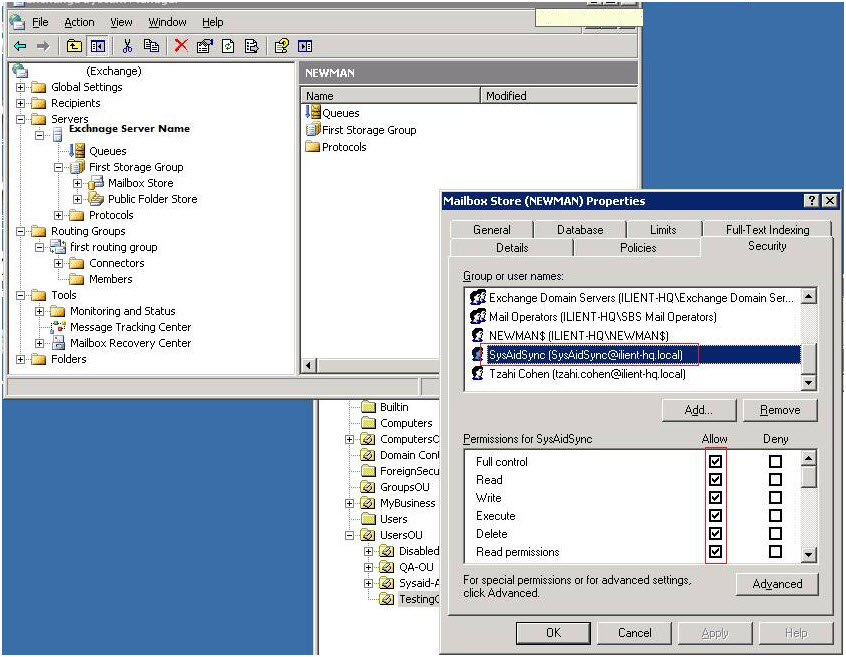
Go to Exchange System Manager > Servers > MailServer > First Storage Group.
Right-click on Mailbox Store > Properties.
Select the Security tab.
Add your new user to the list with full control permission, as displayed below:
