Using SysAid for Teams - Salesforce License Scenario
Send Chat or Group Conversation From SysAid
Once SysAid for Teams is set up, every ticket includes a Microsoft Teams tab. The tab allows you to send a message in Microsoft Teams to an individual user or group of users. Once you select a user, an icon appears that indicates the user's availability status.
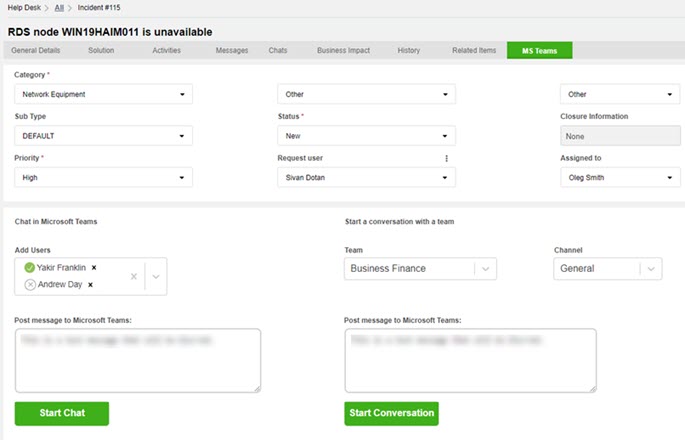
For every chat and conversation initiated from a ticket, SysAid generates an activity record that contains a link to the chat or conversation in Microsoft Teams.
To send a message
In the Microsoft Teams tab, select the relevant tenant.
Start typing the name of a user or group and select the autocomplete option that you want. Continue adding names until you have all the users and groups that you want.
Enter your message in the Post Messages to Microsoft Teams field.
Click Start Chat.
In the Microsoft Teams screen that opens, click Send.
To initiate a Microsoft Teams chat with the ticket's request user
Next to the Request User field click
 .
.Click Start Microsoft Teams Chat.
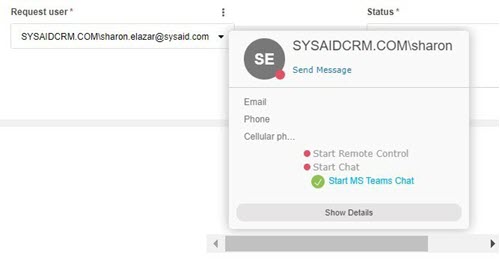
Microsoft Teams opens a chat with the Request User.
To start a conversation
In the Microsoft Teams tab, select the relevant tenant.
Select a team from the Team drop-down list.
Select a channel on which to start the conversation from the Channel drop-down list.
Enter your message in the Start conversation in Microsoft Teams field.
Click Start Conversation.
Use the SysAid Bot in Microsoft Teams
Once the SysAid Bot is set up, you can create, access, close, reopen, and modify tickets in SysAid without ever leaving Microsoft Teams.
Note
Some of these features are currently being gradually rolled out and may not be available in your environment just yet.
Access the Menu
At any point, you can access the main menu for available actions you can perform in the SysAid Bot.
To open SysAid Bot's main menu
Send the message "cancel" to the SysAid Bot.
The SysAid bot responds by displaying its main menu of actions for you to select.
Create Tickets
To create a SysAid ticket from Microsoft Teams
Access the SysAid Bot in Microsoft Teams.
Click Report an Issue.
When asked, respond to the bot with the title of the ticket.
Click Create ticket.
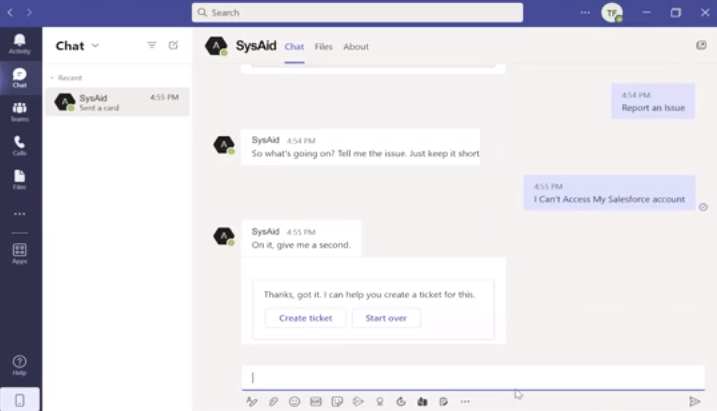
(Optional) In the window that opens you can change your title, change the ticket's urgency, and/or add a description.
Click Next.
(Optional) You can select a category for your ticket and click Next or you can leave the category blank and click Skip.
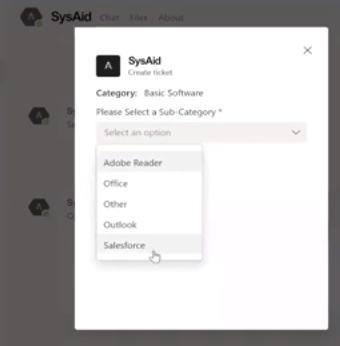
Click Submit.
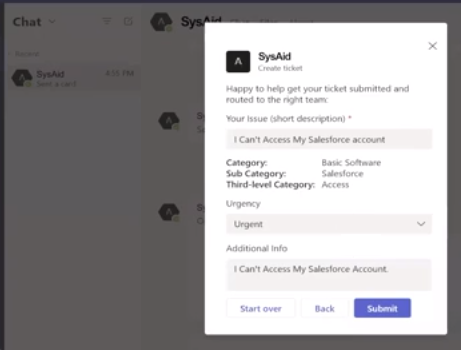
The SysAid bot responds with the ticket number and a direct link to the ticket in SysAid.
View Tickets
You can view active tickets or recently closed tickets via the SysAid Bot.
To view recently closed tickets
Access the SysAid Bot in Microsoft Teams.
Click View Recently closed tickets or type 'view recently closed tickets' and click the Send button.
(Optional) If you want to view details for one of the ticket's, click View ticket details.
You can select the ticket you want from the drop-down list of the ten most recently updated tickets, or enter the SysAid ticket ID in the text box.
Click View Details.
(Optional) If you want to update a ticket with a note or an attachment, click Update a ticket.
To view your active tickets
Access the SysAid Bot in Microsoft Teams.
Click View Active tickets or type 'view active tickets' and click the Send button.
(Optional) If you want to view details for one of the ticket's, click View ticket Details.
You can select the ticket you want from the drop-down list of the ten most recently updated tickets, or enter the SysAid ticket ID in the text box.
Click View Details.
To view a ticket's details
Access the SysAid Bot in Microsoft Teams.
Type 'view ticket details and click the Send button.
You can select the ticket you want from the drop-down list of the ten most recently updated tickets, or enter the SysAid ticket ID in the text box.
Click View Details.
To access the ticket in SysAid, click the Click to open the ticket in SysAid link.
Update a Ticket
To add attachments to a ticket
Access the SysAid Bot in Microsoft Teams.
Click Update a ticket or type 'Update a ticket' and click the Send button.
You can select the ticket you want from the drop-down list of the ten most recently updated tickets, or enter the SysAid ticket ID in the text box.
Click Update.
Click Add Attachment or Screenshot.
Click the Paperclip icon to upload a file from the computer or paste a screenshot directly into Microsoft Teams by pressing CTRL+V.
Click the Send button.
Your attachments are added to the ticket.
To add a note to a ticket
Access the SysAid Bot in Microsoft Teams.
Click Update a ticket or type 'Update a ticket' and click the Send button.
You can select the ticket you want from the drop-down list of the ten most recently updated tickets, or enter the SysAid ticket ID in the text box.
Click Update.
Click Add Note.
Enter your note and click the Send button.
Your note is added to the ticket.
To close a ticket
Access the SysAid Bot in Microsoft Teams.
Click Update a ticket or type 'Update a ticket' and click the Send button.
You can select the ticket you want from the drop-down list of the ten most recently updated tickets, or enter the SysAid ticket ID in the text box.
Click Update.
Click Close the Ticket.
When prompted, click Yes.
To Reopen a ticket
Access the SysAid Bot in Microsoft Teams.
Click Update a ticket or type 'Update a ticket' and click the Send button.
You can select the closed ticket you want from the drop-down list of the ten most recently updated tickets, or enter the SysAid ticket ID in the text box.
Click Update.
Click Reopen the Ticket.
Enter a short explanation for why you are reopening the ticket, and click the Send button.
Your explanation is added as a note in the ticket.
Ticket Summary
The end user in MS Teams is now able to see all the Notes added to the ticket via the SysAid Bot.
When viewing a Ticket Summary in the bot, the user can read the most recent Note added to the ticket and view its full Note history.
Note
As the SysAdmin, you can hide the ticket notes section from the end user, by changing the visibility settings via the Self-Service Portal
To display or hide the Notes section in a ticket's details
Go to the Self-Service Portal
Click on Advanced Settings
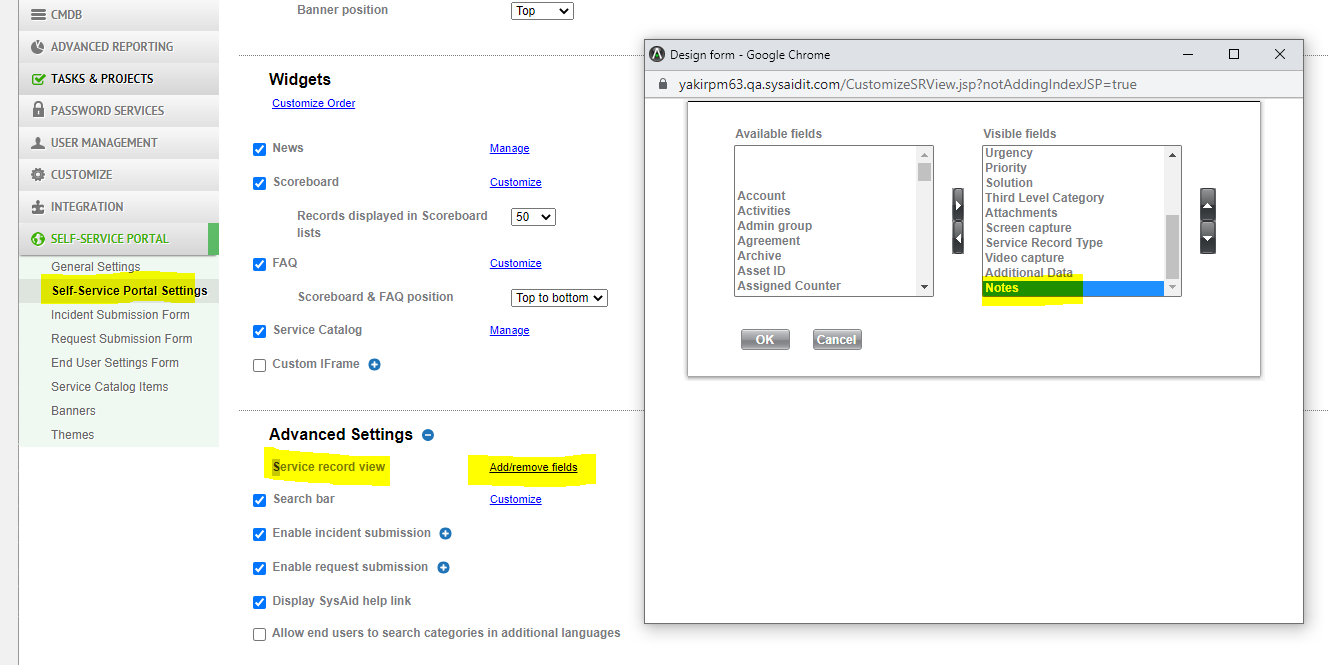
3. Click on Add/remove fields
4. Select "Notes" from the "Visible Fields" scroll menu.
5. Click "OK"
Notifications
Once the integration is set up, users receive SysAid ticket notifications in their Microsoft Teams when their ticket's status is updated. Notifications are sent from the user associated with the sender email you configured in the set up process.
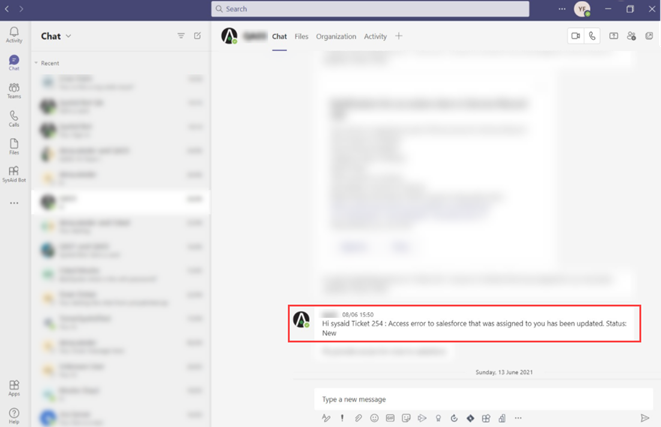
In addition, SysAid sends workflow approval messages to Microsoft Teams, where a user can approve or deny an action item directly from Microsoft Teams.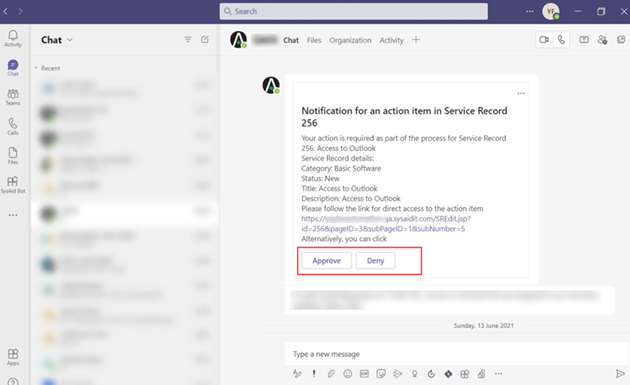
Important
Some of the the tags available for AI Service Desk notifications are different from the other SysAid notifications. For the full list of tags, please see Tags for SysAid Notifications in Microsoft Teams.
Automatically Manage Your Incoming Tickets With Escalation Rules
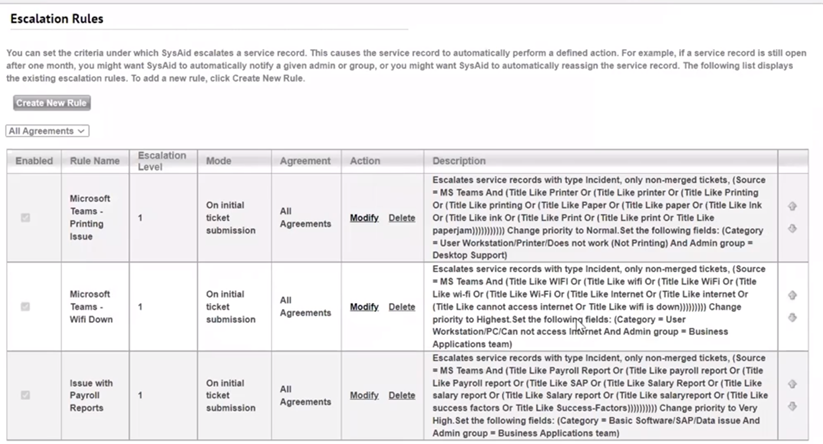
To get the most out of the SysAid Bot in Microsoft Teams, you can configure escalation rules to automatically perform actions on tickets that your users submit in Teams. The escalation rule can run immediately once the ticket is generated.
To set up escalation rules to train the SysAid Bot to handle tickets submitted from Microsoft Teams, see the instructions below or this video:
Training the SysAid Bot video
To set escalation rules to manage tickets submitted from Microsoft Teams
In SysAid settings, navigate to Service Desk > Escalation Rules.
Click Create New Rule.
Click Query Builder.
For the Source field, select MS Teams.
Select the AND operator.
Select the Title field and enter a keyword for identifying the ticket issue (For example, "Salesforce"). It's recommended to set a few versions of the keyword to cover various ways users might type it.
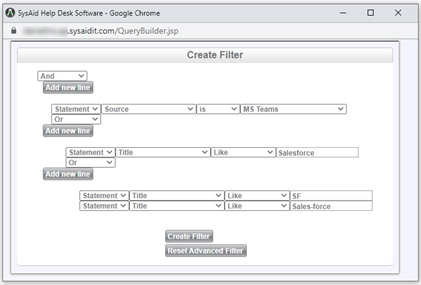
Click Create Filter.
From the Mode drop-down, select On initial ticket submission.
Click Action Builder.
Set the ticket fields you want to be automatically populated (for example: Category, Group, Priority, etc.).
Click Add Rule.
Repeat this process to add rules for as many use cases as you want.
Display Notes Content in Ticket Summary
As a requestor via Teams, the ticket summary card should include a Notes section, so that I can access the full notes history from Teams.
Display Knowledge Base Articles with Rich Text Formatting & Images
SysAid For Teams now displays images, tables and rich text properties of the original article.
Note
Article view in iOS is not yet supported.
Images added to the article are only displayed if embedded.
Large images & tables can result in horizontal scrolling
If your Knowledge Base article has non secure URLs (http), we recommend changing them to secured URLs (https), to avoid needing to define them as 'Open in new tab" in Settings.
Support multilingual navigation elements
(1).png)
SysAid for Teams supports multilingual navigation elements; buttons, prompts and labels.
Note
French, Spanish and Portuguese are supported out of the box, with pre-installed translation files.
For additional languages, Admins can configure their texts independently.
End users can make their own selection from the available languages in My Settings.
Support multiple languages in MS Teams Bot
SysAdmins can now translate the Bot commands and buttons to any language, using the translation service in the Portal
Multi-lingual and non-English speaking customers can offer their end users a customized experience: Bot interaction in their native language.
Note
SysAid AI capabilities (searching Knowledge Base for self-resolution) are not yet supported for non-English languages.
Right-to-left languages are not yet supported.