 You can manually deploy the SysAid Agent to any computer you choose.
This includes:
- Windows
- Linux
- Mac
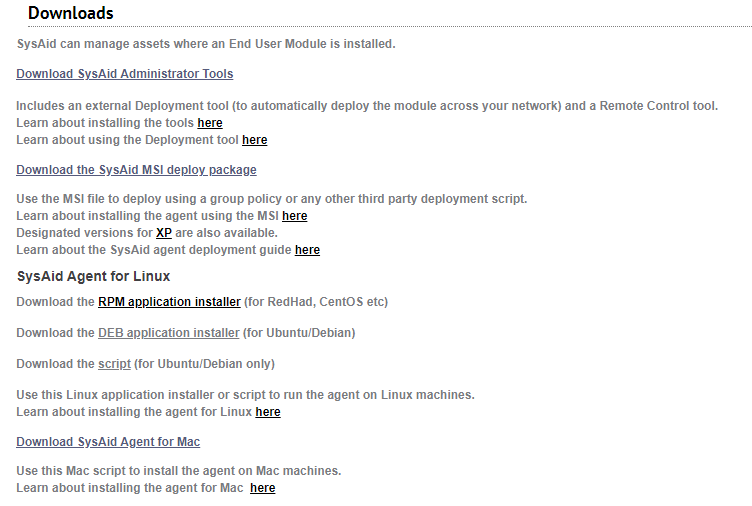
Go to Settings > Network Discovery > Downloads, and select Download SysAid Agent for the OS of your choice.
Manually Install the SysAid Agent for Windows
There may be some cases where none of the other deployment methods are suitable for deploying the agent to a particular computer.
In these cases, you may install the agent manually.
To manually install the SysAid agent on a Windows computer
- Open SysAid and go to Settings > Network Discovery > Downloads.
- Choose Download SysAid Agent for Windows. This allows you to save the installer file locally on the computer you would like to install to.
- Run the SysAidAgent.exe on the computer you are installing to. This opens the installer.
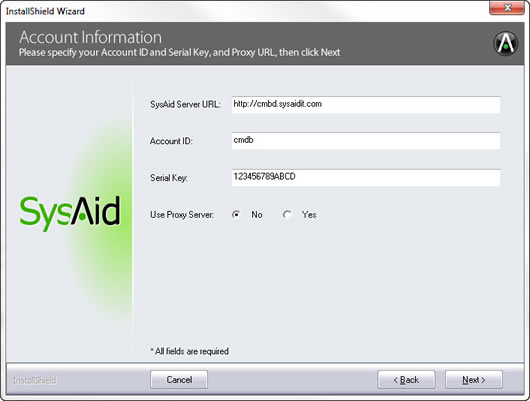
- The installer will prompt you for your server details. Enter these as they are found under Settings > Network Discovery > Downloads. If this computer is behind a proxy server, choose Yes for "Use Proxy Server:" and fill out the proxy server details. Then click Next.Note
If the "Allow only SSL connections to SysAid (HTTPS)" check box is checked in Account Defaults, make sure your URL includes the relevant HTTPS prefix.
- Enter the account information for your SysAid server
- Choose the installation directory for the SysAid agent, and click Next. It's recommended to use the default directory.
- You now see the install confirmation page. Verify the information you've entered, and then click Next to install the agent.
- The Agent is now installed. Click Finish to close the installer.
Manually Install the SysAid Agent for Linux
There are 2 options to install the SysAid Linux agent:
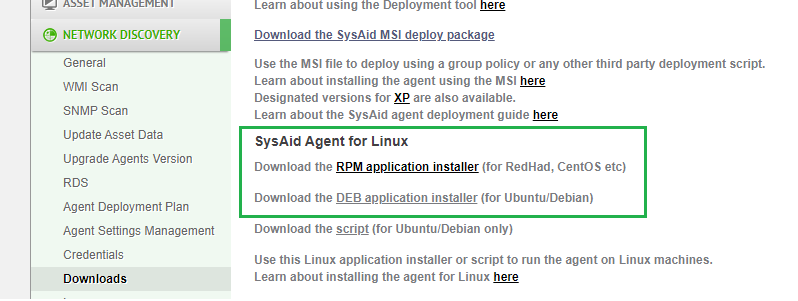
Install the Linux RPM Agent
The RPM agent supports Linux systems that use rpm (RedHat, CentOS, Fedora) or deb (Debian, Ubuntu) package managers. The Linux RPM agent is available as part of the SysAid download installation files and also using Network Discovery.
This agent includes enhanced functionality, including improved inventory capabilities, monitoring, auto upgrading capabilities, controlling the agent setting remotely, and troubleshooting.
In the Downloads page, select the application installer of your choice:
To download the agent, simply click the desired link and the installer will be instantly downloaded locally.
The minimum supported versions are:
- RedHat 9.0 (RHEL 9 Plow)
- Debian 11 (bullseye)
- Ubuntu 20.04.4 LTS
If you want to continue using the Script agent, please contact SysAid Support.
If your environment has a proxy, you can bypass it using the '--no-proxy -no-check-certificate' parameter when running the Installer
Below is the syntax for installing, upgrading, uninstalling, and configuring the Linux RPM agent on RedHat or Debian distributions.
RedHat Commands
Install
sudo rpm -i SysAidAgent_********.rpmUpgrade
sudo rpm -U SysAidAgent_********.rpmUninstall
sudo rpm -e SysAidAgent_********.rpmConfiguration
cd /usr/bin/sysaid/
SetupAgentSettings.out --account=<arg> --serial=<arg> --serverURL=<arg> [--rdsName=<arg>] [--rdsUrl=<arg>] [--proxyAddress=<arg>] [--proxyPort=<arg>] [--proxyUserName=<arg>] [--proxyPassword=<arg>]
Configuration Parameters
- account arg - Your SysAid account ID. This information can be found at the user's profile menu > About > Your account (Required)
- serial arg - Your SysAid serial number. This information can be found at the user's profile menu > About > Serial key for your account (Required)
- serverURL arg - URL of the server SysAid is running on. This information can be found at the user's profile menu > About > Your server URL (Required)
- rdsName arg - RDS Name - e.g. acmecorprds01 (Optional)
- rdsUrl arg - RDS URL - e.g. acmecorprds01.acmecorp.local (Optional)
- proxyAddress arg - Proxy Name/IP Address - e.g. 10.0.0.45 (Optional)
- proxyPort arg - Proxy Port - e.g. 8080 (Optional)
- proxyUserName arg - Proxy Username - e.g. proxyUser (Optional)
- proxyPassword arg - Proxy Password - e.g. secretPass123 (Optional)
Debian Commands
Install or Upgrade
sudo apt-get install SysAidAgent_********.debUninstall
sudo apt-get --purge remove SysAidAgentConfiguration
cd /usr/bin/sysaid/
SetupAgentSettings.out --account=<arg> --serial=<arg> --serverURL=<arg> [--rdsName=<arg>] [--rdsUrl=<arg>] [--proxyAddress=<arg>] [--proxyPort=<arg>] [--proxyUserName=<arg>] [--proxyPassword=<arg>]
Configuration Parameters
- account arg - Your SysAid account ID. This information can be found at the user's profile menu > About > Your account (Required)
- serial arg - Your SysAid serial number. This information can be found at the user's profile menu > About > Serial key for your account (Required)
- serverURL arg - URL of the server SysAid is running on. This information can be found at the user's profile menu > About > Your server URL (Required)
- rdsName arg - RDS Name - e.g. acmecorprds01 (Optional)
- rdsUrl arg - RDS URL - e.g. acmecorprds01.acmecorp.local (Optional)
- proxyAddress arg - Proxy Name/IP Address - e.g. 10.0.0.45 (Optional)
- proxyPort arg - Proxy Port - e.g. 8080 (Optional)
- proxyUserName arg - Proxy Username - e.g. proxyUser (Optional)
- proxyPassword arg - Proxy Password - e.g. secretPass123 (Optional)
Install the Linux Script Agent
This SysAid agent supports Linux systems that use dpkg (Debian, Ubuntu, etc) package managers.
To download the agent, simply click the link and extract the sysaid-agent-linux.tar.gz into a directory where it should stay.
The script needs to get three parameters in the following order:
- ServerURL
- AccountID
- Serial
Run the script with the full path with the mentioned parameters. E.g.:
/var/lib/sysaid-agent-linux/sysaid-linux.sh http://192.168.1.10:8080 Acme A1B2C3D4E5F6G7H8Prerequisites for installing the Linux agent
- Root permissions - script should be run as root
- Ishw B.02.16 & wget packages are required on the Linux machines
Manually Install the SysAid Agent for Mac
There may be some cases where none of the other deployment methods are suitable for deploying the agent to a particular computer. In these cases, you may install the agent manually.
To manually install the SysAid Agent to a Mac computer:
- Open SysAid and go to Settings > Network Discovery > Downloads.
- Choose Download SysAid Agent for Mac. This allows you to save the installer file locally on the computer you would like to install on.
- Locate the .pkg file that you just downloaded and double-click it to deploy the agent.
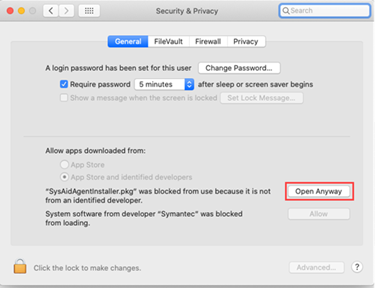
- If you see the following error message "'SysAidAgentInstaller.pkg' can't be opened because Apple cannot check it for malicious software", navigate to Preferences > Security & Privacy, and click Open Anyway.
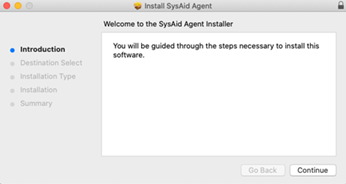
- When the app opens, click Continue.
- If you see the following error message "'SysAidAgentInstaller.pkg' can't be opened because Apple cannot check it for malicious software", navigate to Preferences > Security & Privacy, and click Open Anyway.
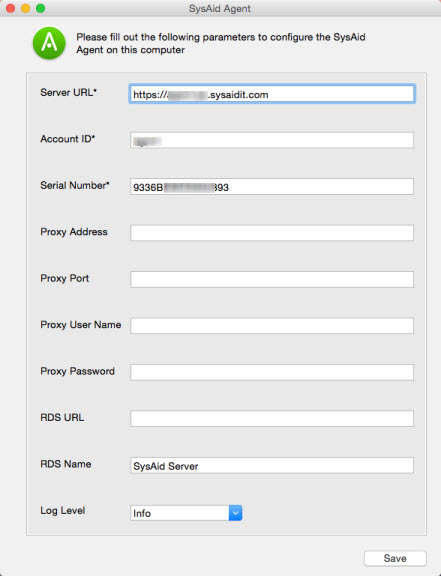
- To configure the agent and complete the installation, in Applications, select SysAid Settings.
- Enter the Server Details as they are displayed in Settings > Network Discovery > Downloads. If you are using a proxy or an RDS, enter the proxy or RDS information.
- Select a log level.
- Click Save.