Take a deep dive into any service record’s history and context — filter through its Journey and perform resolution actions intuitively and collaboratively. Request Users create and fill out service record forms to record an Incident, Change, Problem, or Request and submit it for Resolution.
Admins read and/or manage the submitted service records and delve into their activity history and completed forms. Service record forms can be created based on Templates created in the Template Designer or based on out-of-the-box templates.
Requirements:
End users can create and submit Service Records
Admins with “Read” permissions can view Service Records
Admins with “Edit” permissions can manage Service Records
This document describes Service Records' basic anatomy and role in the resolution process.
Service Record Types
Incident
Unplanned event or malfunction that disrupts your work process or service capabilities, such as an application not responding or a problem with a laptop
Change
Addition, modification, or removal of an authorized, planned, or supported service or service component
Problem
Cause or potential cause of one or more Incidents
Request
The user asks something of the IT department – unrelated to a component failure or error, i.e., permission to access a server
Service Record Layout
Service Records are composed of two main sections:
Service Record Details (Admins & End Users)
Resolution Panel (Admins only)
Service Record Details

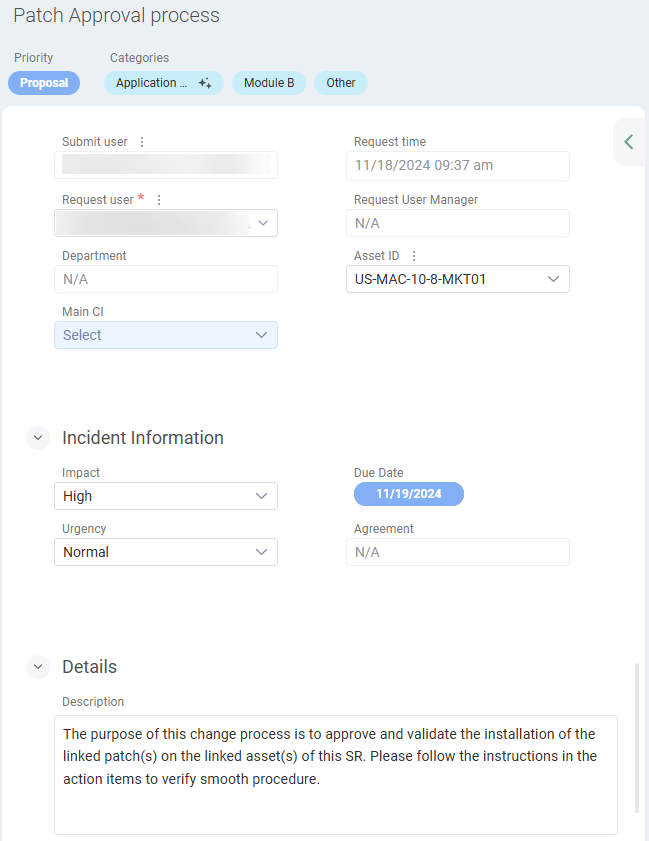
The Service Record Details section (pictured above) contains the following three Sections:
Service Record Header
The Service Record Header contains all Service Record metadata Fields, which include:
Service Record Type
Service Record ID
Service Record Title
Priority
Categories
Status
Assignee
Share button (Service Record link)
Delete button (Trash icon)
User Information
The User Information section contains all Fields representing user-related information.
Submit User
Request User
Submit Time
Department
Main Asset
Location
Main CI
[Service Record Type] Information
Impact
Due Date
Urgency
Agreement
Details
The Details section contains the “Description” Field, a free-form Field that can be filled out using its Rich Text Editor.
End User-facing Service Records
End users can submit Service Records (Incidents & Requests) from the following sources:
Self-Service Portal
Email (including updating emails)
Reminders
Monitoring Notifications
Password Services Notification
Agent Hotkey
AI Chatbot (SysAid Copilot license only)
AI Emailbot (SysAid Copilot license only)
Admin-facing Service Records
Admins that read or manage Service Records have access to the Service Record Panel, the Journey, and the Resolution Panel (edit permissions only). The Service Record Panel contains all Service Record Form Fields that can be filled out by users or auto-populated by the system.
Admins can create and submit Service Records from the Admin Portal.
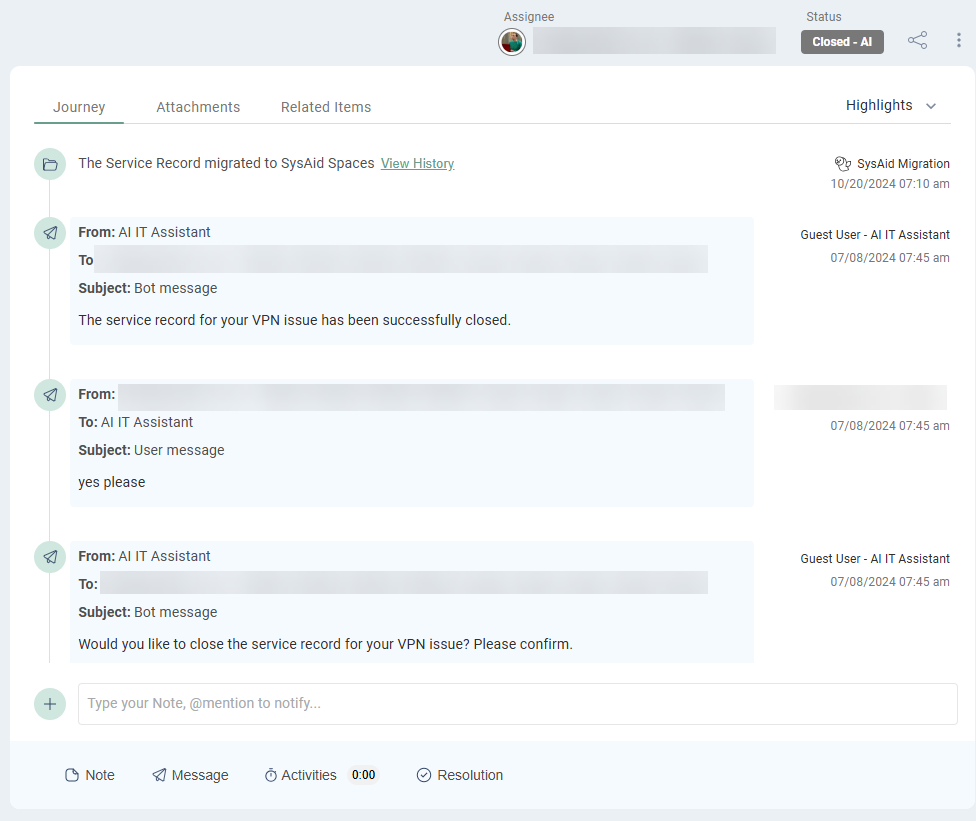
Resolution Panel

The Resolution Panel holds the history and assets of the Service Record and serves as the starting point for initiating communications and actions.
The Resolution Panel is comprised of three main components:
Journey tab
Attachments tab
Toolbar
Journey tab
The Journey tab is an actionable audit log of all Service Record Events.
The Journey can be searched, filtered, and displayed in a variety of preconfigured Modes:
Highlights (the Journey’s default view)
Full Journey
Audit Log
Activities
Each Event specifies who executed it and when it took place.
Attachments tab
The Attachments tab shows a gallery view that displays each Attachment with its respective file details.
The Attachments tab can be searched, filtered, and sorted according to various values; further information on these values can be found here.
Toolbar
The Toolbar is a fixed element within the Resolution Panel, only visible to Admins with Edit permissions.
The Toolbar contains the four key action items that an Admin can perform:
Add a Note
Send a Message
Add an Attachment
Add a Resolution
Adding Notes
Notes can also be added to the Journey using the Next action line (beneath the most recent Event in the Journey).