Application Discovery automatically identifies and tracks SaaS applications used across your organization, providing IT teams with full visibility into their software landscape.
By integrating with Microsoft Entra ID (SSO), SysAid continuously captures sign-in data to detect active applications. Each discovered application is automatically added to your License Manager inventory. This creates a dynamic, always up-to-date catalog of your SaaS environment.
With this visibility, organizations can quickly identify redundant or risky applications, ensure compliance, and optimize license spend, all within their ITSM.
Available for:
Customer using License Manager Advanced. For more details, reach out to your SysAid representative.
.gif)
How it works
Application Discovery connects to your Microsoft Entra ID (formerly Azure AD) to automatically collect information about applications used by your users. Once connected, the data gets updated on a daily basis.
When users sign in to a SaaS application via Entra ID, SysAid captures these entries and creates corresponding records in the Applications tab within License Manager.
Once the application is detected by SysAid, IT teams can:
Monitor usage (active vs. inactive users)
Who is an active user?
An active user is a user who logged into the application in the last 30 days.
Monitor sanctioned or unsanctioned apps
Track total licenses, utilization rates, and associated costs
Manage the application inventory
Gain insights into total and potential savings directly from the License Manager dashboard
You can also add application info manually by clicking Create. Simply type the name, adjust the category, and the number of licenses and active users.
AI application enrichment
SysAid Copilot automatically enriches discovered applications with structured metadata. This gives IT teams immediate context about newly discovered or unfamiliar applications, helping them quickly understand what an app does and whether it requires further review, without the need for manual research.
When an application is discovered, SysAid Copilot enriches it with key details such as the application logo, short description, category, official website URL, and compliance indicators like SOC 2, ISO, and GDPR. You can see all the data in the AI enrichment panel:
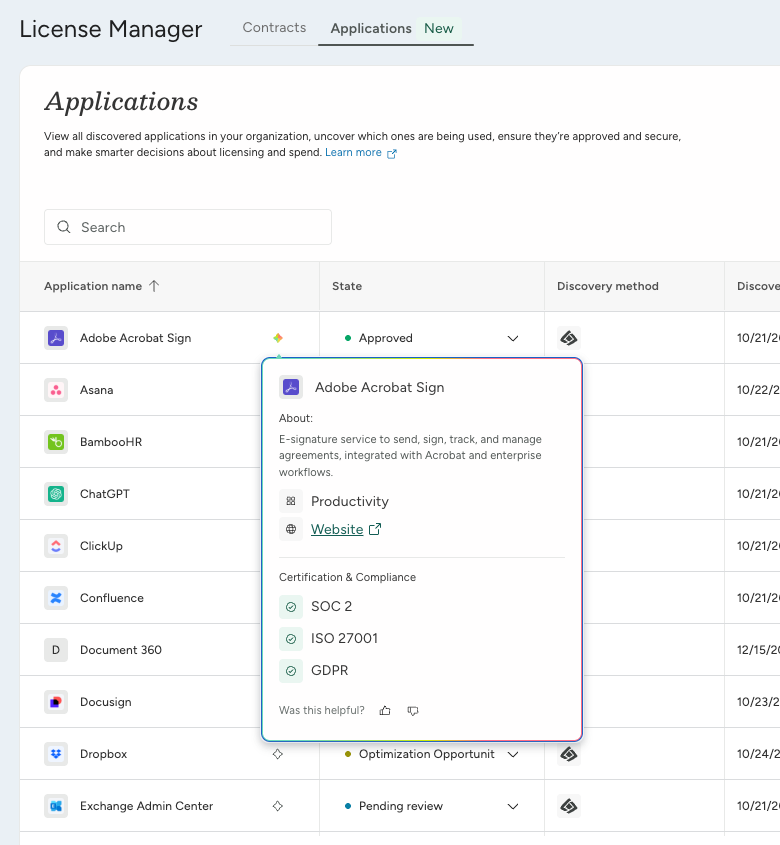
Some customized or niche applications may not be enriched automatically. In these cases, you can complete the details manually and use the feedback options in the AI enrichment panel or enrichment card to report missing or inaccurate information and help improve future results..gif)
Managing discovered applications
Discovered applications appear under the Applications tab of the License Manager. Each application includes key details such as its state, discovery method, discovery date, category, license metrics, and utilization data.
App states
Each application can have one of several statuses that reflect its review or approval progress:
State | Description |
|---|---|
Pending review | The application has been discovered and is ready for your review. |
Under review | The application is being assessed by IT or procurement. |
Optimization opportunity | The application may have unused licenses. |
Requested | The application has been submitted for approval by users or departments. |
Approved | The application is approved for usage. |
Denied | The application was not approved for use within the organization. This helps you monitor the usage of unapproved applications. |
Ignored | The application is excluded from reporting and monitoring. This lets you filter out discovered apps without removing them from the list. |
By default, each discovered application has a “Pending review” state, prompting you to manage the applications. Changing an application’s state helps IT teams track which SaaS tools are allowed, which are being reviewed, and which should be removed or consolidated.
In the Applications table, you can also see detailed metrics for each application, including the total number of licenses, active and inactive users, utilization rates, total costs, and estimated annual savings. These insights make it easy to spot inefficiencies and take informed actions.
Connecting your application discovery tool
Customers who already have Entra ID (Azure addon) connected with SysAid
If you’ve already connected your SysAid account with Entra ID (Azure addon), go to your SysAid application in Entra ID and add the AuditLog.Read.All permission:
Go to the Azure Portal and select Microsoft Entra ID.
In the left-hand menu, navigate to Manage > App registrations
Select the application used by SysAid to connect with Azure.
In the selected app, go to Manage > API permissions.
Click Add a permission > Microsoft Graph > Application permissions.
Search for and select
AuditLog.Read.All.Click Add permissions.
Under Configured permissions, click Grant admin consent and confirm by selecting Yes when prompted.
Customers who haven’t connected Entra ID with SysAid
First, you’ll need to add the Azure addon to your SysAid account:
In SysAid, navigate to Settings > Integrations > Marketplace.
Select Azure from the addon cards.
Click Setup and manage. You will be redirected to the My apps page, where you’ll see Azure.
Click the gear icon.
Check the Azure is secondary to another User Repository checkbox.
Click Save Changes.
Now, you can go ahead and connect the apps - keep your SysAid account in one tab and open a new tab to connect to your Azure portal.
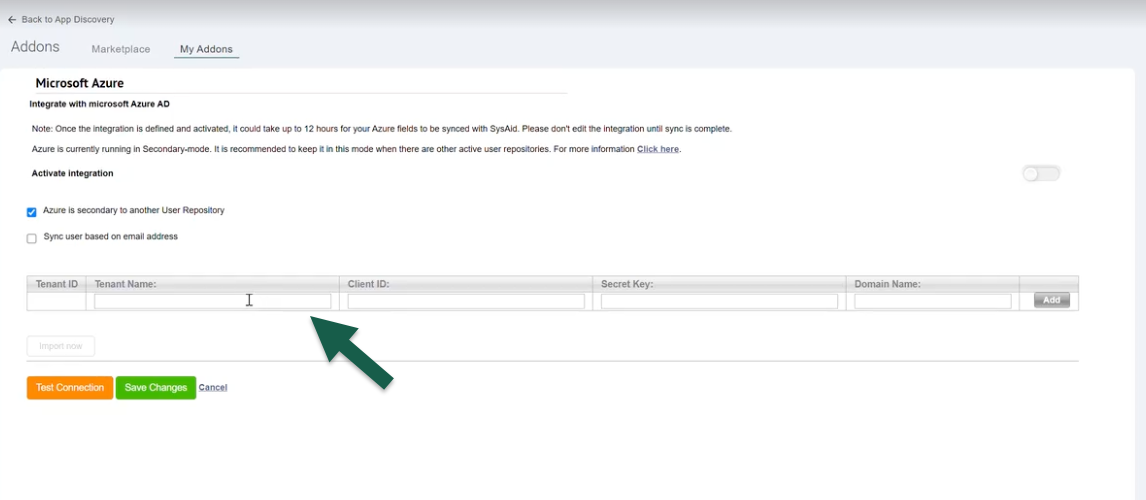
To connect Entra ID (Azure) and SysAid, you’ll need:
A Tenant Name
A Client ID
A Secret Key and Domain Name
Activate the connection
Let’s walk you through where to find the relevant details in Azure.
Tenant Name:
In the Azure portal, under Azure services, choose Microsoft Entra ID.
In the Overview section, go to Manage > Custom domain names.
Copy the name with an “Available” status and paste it into the Tenant Name field in SysAid.
Client ID:
Back in Azure, navigate to Azure Active Directory > App Registrations.
Click New Registration.
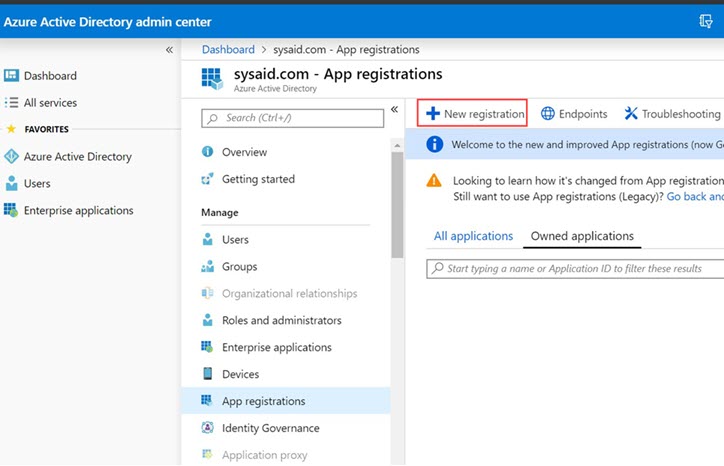
In the Name field, enter a name for the application, for example, "SysAid Login".
Click Register.
Back in the app Overview screen, click Add a Redirect URI.

Click +Add a Platform.
Click Web.
In the Redirect URL column, add your SysAid account URI.
Tip!
Your SysAid URI is the URl that you see when logging into your SysAid account. It should be in the following format:
https://www.[YourSysAidURI]
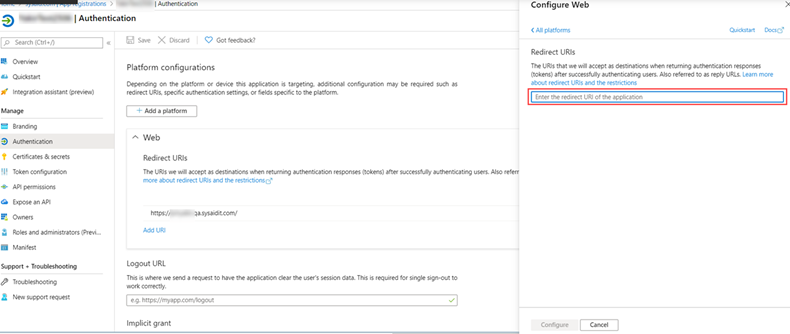
Click Configure.
Click Save.
Click Overview in the menu to the left.
Copy the Application (client) ID for the new SysAid app.

Back in SysAid, paste the copied text into the Client ID field.
Set Microsoft Graph permissions in Azure:
In Azure, navigate to Overview > View API permissions.
Click Add Permissions.
Click Select an API.
Select Microsoft Graph.
Select the
AuditLog.Read.Allpermission from the Application Permissions section.Click Save.
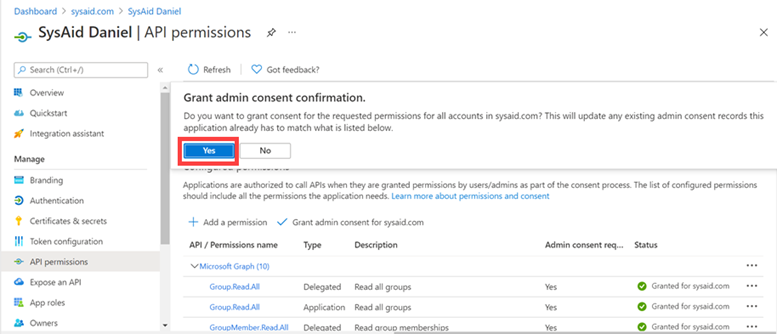
In the Required Permissions section, click Grant permissions.
When prompted, click Yes.
Secret key and Domain name:
In Azure, under the new SysAid app, go to Manage > Certificates & Secrets.
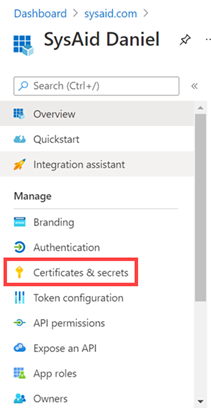
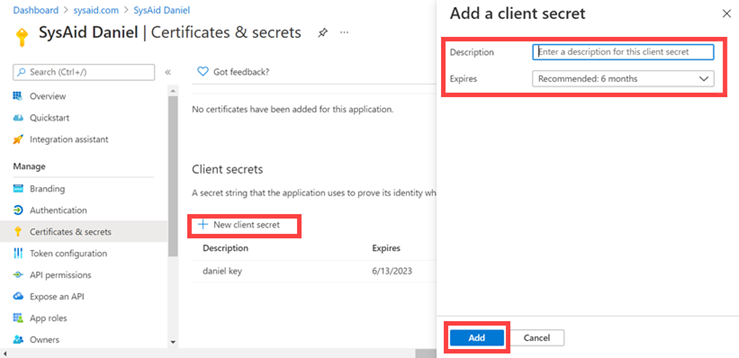
Click New client secret.
Enter a key name in the description field.
Select the expiration date that suits your security needs.
Click Add.
Copy the contents of the key's Value column.
Back in SysAid, paste the copied text into the Secret Key field.
Enter the domain you want, for example - [Your company name].com.
Activate the connection:
Make sure the Azure is secondary to another User Repository checkbox is checked.
Click Add.
Click Save Changes.
Click the slider in the top right corner to activate the connection.
SysAid and Entra are now connected. You can go ahead and start the application discovery process.
Starting the initial application discovery process
Once Entra and SysAid are connected, you can start the initial application discovery process:
In your SysAid account, go to License Manager > Applications.
You will see the system is ready, and you can click Start the discovery process to start the scanning process.
This process might take a while, as SysAid scans usage data from the last 30 days in 12-hour increments. You’ll see a notification on the screen letting you know when the process is complete.
Once the initial process is finished, the data will be refreshed daily to make sure everything is up to date.
Let us know what you think
We’re continuously working to improve application discovery, and your feedback plays a big part in shaping what comes next. You can share your thoughts at any time by clicking the Give Feedback button in the top-right corner of the page.
.gif)