SysAid allows you to send emails, SMSes, instant messages, and broadcasts using the Send Message page. You may access the Send Message page by going to My Menu > Send Message or by clicking  from within a service record. Note that in order to send somebody a message from within SysAid, they must be registered in SysAid as either an end user or an administrator.
Following is a brief description of the fields on this page and how to use them.
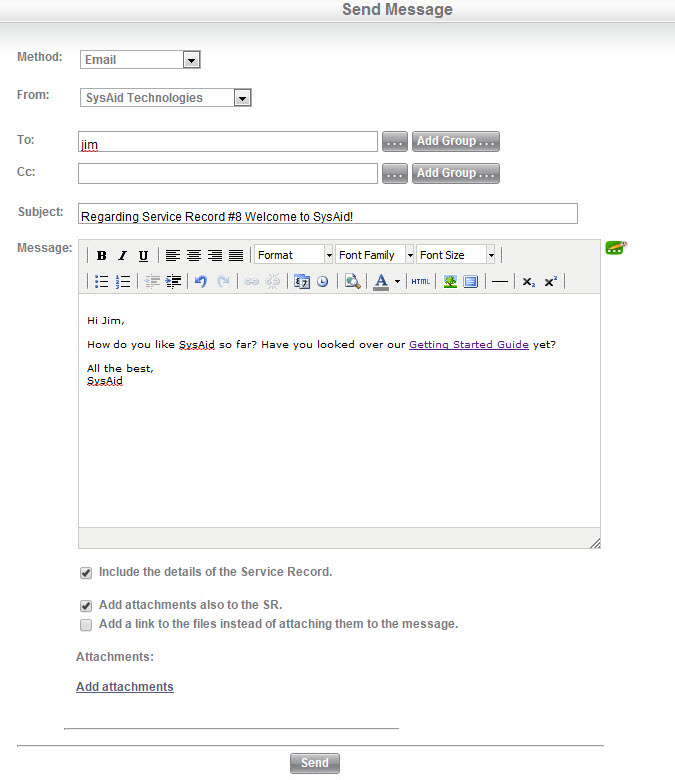
Fields on the Send Message page (click to expand)
Method
There are four ways you can send a message:Instant Message
Instant messages may be sent to administrators only. An instant message will pop up in a new browser window on the screen of the administrator the next time that administrator changes pages in SysAid. Popup blockers may interfere with this functionality.
email
Sends an email to the selected recipients. You must have enabled outgoing email integration from Settings > Integration > Email.
SMS
Sends an SMS to the selected recipients. You must have enabled SMS integration from Settings > Integration > SMS.
Broadcast
Sends a message that pops up on the screen of the selected recipients. In order to receive a broadcast, a user must have the SysAid agent installed on his or her computer. This popup does not use a web browser.
From
(email only) This allows you to choose whether to send the email from one of the helpdesk email addresses or from the administrator's personal email. In order for the From field to appear, you must either A) Allow to send messages from admin emails under Settings > Integration > email, and the administrator sending the email must have an email address registered in SysAid or B) have more than one outgoing email address for the helpdesk (Full Edition only).
To
Select the message recipients. This field accepts user names and not email addresses. You may also enter group names in brackets to send your message to all members of a group. Recipient/group names are separated by commas. You may use the ellipses button to pull up the Select Users page to find users, and you may use the Add Group button to pull up the Select Groups page.
CC
(Instant message, email, SMS) Sends a copy of your email to any user or group you list here. If you are sending the message from a service record, SysAid will record the names in the CC field in the message log.Severity
(Broadcasts only) Choose info or alert. The only difference is the image that will appear next to the popup message on the user's computer, used to indicate severity.Subject
(Instant message, email, SMS) This is the subject of your message.Message
This is the body of your message. The Email and Instant Message methods includes a rich text editor. Note that the rich text editor is only enabled if Content type is set to HTML under Email integration.
Quote the original message
This check box appears when you access the Send Message window by clicking on an email in the Messages tab of an SR. When the box is checked, SysAid appends the text from the original message to the message you are about to send. This allows users who receive the message to reference the previous email in the conversation.
Attachments
(Email only) Add attachments to a service record:- Click Add attachments. The Attachments window opens.
- Click Choose File and select the file for attachment. You can select up to three attachments at once.
- Click Attach Files. Please be patient while your files are attached. The Attachments window closes when the attachments are uploaded. You will see them listed below the Add button.
- If you need to add more attachments, return to step 1.
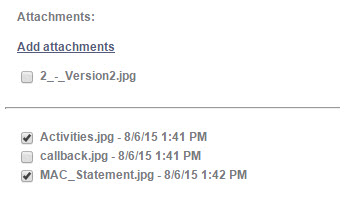
If you are sending the message from an SR, you can attach any files already attached to the SR by selecting their corresponding check boxes. These files are displayed seperate from any new files that you attach to the email.
If you added a file and then decided to remove it from the email, clear the check box corresponding to the desired attachment(s). Any file without a check in its check box is not attached to the email or to the SR.
Add attachments also to the SR
(Only available when sending a message from an SR) After sending your email, any attachments are added to the Attachments field on the service record. They are added with a timestamp indicating when the email was sent.
Add a link to the files instead of attaching them to the message
(Only available when sending a message from an SR) This stores the attachments on the SysAid Server and includes a link to download them in the email. This can be useful if attachments are blocked on the recipient's end.If you do not check the Add attachments also to the SR, option, then there is no link for new files that you add to the email and the files are sent as attachments to the email. Any files that are already attached to the SR are included as links.
Include the details of the Service Record
(Only available when sending a message from an SR) By default, this appends the content of the automatic notification "Email body to end user regarding a service record".
To customize separate content in this notification for manual notifications,i reference the ${ManualMessage} tag.
Send to all the child requests of this Service Record
(Only available when sending a message from a parent SR, i.e. an SR that has child SRs) To make it easier to communicate with all involved parties when managing a parent service record, this check box allows you to send your email to both the request user of the parent SR and to the request user of every child SR of the parent.Add/Edit automatic text messages
SysAid allows you to create automatic texts for use in messages. To insert an automatic text:- Click the cursor on the part of your message where you would like to insert the text.
- Click the Add/Edit automatic text messages icon
 to open the list of automatic text messages.
 - Click on the automatic text you would like to insert. You may also click Automatic Text Settings to open a screen where you can edit these texts.
For complete edit options for automatic texts, go to Settings > Customize > Automatic Texts.
Embed images in the email
You can embed images into the Question or Answer portions of a Knowledge Base article by clicking the .The process is different for images stored on the internet and images stored locally:
Internet images : Enter the Image URL in the following format: http://www.website.com/yourimage.xyz
Local images : Copy the image to the *...\SysAidServer\root* directory on your SysAid server and for the Image URL simply enter the filename. If you would like to create a new folder such as "Images" under *...\root* to store your images in, enter the Image URL as Images/yourimage.xyz . Make sure to use a forward slash and not a backslash.
Sending an email from a service record

