The report form allows you to run a report or modify almost any aspect of a report provided you have the necessary permissions. It also displays a dynamic preview of the report output that you can modify to ensure that the report best fits your requirements.
This page details some of the basic functions of the Report form.
For information on the various graphs or charts you can include in your report, see Report Types.
For information on building or editing your report, see Build Report.
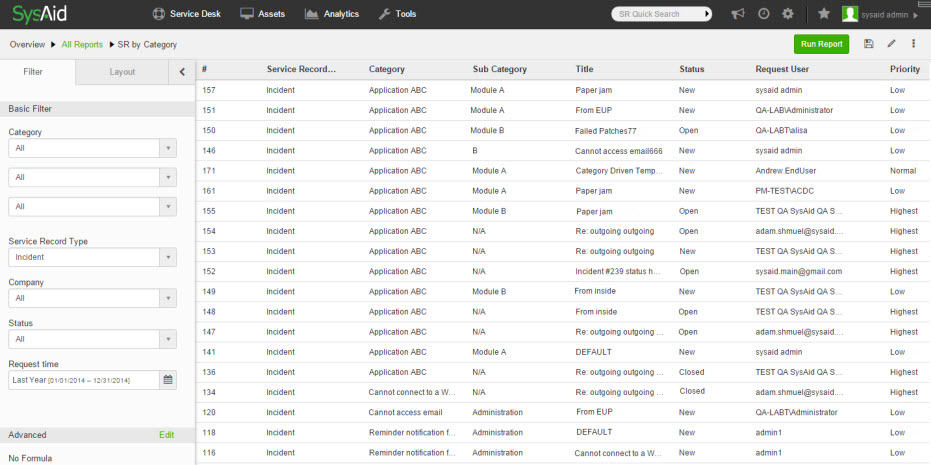
Filter a report
Admins without the Manage Report permission can filter the report's results with any of the predefined basic filter drop-downs in the Filter tab. Once a report is saved to My Reports, they can filter that version with the Advanced filter as well.
For more information on using the report filters, see Filter Report Results.
Run a report
To run the report
- In the top-right corner of the form, click Run Report.
- Select a file location to save the report to.
- Click Save.
The report file is downloaded to your machine, and SysAid creates a record of the report in the Recent Reports tab.
If the report run-time exceeds ten seconds, the report continues to run in the background. A download link appears in the Recent Reports tab when the report is ready.
Email a report
Emailing a report is similar to the Run option, except the process happens entirely in the background, and SysAid sends the report to the specified recipients when it's ready.
To email a report
- In the top-right corner of the form, click
 .
. - Select Email Report.
- In the Email Report dialog, begin entering the name of the person you want to send the report to and select the name from the autocomplete list that opens below.
If the Allow Admins to Send Emails to Addresses not Registered in SysAid option is selected in Email Integration, you can also enter any email address you would like to send the report to.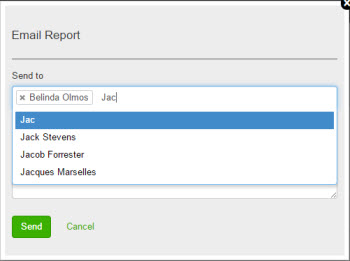
- Enter text for the email subject and body.
- Click Send.
When the report is ready, it is sent as an email attachment to the selected addresses. It also creates a new record in the Recent Reports tab.
Add a report to My Reports
Saving a report to My Reports, creates a shortcut to the report that includes your personally customized parameters such as: search criteria, output layout, scheduling preferences, etc. You can add the same report multiple times to My Reports with different parameters.
For example, you may want to run a report that displays data regarding the workload of an individual admin. You can save a shortcut for each admin you want the report to run for. In this regard, each report in My Reports must have a unique name. If you attempt to save a report with an already existing name, SysAid prompts you to change it.
The My Reports tab allows you to repeatedly run the report with customized parameters and add scheduling parameters. Once a report is added to My Reports, admins without Manage Reports permission can apply Advanced filter conditions to the report data.
To save a report to My Reports
- In the top-right corner of the form, click
 .
. - Select Save in My Reports.
- If a report with this name is already saved in My Reports, enter a unique name for the report and click Done.
Schedule a report
You can schedule a report to automatically run according to a specified recurrence. SysAid sends the report results to the specified email addresses.
Only reports saved to the My Reports tab can accept schedule parameters. Therefore, setting a schedule for a report from the All Reports tab includes saving the report to My Reports. Saving a report to My Reports, creates an advanced shortcut to the report that includes your personally customized parameters such as: search criteria, output layout, scheduling preferences, etc. You can add the same report multiple times with different parameters.
Each time you schedule a report from All Reports, a new version of the report is scheduled and does not affect previous schedules you set for that report.
To schedule a report
- In the top-right corner of the form, click
 .
. - Select Add Schedule.
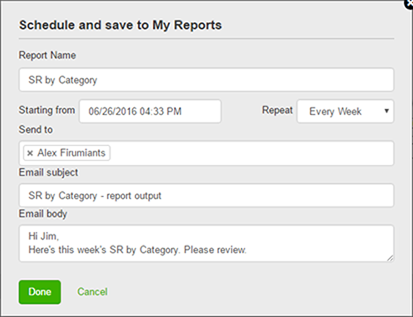
- If a report with this name is already saved in My Reports, enter a unique name for the report.
- In the Start From field, use the date picker to select an initial date and time for the report to run.
- From the Every drop-down, select if you want the report to run daily, weekly, or monthly.
- In the Send To field, begin entering the name of the person you want to send the report to and select the name from the autocomplete list that opens below.
If the Allow Admins to Send Emails to Addresses not Registered in SysAid option is selected in Email Integration, you can also enter any email address you would like to send the report to. - Enter text for the email subject and body.
- Click Done.
The report is saved as a unique instance in the My Reports and Scheduled Reports tabs. Every time it runs, it creates a record in the Recent Reports tabs.
Selecting Schedule again in the All Reports tab will save a new instance of the report to My Reports. To edit an existing schedule, you must open it in the My Reports or the Scheduled Reports tabs.
Define print settings
You can adjust how your printed report looks using the Paper Layout settings in your report form.
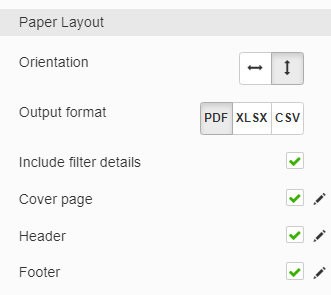
To set your print settings
- Select the Output format to print your report to .pdf, .xlsx, or .csv format.

- To include report details in the report select the Include Details check box.
If you selected .pdf format for your report, the following options are available:
- Select the vertical or horizontal arrow buttons to set your report to portrait or landscape orientation.

- If you want to include a cover page, select the Cover Page check box.
- To edit the cover page, click the pen icon next to the check box.
- Edit the text in the lightbox and click Done.
- If you want to include a header to appear on each page of the report select the Header check box.
- To edit the page header, click the pen icon next to the check box.
- In the lightbox select the header variables from the drop-downs.
- If you want to add your own text select User Specified Text and enter the text in the text box that appears.
- Click Done.
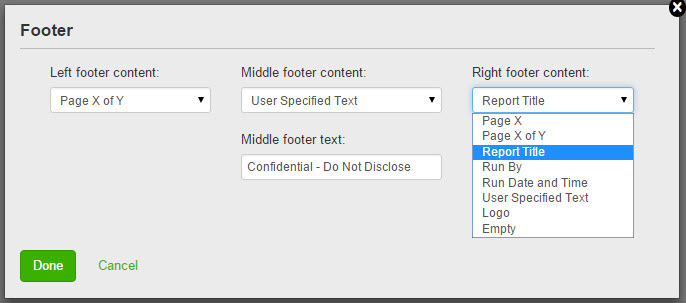
- If you want to include a footer to appear on each page of the report select the Footer check box.
- To edit the page footer, click the pen icon next to the check box.
- In the lightbox select the footer variables from the drop-downs.
- If you want to add your own text select User Specified Text and enter the text in the text box that appears.
- Click Done.
