The Report form allows you to control almost any element of your report. This page includes information about editing your report features. Please note, that some of these options are only available to admins with Manage Reports permission.
For more information about the report form, see Report Form.
For information on the various graphs or charts you can include in your report, see Report Types.
Edit report properties
To edit the report's properties:
Go to Analytics > Reports.
Click on the report you want to edit.
In the top-right corner of the report, click the 3-dot menu.
Select Properties.
Edit the desired properties (see Design Reports).
Click Done.
Delete the report
To delete an existing report:
Go to Analytics > Reports.
Click on the report you want to edit.
In the top-right corner of the report, click the 3-dot menu.
Select Delete Report.
When prompted, click Delete.
Preview the Report
The report preview covers the bulk of the report form and allows you to view an updated simulation of the published report. Every change you make to the preview appears in the published report. Admins with the Manage Reports permission can save changes to all instances of the report and admins with the Access Reports permission can save the changes to a new instance of the report in My Reports, or just run the changed report once by clicking Run Report.
Note:
The report preview is based on the first 2000 items that your report criteria yields. Your full, published report may display results that are different from those displayed in the preview.
Most of the options for editing the report are located in the right pane. To collapse the right pane, click  . To expand the right pane, click
  .
.
Edit Mode
Admins with Manage Report permission can click  to enter Edit mode. Edit mode allows admins to add, remove, or reposition field columns in the report and to sort or group the report data by one of the fields.
Please note that for clustered reports, the edit options are limited to the cover page and the filters.
Add/remove/reposition a column
You can add any SysAid field as a column to your report. All field options for the report's entity (SR, asset, etc) )are available in the Data tab on the right pane. You can also expand certain fields to add their sub-fields. For example, if you are creating an SR report and want data on SRs' request users' companies' countries, you can expand the Request User field, and then the Request User's Company field until you locate the Country field. You can also use the Search bar to narrow the list of fields.
Note:
Time fields in reports are displayed in Float format (1.5) as as opposed to HH:MM (01:30). This allows you to perform mathematical calculations on time values in your report data. For more information on performing mathematical calculations, see Summarize a numeric field below.
To add a column to your report:
In the top-right corner of the form, click
 .
.On the right pane, select the Data tab.
Locate the field you want to add.
If you want to narrow down the list, begin entering the name of the field you want in the Search bar.
Select the field you want and drag it to the position you want in the Report preview.
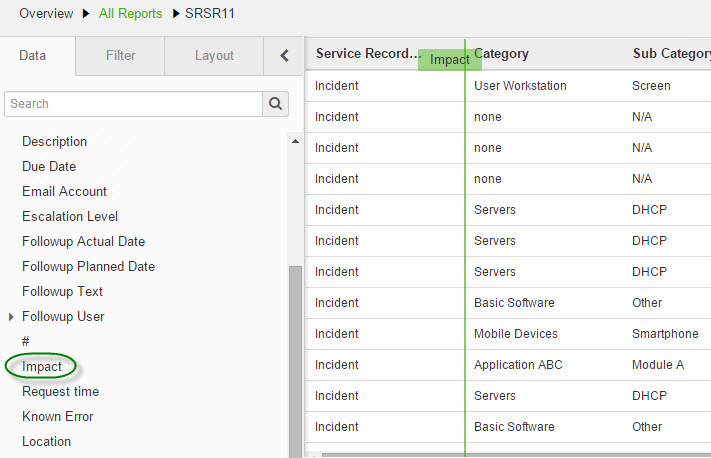
To remove a column from the report:
In the top-right corner of the form, click
 .
.Hover over the column header you want to remove, and click
 .
.From the Column menu, click Remove Column.
To change a column’s position, click on the column header and drag it to the desired position.
Sort report data by a specific column
You can sort a report by a column in ascending or descending order.
To sort a report by column:
In the top-right corner of the form, click
 .
.Hover over the column header you want to sort, and click
 .
.From the Column menu, click Sort Ascending or Sort Descending.
Group by a specific field
You can also choose to group the result results by a particular field. Each group header displays the group's field value and number of list entries.
To group the report by a specific field:
In the top-right corner of the form, click
 .
.Hover over the column header you want to group your results by and click
 .
.From the Column menu, click Group by this Field.
If you want to remove the grouping, click Remove at the end of any of the group headers.
Summarize a numeric field
You can calculate the values of numeric fields displayed in your report.
To perform a calculation on a numeric field's column:
In the top-right corner of the form, click
 .
.Hover over the column header you want to group your results by and click
 .
.From the Column menu, click Summarize this Field.
Select the calculations you want to perform on the column.
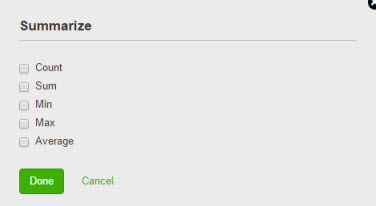
Click Done.
The results of the calculations are displayed at the bottom of the column.
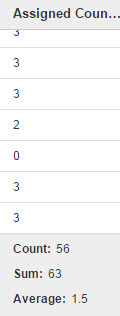
Filter report results
You can use Basic and Advanced filters to narrow down the results of your report. If any part of a filter for a clustered report conflicts with a filter for one or more of its individual reports, the filter for the clustered report is given priority.
Basic filter
The basic filters allow you to select values from predefined fields to narrow the report data.
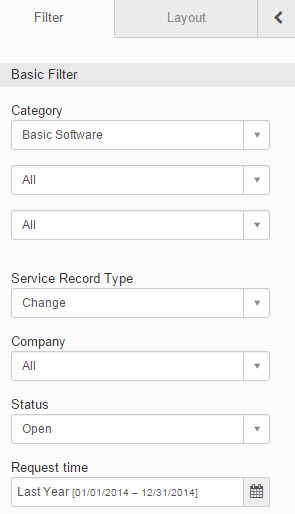
To apply a basic filter:
In the right pane, select the Filters field.
Select values from the drop-downs you want to apply to the report.
If you want to filter by a date click
 .
.In the date picker select a predefined date range or click a start date and end date on the calendar.
Click Done.
The selected date appears in the date field.
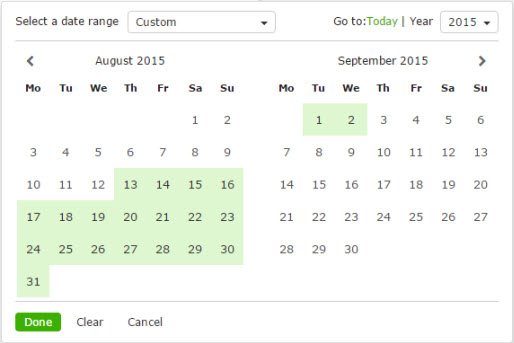
The report preview automatically updates as you select your filter values.
To save your filter to the report click
 .
.
Note:
Only admins with the Manage Reports permission can save the filter to the source report (located in All Reports). Once saved, the filter is applied to all instances of the report in My Reports tab of all admins in the account.
Admins without this permission can run the filtered report without saving it or they can save it to My Reports.
Add/remove basic filter fields
Admins with the Manage Reports permission can activate Edit mode to add new fields and remove fields in the Basic filter
To add fields:
In the top-right corner of the form, click
 .
.At the bottom of the Basic filter, click Add New Filter.
Select the field you want to enter.
Click Select.
When you've added all the fields you want, click
 again to exit Edit mode.
To remove fields:
In the top-right corner of the form, click
 .
.Click the X corresponding to the fields you want to remove.
When you've removed the fields you want, click
 again to exit Edit mode.
Advanced filter
You can use the advanced filter to build custom filter queries to apply to your report results. The advanced filter expression is added as an AND statement to whatever filters you have set in the Basic filter.
To build an Advanced filter expression:
In the Advanced area of the Filter tab, click Edit.
Select a field, a filter operator, and a value for your filter condition.
If you want to add another condition, click Add New Filter and build your condition.
The number corresponding to the new condition is added to the filter statement at the top of the Advanced Filter area.
Click Done.
Edit the filter statement
When you add a filter condition, SysAid automatically adds the condition to the statement with an AND statement. You can edit the statement to best fit your needs.
Let's say Mary, a support manager, is creating an advanced filter with the following three conditions:
Due Date is set for any time within the current year
Urgency is High
Urgency is Very High
By default, Mary's Advanced filter statement would be "1 AND 2 AND 3". The problem is that both 2 and 3 represent the Urgency field which can only hold one value at a time. If she runs a report with this filter, it will search for tickets that have an Urgency of both High and Very High, which would return an empty report. Mary decides to fix this fault by replacing the AND operator with the OR operator so the filter returns all tickets due within the current year and with an Urgency of High or Very High. After this replacement, her filter statement reads "1 AND 2 OR 3".
But now Mary has a new problem. The system does not know how to process this statement. She intended to search for tickets due within the current year (1) and with an Urgency of High (2) or Very High (3), but the statement can also be read as all tickets with both a Due Date within the current year (1) as well as an Urgency of High (2) or tickets with an Urgency of Very High (3) regardless of the Due Date! In fact, because this statement is ambiguous, SysAid does not let Mary save it in this form. To fix this issue, she must add parenthesis to properly group her conditions. Now her statement read as "1 AND (2 OR 3)". Now her filter is ready to go.
Illegal Filter Expression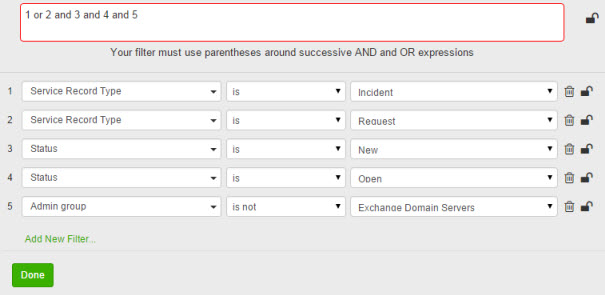
A few days later, Mary realized that she needed to further narrow down her report results with a fourth condition, Category not equal to Network Equipment. Before she builds the category she decides to modify the statement manually so it reads "1 AND (2 OR 3) AND 4". SysAid doesn't permit this statement because condition 4 has not yet been defined. Once the condition is defined, it is added automatically to the statement.
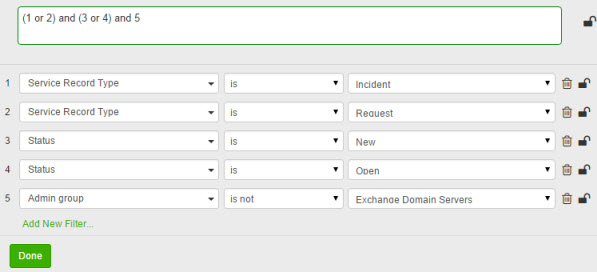
To edit the filter statement:
In the Advanced Filter area of the Filter tab, click Edit.
Click the filter statement text box and enter your changes.
Click Done.
Filter Statement
Lock a filter or condition
Admins with the Manage Reports permission can lock filter conditions or the entire Advanced filter. This ensures that the report is always run with the locked elements of the filter and that those elements cannot be removed or edited by an admin without the Manage Reports permission. If you place locks on filters of a report in the All Reports tab, those filters are locked in all of the instances of the report.
To lock an advanced filter condition:
In the Advanced Filter area of the Filter tab, click Edit.
Click
 next to the condition you want to lock.
If you want to lock the entire advanced filter, click
 next to the filter statement.
If you want to unlock the filter or any of its conditions, click

next to the item you want to unlock.Click Done.
Remove filter condition
To remove a filter condition:
Click
 next to the condition you want to remove.
Your Filter statement automatically updates to reflect your deletion.Click Done.
Admins with the Manage Reports permission can click  to save any changes to the source report.
Admins with the Access Reports permission can save filters or Print settings changes to their version in My Reports.