This page is designed to guide you through the initial setup of Change and Problem Management.
Location Guide - Where do I go in order to...?
- Create a new change/problem: Service Desk > Help Desk > Changes or Service Desk > Help Desk > Problems.
- Choose which action items appear on a given workflow tab within a template: Settings > Service Desk Templates > Change Templates or Settings > Service Desk Templates > Problem Templates.
- Choose which action items appear on a given workflow tab within a specific change or problem: Open the individual change request or problem and navigate to the workflow tab in question.
- Define the attributes of an action item for a given template: Settings > Service Desk Templates > Change Templates > Attributes (button) or Settings >Service Desk Templates > Problem Templates > Attributes (button).
- Define the attributes of an action item on a specific change request or problem: Open the individual change request or problem, navigate to the action item in question, and click the attributes button.
- Modify an individual action item layout: Click the cogwheel icon
 for that action item. See How do I edit the contents of an action item? for full instructions.
 - Modify one of the non-workflow tabs for a change or problem: Settings > Service Desk Templates > Sub Types (open the subtype you would like to change)> Edit Sub Type View.
- Choose which workflow tabs appear on a change or problem: Settings > Service Desk Templates > Sub Types (open the subtype you would like to change)> Edit Sub Type View.
- Choose the initial status of an incident linked to a change or problem: Settings > Service Desk > General.
- Choose how the status of a linked incident changes as the status of its corresponding change or problem changes: Settings > Service Desk > SR Status Settings.
- View action items and their assigned users: Service Desk > Help Desk > Service Record Actions.
- Create notifications to be used by Change and Problem Management: Settings > Service Desk Templates > Workflow Notifications.
Frequently Asked Questions
What are workflow tabs and action items?

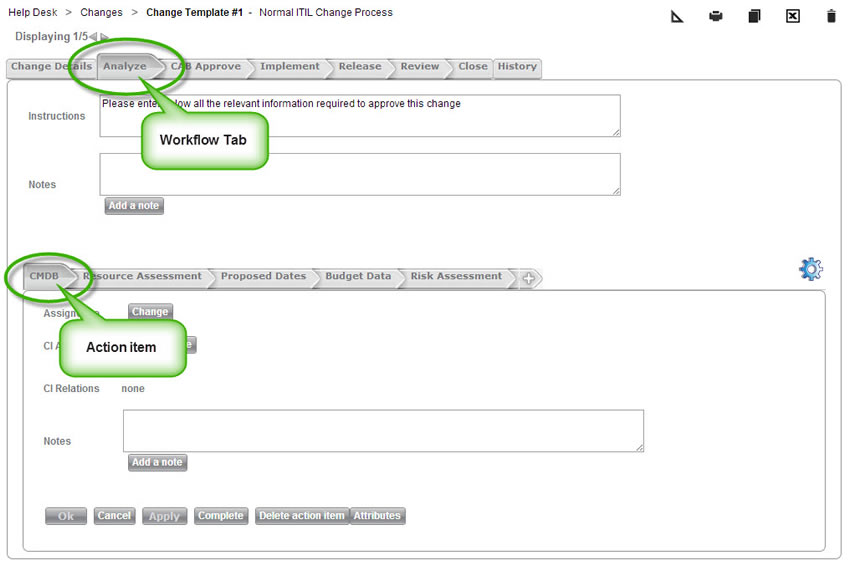
- Workflow tabs are the primary tabs in change and problem management, located on the top half of the screen. Unlike regular tabs, workflow tabs have a pointed end on the right side to indicate the direction of the workflow.
- Action items are the secondary tabs in change and problem management. Each workflow tab has its own action items.
How do I create a new change or problem?
There are two types of changes and problems-- linked and unlinked.
To create a linked change or problem:
- Open the service record you would like the change or problem to link to.
- Click the Create a new linked item button
 .
. - Select the type of item to link to. In this case, you will choose either a change template or a problem template.
- Choose the appropriate change or problem template to use based upon the situation.
- Click Create new.
To create an unlinked change or problem:
- Go to Service Desk > Help Desk > Changes or Service Desk > Help Desk > Problems.
- Click the New button.
- Choose the appropriate change or problem template to use based upon the situation.
- Click Create new.
How do I add an action item to a template?
- Go to Settings > Service Desk Templates > Change Templates or Settings > Service Desk Templates > Problem Templates.
- Click on the template you would like to edit in order to open it.
- Click on the workflow tab to which you would like to add the action item.
- Click on the + button at the end of the row of action items. This duplicates the last action item in the row.

- See How do I edit the contents of an action item? for further instructions on configuring this new action item.
How do I edit the contents of an action item?
Before editing an action item, please read I just edited an action item and now all changes/problems that use that action item have changed. Why?
- Open a change or problem that contains the action item you would like to edit.
- Open the workflow tab that contains the action item.
- Click on the action item to select it.
- Click the cogwheel icon
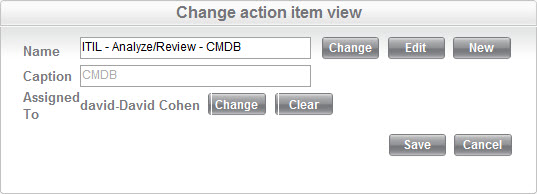
 located to the right of the action item row to open the Change action item view.
- Click the Edit button to the right of the name field. This opens the design action item view. (If, instead of redesigning the current action item, you would like to change the action item to another already existing action item, use the Change button and select your desired action item from the action item list.)
- You are now looking at the design action item view. For full instructions for this page, please read about customizing forms.
- Click Save to save your modified action item. This closes the design action item view and returns you to the Change action item view.
- Click Save to confirm the selection of this action item. This closes the action item view and updates the workflow tab.
How do I use automatic notifications for changes and problems?
How do I configure action item and workflow tab dependencies?
How do I update the status of a linked incident as the change/problem progresses?
Notifications, linked incident status, and dependencies for changes and problems are controlled individually by action item from the action item attributes page.
- Go to Settings > Service Desk Templates > Change Templates or Settings > Service Desk Templates > Problem Templates.
- Click on the template you would like to edit in order to open it.
- Click on the workflow tab that contains the action item to which you would like to add a notification or a dependency.
- Select the action item to which you would like to add a notification, a dependency, or a linked incident status change.
- Click on the Attributes button at the bottom of the page. This opens the attributes and dependencies page.
- For more information about configuring the attributes and dependencies page, see here.
How do I add or remove a workflow tab?
How do I edit the Request Details or Close tabs?
In order to change workflow tabs or edit the normal tabs in a change or problem, you must edit the sub type.
- Go to Settings > Service Desk Templates> Sub Types.
- Click on the change or problem sub type that you would like to edit. This opens the sub type edit page. Alternatively, you can create a new sub type by clicking the New button.
- Click on the Edit Sub Type View link. This opens the edit sub type view page.

- Click on the tab that you would like to edit.
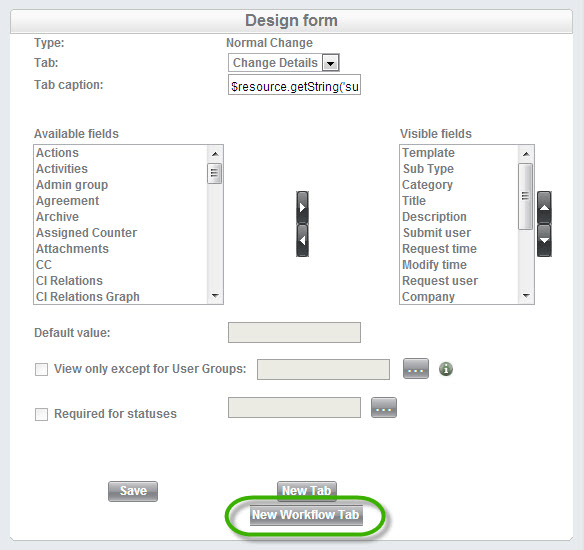
- Click on the Design Form option on the top right. If you are on a regular tab, the design form page opens. If you are on a workflow tab, the change action item view page opens.
- For full instructions on designing a regular tab, please go here.
- To add a workflow tab, click New Workflow Tab.

- Enter a new tab caption and click Save.
- Go to Settings > Service Desk Templates > Change Templates or Settings > Service Desk Templates > Problem Templates.
- Create a new template or edit an existing template that's based upon the sub type you just edited/created.
- Navigate to the workflow tab you just created. The new workflow tab is currently empty.
- Click on the design form icon
 on the top row of menu icons. This opens the change action item view.
 - Select an action item for the workflow tab (the top half of the screen). See How do I edit the contents of an action item? starting with step 5 for instructions.
- The new workflow tab is now completed, and you can add additional action items as appropriate.
I just edited an action item and now all changes/problems that use that action item have changed. Why?
Action items are universal. When you edit an action item, you are editing that action item for all templates that use it. For example, if five templates use the same action item, they are all pointing to one centrally stored action item. Therefore, if you edit that action item, any change or problem that uses it is affected. Always be sure you know all locations an action item is used before editing it. If you have any concerns about making mistakes, you can always create a new action item and avoid any potential problems.
I just edited a sub type and now all templates that use that sub type have changed. Why?
Editing a sub type will affect any change or problem based upon that sub type. Be very careful when editing sub types. Rather than editing sub types, it can sometimes be better to create a new one that contains the modifications you need. This is especially true if you need to make changes to only certain change/problem templates that are based upon a specific sub type.
Where do I define notifications for changes and problems?
Notifications for changes and problems are defined under Settings > Service Desk Templates > Workflow Notifications.