The SSO Connector integrates SysAid with Microsoft Entra (Azure AD) and supports multi-tenanted authentication platforms. It gives your users a seamless login with their existing corporate credentials, enforces stronger security through your IdP’s policies (such as MFA and conditional access), and ensures centralized user management within your identity provider.
SysAdmins can configure the SSO Connector in both SysAid and Entra to enable secure, single sign-on for the entire organization.
Please note:
In case you decide to install the integration that we do not provide our support, you hereby acknowledge and agree that you install and maintain such integration on your sole responsibility and that SysAid will have no responsibility, nor liability, with this regard.
How it works
The SSO Connector acts as a bridge between SysAid and your identity provider (IdP), allowing your users to sign in securely with their existing corporate credentials.
Here’s what happens behind the scenes:
When a user tries to access SysAid, the SSO Connector redirects the login request to your organization’s IdP.
The IdP verifies the user’s identity (e.g., through username/password, MFA, or other authentication methods).
Once the identity is confirmed, the IdP sends a secure token back to SysAid via the connector.
SysAid uses this token to grant the user access—without needing a separate SysAid username or password.
Requirements
The SSO Connector requires an Azure AD (Entra) account because setup relies on creating an app registration in Entra.
If your organization uses a local Active Directory (LDAP), you can still enable SSO by syncing it with Azure AD (Entra).
Users must have an existing account in SysAid unless the Create new users option is enabled.
If it’s disabled, only pre-existing SysAid accounts can log in.
If it’s enabled, users without a SysAid account will have one created for them at first login.
Setting up the SSO Connector
To set up the SSO Connector, you’ll configure parameters both in SysAid and in Microsoft Entra (Azure AD). The process involves four main steps:
Configure the Callback URL and Issuer in SysAid – Install the SSO Connector add-on and enter your SysAid Callback URL.
Generate the Federation Metadata URL in Entra – Register a new application, update its manifest, and copy the Federation Metadata URL into SysAid.
Set the App ID URI and Application ID – Configure authentication and API exposure in Entra, then paste the values into SysAid.
Enable and finalize the integration – Adjust user creation and domain mapping options, enable the integration, and save your changes.
Once these steps are complete, your users can seamlessly log in to SysAid using their Microsoft Entra (Azure AD) credentials.
Step #1: Configuring the Callback URL and Issuer in SysAid.
To configure Office 365 parameters in SysAid:
In SysAid, go to Connect and click Explore in the Marketplace banner.
Search for SSO Connector and click on the card.
Click Setup and manage. You will be redirected to the My add-ons page, where you’ll see SSO Connector .
Click the gear icon.
In the Office 365 Callback URL field, enter https://<YOUR SYSAID URL>/addons/multiSSOConnector/jsp/consume.jsp
Where can I find my SysAid URL?
Your SysAid URL can be found by navigating to Settings > Network Discovery > Downloads. You will see it at the bottom under Server URL.
Step #2: Generating the Federation Metadata URL
In Azure, under Azure services, choose Microsoft Entra ID.
From the left pane, select App Registration.
Click New Registration.
In the Name field, enter a name for the application (for example, "SysAid SSO Connector").
Click Register.
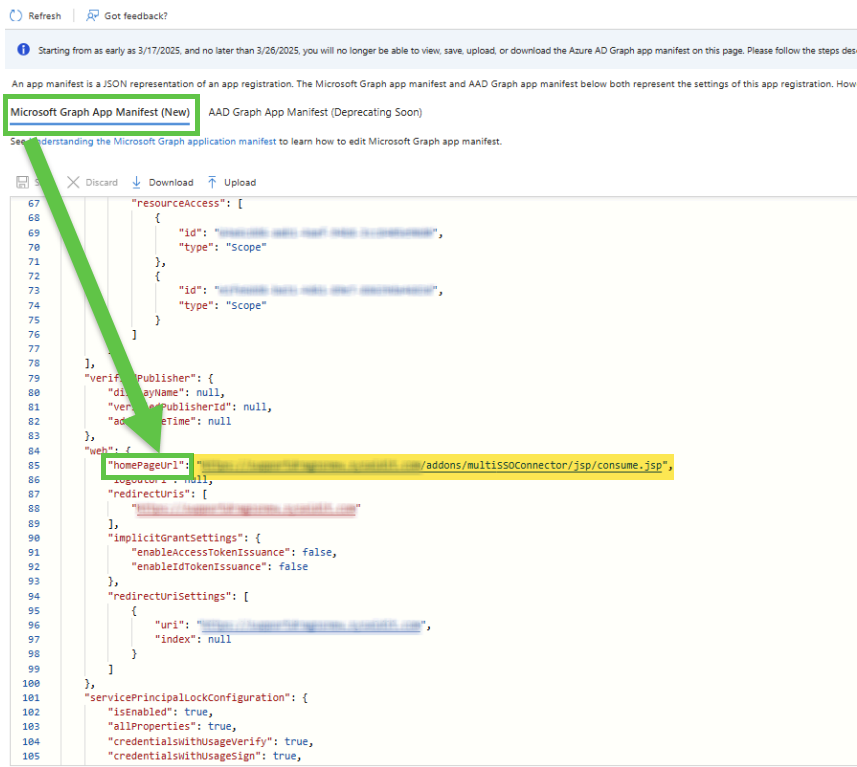
On the left-hand menu, click Manifest.
At the top, switch to the ADD Graph APP Manifest (New) tab.
Search for the homePageUrl parameter.
Change the parameter to the callback URL you set in SysAid. Make sure it's enclosed with quotes.

Click Save.
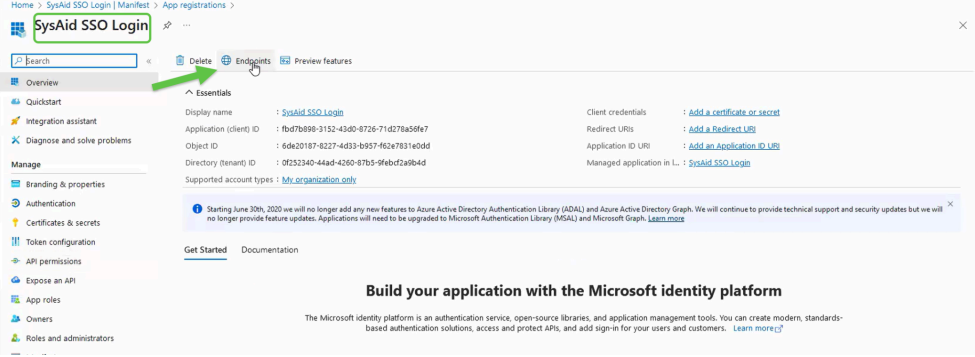
In the app view, go to Overview > Endpoints.

Copy the Federation metadata document URL.
Back in SysAid, paste the copied URL into the Federation Metadata URL field.
Click Save Changes.
Step #3: Filling in the App ID URI field and copying the Application ID
In Entra, go to Authentication in the left-hand menu.
Click Add a platform.
Click Web.
In the Redirect URI column, add your SysAid account URL.
Where can I find my SysAid URL?
Your SysAid URL can be found by navigating to Settings > Network Discovery > Downloads. You will see it at the bottom under Server URL.
Click Configure.
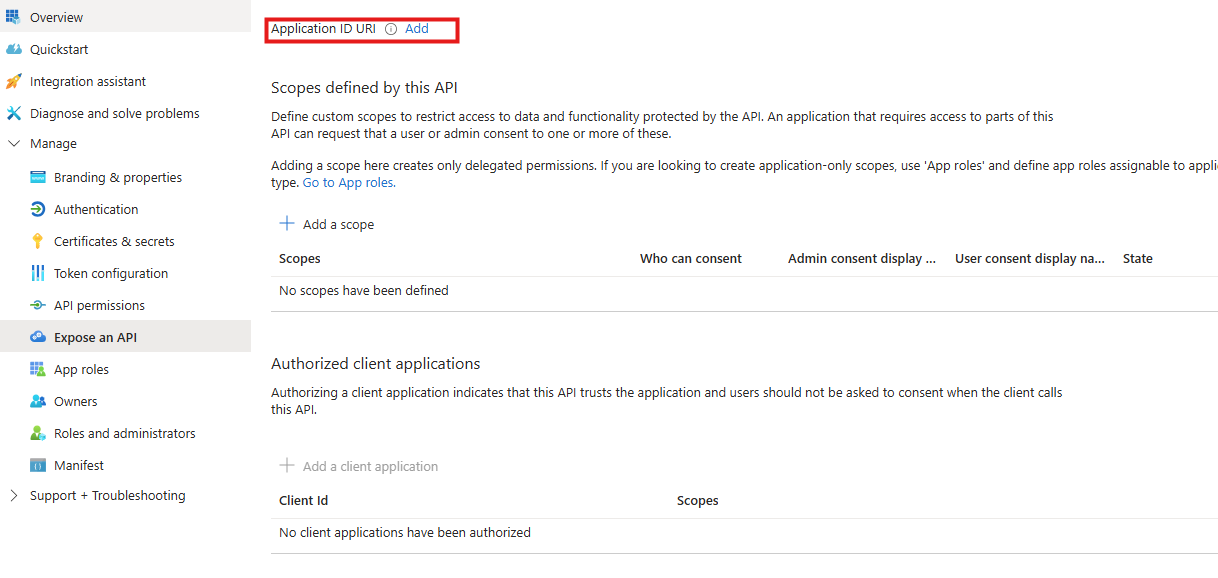
Click Expose an API.
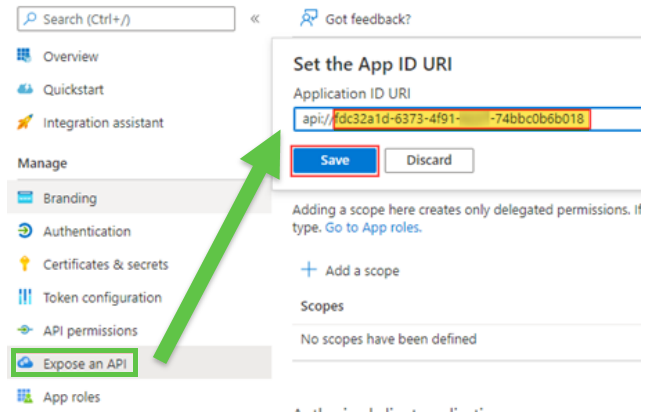
Find the Add an Application ID URI and click Add.

Click Save.
Copy everything that comes api://.

Back in SysAid, paste the string in the Office 365 issuer field.
Click Save Changes.
Add an optional claim (this step is required when the 'Sync user based on email address' field in the integration setup page is set to Y):
In Entra, from the side menu, click Token configuration.
Click Add optional claim.
In the Token Type area, select SAML.
In the Claim column, select email.
Click Add.
Click Save.
Step #4: Enabling the integration
(Optional) If you want SysAid to create new users with their Office 365 IDs, type "Y" in the Create New Users field.
(Optional) You can replace the domain of users who log into SysAid via Office 365 with any name you want in the Domain Mapping field. This allows you to sync users with their existing names in SysAid.
The Tenant(s) Domain Mapping field is required for the integration to work. Enter the Azure domain name using the format 'domain.com'.
Repeat this process for all integrations.
For each integration, in the Enabled field, enter Y or N to determine if the specific integration should or should not be enabled.
In the HTML for the Main Login Page field, you can enter HTML and CSS code to determine the content and appearance of the Main Login page that appears when the user accesses SysAid.
Turn on the Activate Integration toggle.
Click Save Changes.
To add more than three integrations, click Add. To remove an integration, click Remove at the bottom of the integration.
Troubleshooting
Manually logging into SysAid
If you need to manually log in to SysAid to fix your SSO Connector configuration:
For SysAid Spaces use the following URL: <SYSAID URL>/spaces/login?manual=true
For SysAid Classic use the following URL: <SYSAID URL>/Login.jsp?manual=true
Changing the integration details
After you fill in on the details and save, you will not be able to edit or change any of the integration details.
To change or update the details:
Navigate to Settings > Integrations > My Apps.
Click the gear icon on SSO Connector.
Click Add at the top of the page.
Reconfigure the integration with the new details.