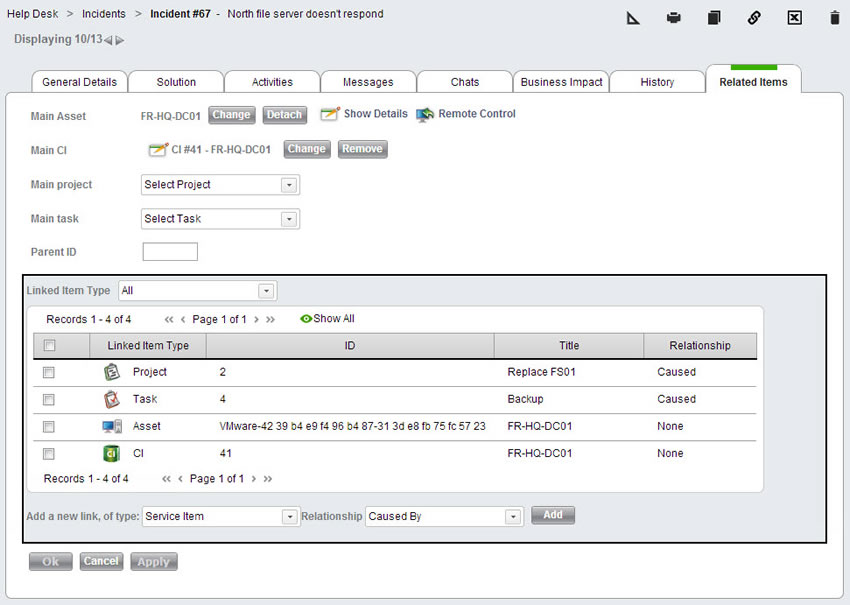
This tab allows you to manage the relationships between the service record and other entities within SysAid. Creating relationships allows you to easily see what this service record is connected to, and it also creates links to the related items so that you can easily navigate back and forth between them.
When you are done making all necessary changes to your service record, click OK/Apply to save your work.

Following is a description of the default fields that appear on this page:
Main Asset
Please read the description found in SR Fields. A service record's Main Asset is added to the Linked Items table that appears on this tab.
Main CI
Similar to the Main Asset. Once a service record has a Main CI, the service record will appear on the Help Desk tab for that CI in the CMDB. For more information about the functionality of the Main CI, see Business Impact, above. A service record's Main CI is added to the Linked Items table that appears on this tab.
Main Project
If this service record is part of a project, you can select the relevant project here. This adds a link to the project so you can easily access it from the service record. A service record's Main Project is added to the Linked Items table that appears on this tab.
Main Task
Selecting a Main Task adds a link to the task so that you can easily access it from the service record. If you have selected a Main Project for this SR, only tasks that are part of that project will appear in this list. If no project is selected, all tasks for all of your projects appear in this list. A service record's Main Task is added to the Linked Items table that appears on this tab.
Parent ID
Sometimes, multiple service records are submitted for the same problem. A good example is when the internet goes down, and you get 30 service records informing you of this. In order to effectively manage all of these service records together, SysAid allows you to make one service record the parent and all other service records the children. Any status changes that affect the parent SR affect all the children (such as closing the SR), and any email sent to the parent SR can also be sent out to all of the child SRs. In this way, you can manage all of the service records as one.
Parent SRs
A service record is automatically considered a parent service record as soon as it has child service records. This means that all you need to do is assign the child SRs. If you would like to see all child SRs for a given parent, open the parent SR and add the field Child Service Records to the form by clicking Design Form.
Child SRs
To make a service record a child service record, enter the SR# of the parent SR into the Parent ID field and click OK/Apply. This adds a link to the parent SR. Once a service record is marked as a child, you don't generally need to look at it again. Note that the only way to change the status of a child SR is by changing the status of the parent.
Using the Linked Items table
The Linked Items table shows you a list of all items related to the service record. Click on any item to open a new window with details for that item.
Items added to this table also appear in the Linked Items table for the related item. For example, if you add a task to the Linked Items table on a service record, you will see the service record in the Linked Items table for that task.
Adding linked items
The following four items are added to this list automatically, as detailed immediately above:
- Main Asset
- Main CI
- Main Project
- Main Task
To manually add linked items:
- Select the type of item you would like to add using the Add a new link, of type drop-down list.
- Choose whether the linked item caused the current SR, was caused by the current SR, or neither.
- Click Add. This opens a list of items of the selected type.
- From the list, select one or more items using the checkboxes at the left end of the rows.
- Click Select to save the selected items. This closes the list and attaches the items.
Removing linked items
To remove linked items that were added automatically (such as Main Asset), remove the connection (e.g. Detach the asset,) and the item will be removed from the table.
To remove linked items that you added manually:
- Select one or more linked items using the check boxes.
- Click Delete from the list actions.