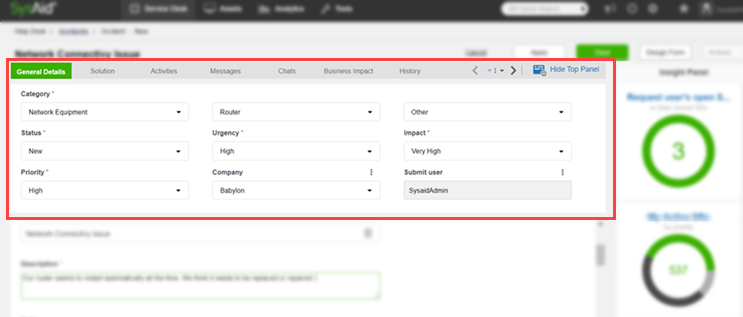
The SR form is where you create new service records, update service records, record activities, and otherwise manage all facets of an individual service record. The form is divided into three sections, the top panel, the bottom panel, the insights panel. The top and bottom panels consist of various fields that provide information about your SR, and the
Form Layout
The top panel is intended for high-level information, such as the SR's category, assigned admin, and status. These fields remain fixed in place at the top of the screen so you can review them whenever the SR is open. To optimize space on your screen, the fields in the top panel appear side-by-side and the entire panel can be collapsed and expanded at any time.
The bottom-panel is for more granular details for the SR. You can divide these fields into tabs and add or remove tabs according to your usage needs. Each tab on the SR form has its own fields, each with its own purpose. Read below for an overview of each tab and the fields it contains.
The top panel and any tab on the bottom panel can be customized to determine which fields appear where and the order in which they appear. It's highly recommended to put all of the fields you use most on the General Details tab so you can avoid changing tabs too frequently. See here for a full glossary of all available fields for the SR form. Please note that the top panel has a limit of nine fields and the Category field is takes up three of those spaces.

Insights Panel
The insights panel displays relevant data in graphical widgets - to help you quickly access the information you need to analyze your tickets and reduce your response time.
You can click on a segment of a chart to access a list of items represented by that segment.
For information on customizing the Insights Panel, see below or Insight Panel Customization.
Customize the SR form
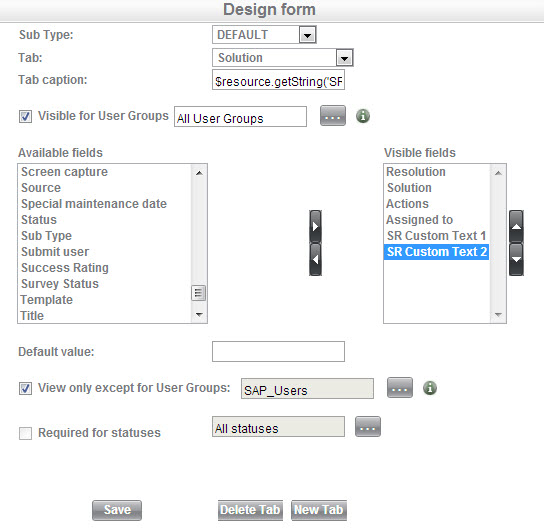
You can customize which fields appear in the SR form. For a detailed description of all available fields, see SR Fields. For more form customization options see Customize Forms.
To Add/remove fields in the Top Panel
- On the top-right of the form, click Design Form.
- From the Tab drop-down list, select Top Panel.
- Use the Right/Left arrow buttons to move fields between the Available Fields and Visible Fields sections.
- Use the Up/Down arrow buttons to reorder fields within the Top Panel.
- Click Save when your changes are completed.
Add/remove fields in the Bottom Panel
- On the top-right of the form, click Design Form.
- From the Tab drop-down list, select the tab in the Bottom Panel that you want to customize.
- Use the Right/Left arrow buttons to move fields between the Available Fields and Visible Fields sections.
- Use the Up/Down arrow buttons to reorder fields within the Top Panel.
- Click Save when your changes are completed.

Add widgets in the Insights Panel
- Navigate to Settings > Service Desk > Side Panel Widgets.
- Click the widget you want to add.
- From the Enabled drop-down list, select Yes.
- Select if the widget should be visible Always, in New Service Records, or in Existing Service Records.
- Click OK.
Remove widgets in the Insights Panel
- Navigate to Settings > Service Desk > Side Panel Widgets.
- Click the widget you want to remove.
- From the Enabled drop-down list, select No.
- Click OK.
Reorder widgets in the Insights Panel
- Navigate to Settings > Service Desk > Side Panel Widgets.
- Click the check box corresponding to the widget you want to move.
- Above the list, select Move Widget Up or Move Widget Down.