SysAid and Lansweeper allow you to effortlessly scan and discover all assets across your network, giving you a broader view and up-to-date hardware and software data at your fingertips.
Lansweeper is an IT Network Discovery tool that automatically scans and inventories devices, software, and user data across an organization. It helps businesses track assets, manage compliance, and gain insights into their IT infrastructure.
Managing IT services without accurate asset data is like navigating without a map. While IT Service Management (ITSM) ensures smooth service delivery, IT Asset Management (ITAM) provides visibility into the assets that power those services. Without effective ITAM, IT teams face outdated asset records, compliance risks, and inefficiencies that slow down service delivery.
This integration eliminates these challenges by bringing real-time asset intelligence into your ITSM workflows, ensuring IT teams have the right data at the right time to make better decisions, improve security, and enhance efficiency.
Available for:
SysAid Spaces
SysAid Classic
Lansweeper Pro plan or or an on-premise with Cloud Pro Sync turned on
How it works
Once the Lansweeper and SysAid are connected, all the device data in Lansweeper will be imported into SysAid.
During the import process, SysAid’s system matches assets according to manufacturer and serial number:
Assets already in SysAid’s database will be enriched with additional information from Lansweeper, but will still retain “Agent” or “WMI” as their source to avoid asset duplication.
New assets will be imported and created only if both vendor and serial values exist. They will show “Lansweeper” as their source, and display all the information imported from Lansweeper.
You also have the option to create a filter so that only assets with specific parameters are imported and synced. SysAid will run a daily scheduled sync to import new and updated data from Lansweeper.
If your account exceeds its asset quota, new assets will be created in a disabled state, and existing disabled assets will not be updated.
Lansweeper on-prem:
For your integration to work, you'll have to link your Lansweeper to the cloud. To learn how to do that, visit Lansweeper Community.
Connecting Lansweeper and SysAid
The connection process consists of these main steps:
Adding the Lansweeper addon
Creating a Lansweeper account. If you already have an account, you can go directly to step #4.
Creating scanning credentials
Connecting Lansweeper with SysAid
Turning on the integration
We’ll walk you through each and every step.
Step #1: Adding the Lansweeper addon
To add the Lansweeper addon to your SysAid account:
In SysAid, go to Connect and click Explore in the Marketplace banner.
Search for Lansweeper and click on the card.
Click Setup and manage. You will be redirected to the My add-ons page, where you’ll see Lansweeper.
Click the gear icon.
Next, you’ll need to create an account with Lansweeper.
Step #2: Creating a Lansweeper account
To set up a Lansweeper account:
Go to Lansweeper’s website, click Start Free, and begin the free trial process. If you already have an account, you can go directly to step #4.
Fill in your details for the account.
Click Download Scanner and start the setup process.
Select the Easy install installation type.
Tip:
For additional information about the installation process, see Lansweeper’s Create a Lansweeper Site and Installation video.
Lansweeper will run a Prerequisite check to make sure your installation is ready to link to the Cloud. For more details, see Lansweeper Community.
Click Finish.
Log in to your account with the details you provided for the trial account.
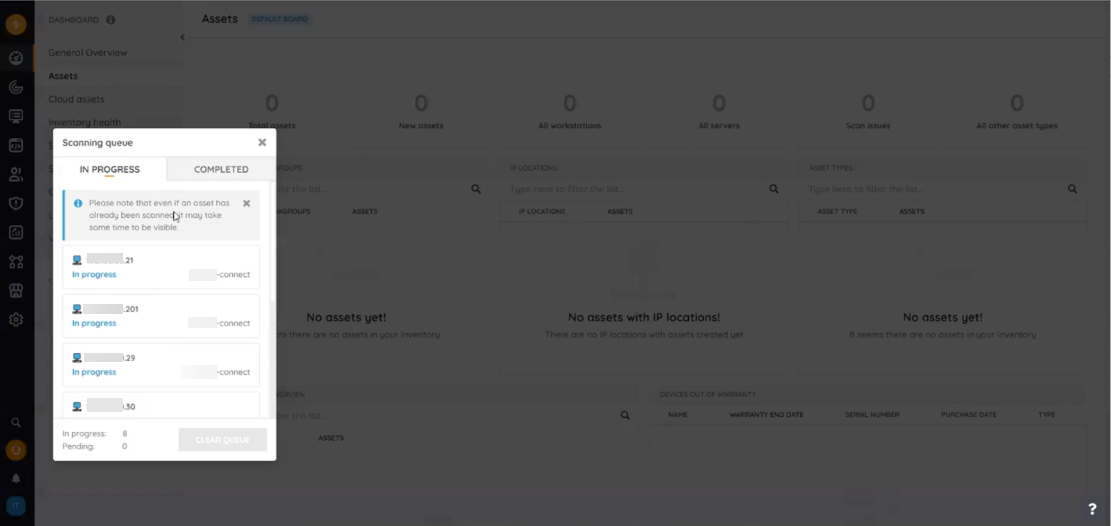
Once the setup process is finished and you have access to your Lansweeper account, you can click on Scanning Queue in the bottom left corner. You will see the scans Lansweeper will be running to detect devices in the selected network.

Lansweeper’s discovery technology utilizes a proprietary blend of active, passive, and agent-based discovery technologies for maximum coverage and efficiency.
Please note:
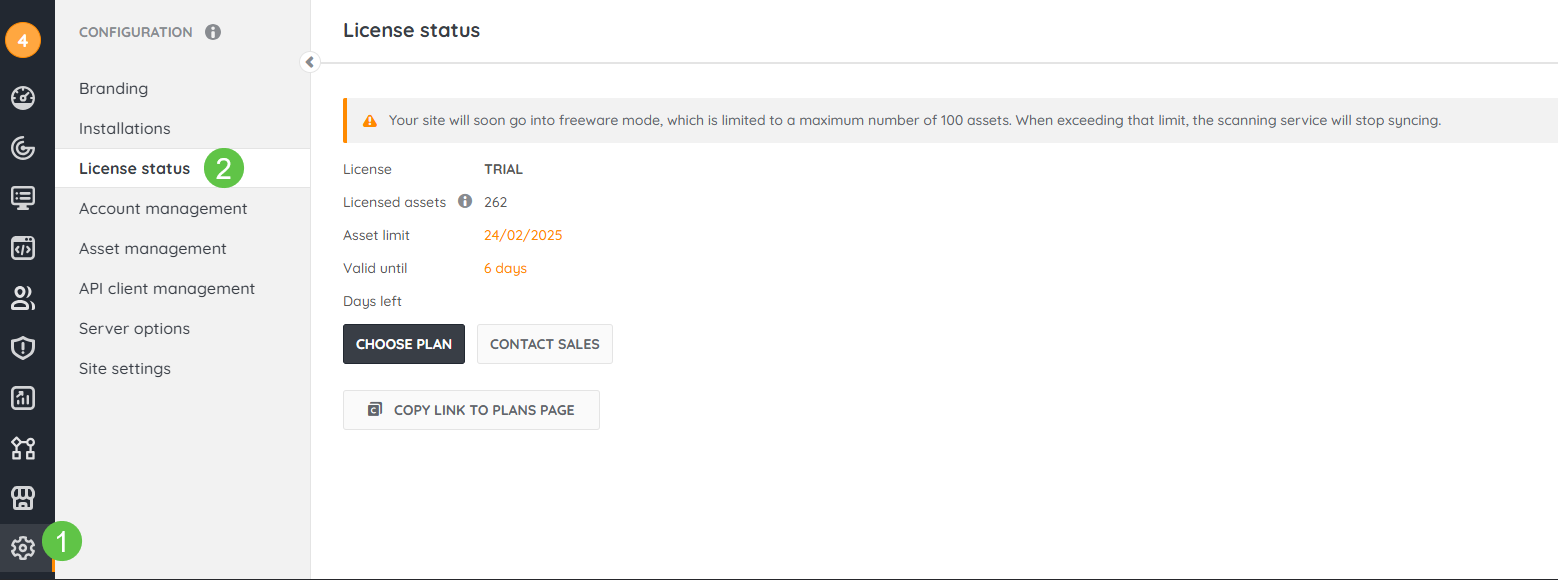
The Lansweeper free trial ends after 14 days. If you haven’t purchased a Lansweeper license, the integration will stop working once the trial is over. You can reach out to your SysAid representative or our Sales team to purchase a license as part of your SysAid plan. After purchasing a license, your Lansweeper account will be automatically upated.
You can check your Lansweeper license status by navigating to Settings > License status.
Step #3: Creating scanning credentials
We recommend creating scanning credentials to get as many details as possible to enrich your asset management to the fullest.
To create the scanning credential:
In your Lansweeper account, go to Scanning > Credential Vault.
Click Default Credentials.
Click Add default credentials +.
Add credentials for Windows, SSH, and SNMP.
You can add credentials for additional systems as needed.
Please note:
Credentials are stored securely in an on-premise vault, ensuring that they are never stored in the cloud.
To learn more about Lansweeper Security, see Lansweeper’s website.
Once the scan is complete, you can go ahead and connect Lansweeper with SysAid.
Tip:
If you have different sets of credentials for different systems, set them up as My credentials:
Go to Scanning > Targets and click the scan server you installed.
Click Add Scanning target + and select the scan type.
Map the credentials you want the scan to use if they are not part of the default credentials you entered
To learn more, see Lansweeper’s video on Credential vs. Credential-less Scans Compared.
Step #4: Connecting Lansweeper with SysAid
To connect your Lansweeper account with your SysAid account:
In your Lansweeper account, go to Settings in the bottom left corner.
Go to Developer Tools > API clients.
Click Add new API client.
Select Personal Access Token (PAT).
In the API client name field, enter “SysAid”.
From the Integration drop-down menu, select SysAid.
Click Continue.
Under Which sites do you want to give access to SysAid? Select your SysAid domain.
Click Allow and copy the token.
In your SysAid account, go to your My apps page, where you’ll see Lansweeper.
Click the gear icon.
Paste the copied Lansweeper token in the API Token field.
Step #5: Turning on the integration
Fill in the Filter field if you want to only import assets with specific parameters
Example filters
Filter that pulls two assets with specified keys:
{conjunction: OR, conditions: [{operator: EQUAL, path: "key", value: "ASSET1_KEY"}, { operator: EQUAL, path: "key", value: "ASSET2_KEY"}]}Filter that pulls assets that have a non-empty manufacturer and serial:
{conjunction: AND, conditions: [{operator: EXISTS, path: "assetCustom.manufacturer", value: "true"}, {operator: EXISTS, path: "assetCustom.serialNumber", value: "true"}]}Filter that pulls assets that have been updated after 1st of Jan:
{conjunction: AND, conditions: [{ operator: GREATER_THAN, path: "assetBasicInfo.lastUpdated", value: "2025-01-01T13:16:02.013Z" }]}Filter that only loads devices with Windows or Linux OS installed: {conjunction: OR, conditions: [{operator: EQUAL, path: "assetBasicInfo.type", value: "Windows"}, { operator: EQUAL, path: "assetBasicInfo.type", value: "Linux"}]}
Filter that excludes importing devices with Windows or Linux OS installed:
{conjunction: AND, conditions: [{operator: NOT_EQUAL, path: "assetBasicInfo.type", value: "Windows"}, { operator: NOT_EQUAL, path: "assetBasicInfo.type", value: "Linux"}]}
Click Test Connection to verify that you are connected to Lansweeper.
Please note:
Incorrect syntax in the Filter field may cause the test to fail. If you’ve added a filter, try removing it and running the connection test once again.
Turn on the integration toggle - the Lansweeper asset data will be imported to SysAid within 24 hours.
Run a test import:
To quickly preview how imported device data appears in SysAid, click Import Sample to instantly load up to 40 devices for review.
Select the Scheduled run checkbox.
Now, the scheduled sync will happen once every 24 hours to ensure the asset data is up to date. You can check the last time an import ran by checking the “Last Updated” field in the Lansweeper addon page in SysAid.
Viewing Lansweeper asset data in SysAid
Once your Lansweeper integration is up and running, your Lansweeper information is integrated with SysAid asset management. Here are a few places where you can view your Lansweeper data.
Asset list
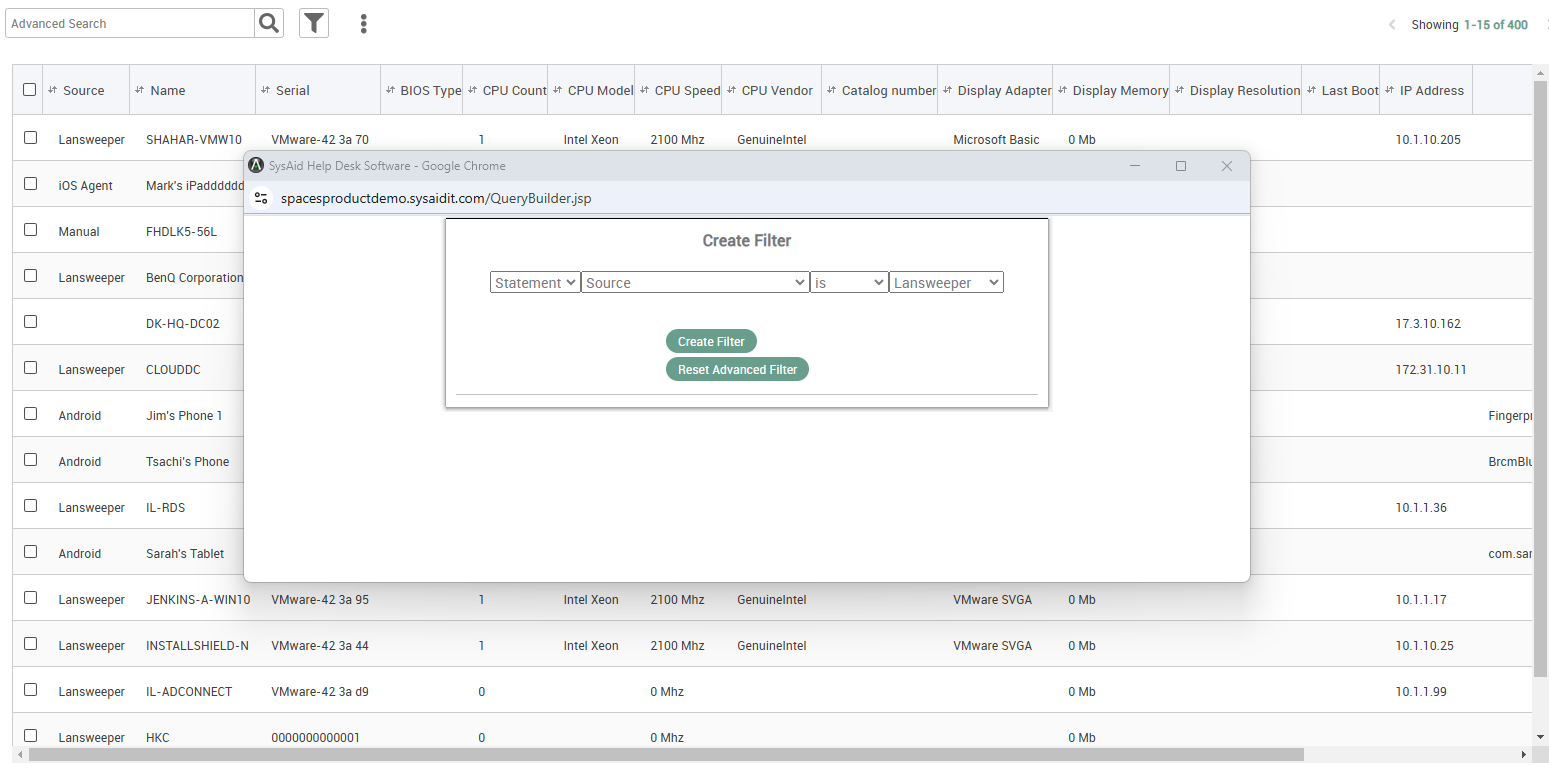
The imported Lansweeper devices are displayed in the asset list.
You can view all the devices that came from Lansweeper by filtering the asset list by “Source is Lansweeper”.

Please note:
This filtering will only show newly added devices. Models and serial numbers that already exist in SysAid’s database will be enriched with additional information from Lansweeper, but still have “Agent” or “WMI” as their source - to avoid asset duplication.
When looking at a specific asset, you’ll see the Additional data field populated with even more data from Lansweeper.
Device mapping
Various Lansweeper device types will be remapped when imported into SysAid. You can see the full device mapping below:
Lansweeper device type | SysAid asset category |
|---|---|
Android | Smartphone |
Apc | Other SNMP Device |
Apple Mac | Workstation |
Aws Ec2 Instance | Server |
Azure Virtual Machine | Server |
Blackberry | Smartphone |
Blade Server | Server |
Cell Phone | Smartphone |
Chrome Os | Workstation |
Citrix Guest | Server |
Citrix Pool | Server |
Citrix XenServer | Server |
Computer | Workstation |
Desktop | Workstation |
DNS Server | Server |
Esxi Server | Server |
Firewall | Firewall |
Hyper-V Guest | Server |
Ipad | Tablet |
Iphone | Smartphone |
KVM Switch | Switch |
Laptop | Laptop |
Linux | Workstation |
Mail Server | Server |
Mobile | Smartphone |
Nas | Other SNMP Device |
Network Device | Other SNMP Device |
Power Distribution Unit | Other SNMP Device |
Power Injector | Other SNMP Device |
Printer | Printer |
Proxy Server | Other SNMP Device |
Router | Router |
Security Appliance | Firewall |
Switch | Switch |
Tablet | Tablet |
Unix | Server |
Virtual Machine | Server |
Vmware Guest | Server |
Vmware Vcenter Server | Server |
Webserver | Server |
Windows | Workstation |
Windows Ce | Tablet |
Windows Ce 2 | Tablet |
Windows Ce 3 | Tablet |
Windows Ce 4 | Tablet |
Windows Ce 5 | Tablet |
Windows Phone | Smartphone |
Wireless Access Point | Other SNMP Device |
Wireless Controller | Other SNMP Device |
Xdsl Router | Router |
