This page allows you to build or edit the parameters of an email rule. The page is composed of three sections, which determine:
Each rule should have a unique name and is only applied if it is enabled. You can select if subsequent email rules on the list should be applied to service records on which this rule runs.

Make sure to click Save at the bottom of the page when you are finished.
Plase note:
Email cannot be applied if there is a “\” character in any of the strings.
Which incoming email addresses does the rule apply to?
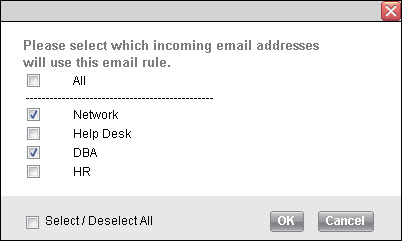
From the top section of the page, you can select incoming email addresses to apply this rule to. Once you add email addresses, SysAid applies the rule only when an email is received by these addresses.

To add incoming email addresses for the rule
Next to the Incoming email addresses field, click
 .
.Perform one of the following actions to select the incoming email addresses you want to add:
To add specific email addresses, select the check boxes corresponding to those addresses.
To select all of the listed email addresses, select the Select/Deselect All check box on the bottom of the screen.
To apply this rule to all listed email addresses, including any addresses that are integrated after you create the rule, select All.

Click OK.
The email addresses appear in the Incoming email addresses field.
If you want to remove the email addresses, click Clear.
For information on adding more email addresses to the list, see Email Integration.
What text does the rule search for?
In the next area of the screen, you can add search text or email addresses for SysAid to look for when parsing the incoming email. You can use the Expression Builder to set the rule to run based on the search text's presence in the email.
To set search criteria
Next to the Text to search for field, click
 .
.Use the Expression Builder to build your search criteria. The search criteria appear in the Text to search for field.
If you want to remove the search conditions, click Clear.

You can set a condition to apply to any of the following parts of the email:
The sender's email address
The subject
The body
The subject or the body
The address that the email was sent to (the "To" field) - This could be helpful if you have multiple Alias addresses that are all routed to the same inbox.
You can select from five different operators to apply to the part of the email you selected:
Operator | Description | Examples |
|---|---|---|
Equals | The selected section contains only the the exact text that you enter. | Example:Subject Equals "server" Meaning: The entire subject of the email is the word "server". |
Does not equal | The selected section's text is not the exact text that you enter. | Example: Body Does not equal "computer" Meaning: The body of the email contains content other than the word "computer". |
Contains | The selected section includes some form of the text that you enter. | Example: Body Like "print" Meaning: The body of the email includes content similar to the word "print", such as the word "printer", "printing", or "printed". |
Does not contain | The selected section does not include any form of the text that you enter. | Example: Subject or Body Not like "network" Meaning: The word "network" does not appear in any form in the email's subject or body. |
Is empty | The selected section contains no content. | Example: Body Is empty Meaning: The body of the email is completely blank. It contains no content (including text, spaces, or images). |

What fields does the rule update?
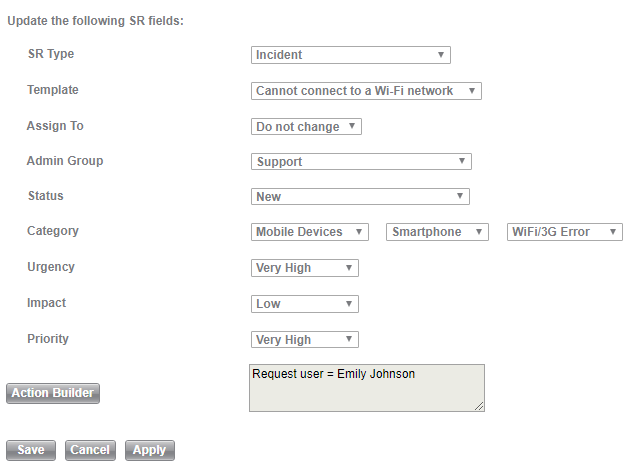
You can set any of the following actions to happen when SysAid runs the email rule:
Set the SR type (incident, request, change, or problem)
Set the SR's template
Assign the service record to an administrator
Assign the service record to an admin group
Set the status of the service record
Set the category of the service record
Set the urgency of the service record
Set the impact of the service record
Set the priority of the service record
Use the action builder for fields other than those listed above
Please note:
If you set an email rule to set the SR type, subsequent email rules cannot change the SR type or template. Any rule that sets the type or template should be placed at the top of the email rule list to ensure that it runs first.
The action builder allows you to set almost any field on a service record when SysAid applies the email rule.
To set a new action:
Click Action Builder.
Choose the field(s) you would like to set.
Enter the value for the field.
Click Create Filter.
Note that, unlike the Expression Builder, the Action Builder only allows you to choose the And statement. SysAid implements all actions you specify when it applies the email rule.
Example: This email rule sets the new SR as an incident with the Cannot Connect to a Wi-Fi Network template, assigns it to the support admin group, sets the status as New, gives it the category of Mobile Devices > Smartphone > Wifi/3G Error, sets the Urgency and Priority to Very High, the Impact to Low, and Emily Johnson as the Request User.

When you are finished creating/editing your rule, click Save.