You can set up email integration with the OAuth 2.0 protocol with Microsoft 365 or Google. The instructions below can be applied to incoming or outgoing email integration or both.
Setting up outgoing/incoming email integration with the OAuth 2.0 protocol
Follow these steps to set up the email integration:
Step #1: Setting the Protocol in SysAid
In SysAid, go to Settings > Integrations > Email Integration List.
Click +New.
Go to the Outgoing Email tab.
From the Protocol drop-down, select OAuth 2.0.
Select Google.
Step #2: Creating a project in Google
Navigate to the Google Cloud Platform Console. If you haven't used this Google Cloud Platform Console yet, agree to their terms and conditions.
Click Select a project.
Click New Project.
Enter a Project name, select an Organization and Location, and click Create.
Step #3: Adding Gmail API and Google Calendar API scopes
From the navigation menu, select APIs & Services > Library.
Search for "Gmail API" and select it from the search results.
Click Enable.
Go back to the API/Service Details page.
Search for "Google Calendar API" and select it from the search results.
Click Enable.
Step #4: Creating a service account
In the Google Cloud Platform Console, go to Credentials.
Click Create Credentials.
Select Service Account.
Enter any name for your service account.
Click Create.
Step #5: Setting owner access
In the 'Grant This Service Account Access to Project' step, click within the Select a role field.
In the window that appears, select Project > Owner.
Click Continue.
Click Done. You will be prompted to configure the OAuth consent screen with information about your application. Click on Configure consent screen.
Click Get started.
Fill in the App name and User support email (this email address does not have to be the same one as the integrated email) fields, and click Next.
Select Internal and click Next.
Fill in the Email address field (this email address does not have to be the same one as the integrated email) and click Next.
Make sure to agree to the Google API Services: User Data Policy and click Continue.
Click Create.
Click Create OAuth client.
Set the Application type to Web application.
Enter a name for the application, such as “SysAid Email Integration”, and click Create.
Click Download JSON, then click OK.
Navigate to Data access.
Click Add or remove scopes.
Enter https://mail.google.com/.
Select the option from the drop-down and click Update.
Please note:
If the option you are searching for doesn't appear in the drop-down menu, you may need to enable the API on your account: Click the link for the Google API Library, search for Gmail API, and follow the instructions for enabling the API.
Repeat the Add Scope process (step #16) and search for https://www.googleapis.com/auth/calendar to add the Google Calendar API.
Click Save.
From the main navigation menu, select IAM and Admin > Service Accounts.
Click your new service account and select the check box for Enable G-Suite Domain-wide Delegation.
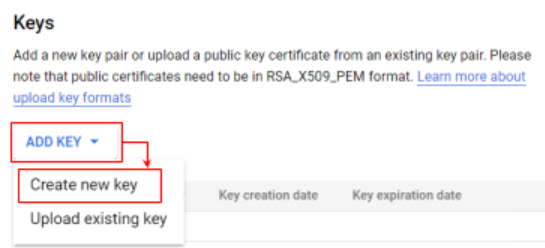
Click Add Key.
Click Create new key.

Select JSON.
Click Create.
Save the downloaded JSON file to a location on your PC where you can access it later.
Click Save
Step #6: Configuring the Google Admin console
Navigate to the Google Admin console.
Click Security.
Navigate to Access and data control > API Controls.
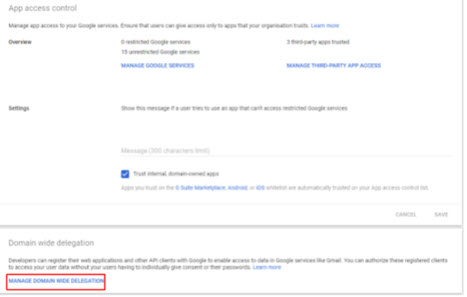
Click Manage Google Services.
Make sure Gmail and Calendar are marked as Unrestricted.

Return to the Advanced Settings screen and select Manage Third-Party App Access.

Click Configure new app.
Select OAuth App Name Or Client ID.
In the search box, enter the value of the
client_idparameter from your JSON file.Select the application you created.

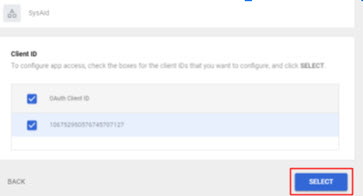
Select both Client ID check boxes and click Continue.

Under App Access, select Trusted Can Access All Google Services.
Click Configure.
Return to the Advanced Settings screen and select Manage Domain Wide Delegation.

Click Add New.
In the Client ID field, enter the value of the
client_idparameter from your JSON file.In the OAuth scopes field, enter https://mail.google.com/ and https://www.googleapis.com/auth/calendar.
Click Authorize.
Step #7: Entering the generated values in SysAid:
Open the JSON file you generated.
Copy the value of the
client_idparameter and paste it into the Service Account field in SysAid.Copy the value of the
private_keyparameter and paste it into the Private Key field in SysAid.
Follow the instructions in the related content below to fill out the rest of the email form. Be sure that the inbox that you set up for incoming email integration is dedicated specifically for incoming email integration with SysAid and not used for any other purposes.
Email processing behavior
When Google Email Integration with OAuth 2.0 is enabled, SysAid continuously monitors the integrated Gmail mailbox for new incoming emails.
All emails sent to the integrated email address are automatically processed by SysAid and used to create service records. Once an email is successfully processed, it is removed from the Inbox to prevent duplicate service record creation.
In Gmail, emails removed by automated integrations are moved to the Trash folder. This behavior is part of Gmail’s standard design for OAuth 2.0–based access and automated message handling.
Emails in the Trash folder are retained for 30 days, after which they are permanently deleted by Google.
Viewing processed emails
To locate emails that were processed and removed from the Inbox, open the Trash folder in Gmail. All processed emails remain available there until the 30-day retention period expires.
Keeping a copy of incoming emails (optional)
If you want to retain a visible copy of all incoming emails, you can configure SysAid to save copies to a dedicated folder.
To do this, go to Settings > Setup > Email > Incoming Email and fill in the Send a copy of the incoming emails to field (available for Enterprise editions only). When configured, SysAid will store a copy of each incoming email in the selected folder instead of relying on the Trash.
Alternatively, Gmail filters and labels can be used to apply a label to incoming emails before they are processed by SysAid.
To learn more, see Incoming Email Integration Form.
Related content
Email list
Required network access
Email form
Outgoing email
Incoming email
Microsoft 365 Email Integration with OAuth 2.0
Email rules