SysAid’s Microsoft Intune integration allows you to automatically and securely pull information from your Intune Inventory to SysAid.
This provides centralized access to asset information; enhancing your capability to quickly service the devices in your network and improve efficiency as part of the ITSM process.
Requirements:
SysAid Cloud
How it works
Once the Intune and SysAid are connected, all the devices in Intune (workstations, smartphones) data will be imported to SysAid.
During the import process, SysAid’s system matches assets according to manufacturer and serial number:
Newly imported assets will show “Intune” as their source and display all the information imported from Intune
Assets that already exist in SysAid’s database will be enriched with additional information from Intune, but still have “Agent” or “WMI” as their source - to avoid asset duplication
You also have the option to create a filter so that only assets with specific parameters are imported and synced.
SysAid will run a daily scheduled sync to import data new and updated data from Intune.
Imported fields
When you import data from Intune, the integration pulls and maps the field values from Microsoft Intunes to SysAid asset management as follows:
Intune Field | SysAid field |
|---|---|
Name | Name |
Intune Device ID | Intune ID |
Model | Model |
Serial number | Serial |
Operating system | Operating System Type |
Operating system version | Operating System Version |
Total storage space | HDD Total Space |
Free storage space | HDD Total Free Space |
Total physical memory | Memory |
Manufacturer | Manufacturer |
Subscriber carrier | Current Carrier |
Last check-in time | Update Time |
Device ownership | Ownership |
Primary user | Owner |
Phone number | Phone Number |
| Additional data from Intune - These are additional fields that were not mapped to specific fields in SysAid. It can be added to the asset page via the design form. |
Adding the Intune add-on
To add the Intune addon to your SysAid account:
In SysAid, go to Connect and click Explore in the Marketplace banner.
Search for Microsoft Intune and click on the card.
Click Setup and manage. You will be redirected to the My add-ons page, where you’ll see Intune.
Click the gear icon.
Now, you can go ahead and connect the apps - keep your SysAid account in one tab and open a new tab to connect to your Azure portal.
Connecting Intune and SysAid
To connect Intune and SysAid, you’ll need:
A Tenant ID
A Client ID
A Secret key
Let’s walk you through where to find the relevant details in Azure.
1. Tenant name
In Azure, under Azure services, choose Microsoft Entra ID.
In the Overview section, copy the Tenant ID and paste it into the Tenant ID field in SysAid.

2. Client ID
In Azure, navigate to Manage > App Registrations.
Click + New Registration.
In the Name field, enter a name for the application, for example, "SysAid-Intune".
Keep the default setting and click Register.
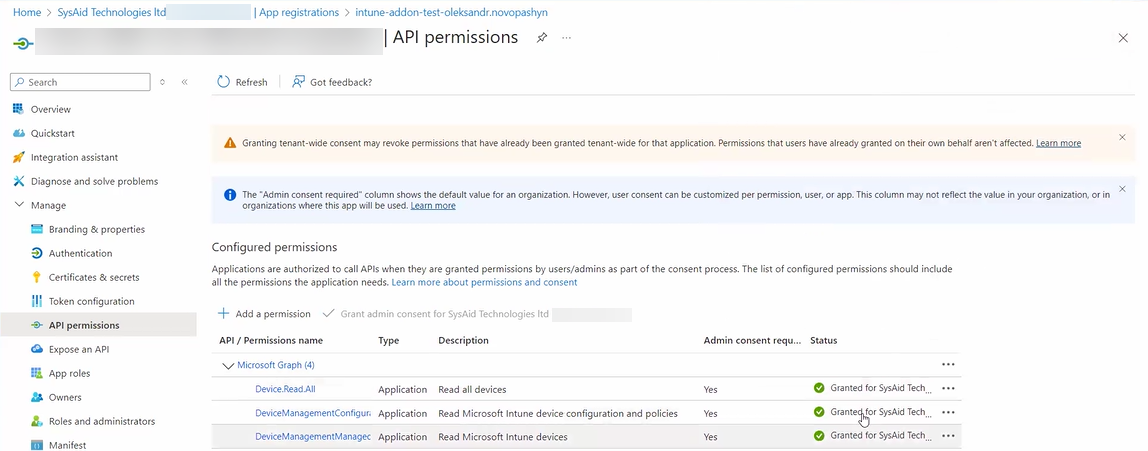
Scroll down and click View API permissions.
Click + Add a permission > Microsoft Graph > Application permissions.
Add the following permissions:
DeviceManagementManagedDevices.Read.All
DeviceManagementConfiguration.Read.All
Device.Read.All
Click Grant admin consent for SysAid.

9. Go to App registration and click on the newly created app.
10. In the Overview section, copy the Application (client) ID and paste it into the Client ID field in SysAid.
3. Secret key
In Azure, navigate to Manage > App registration and click on the newly created app.
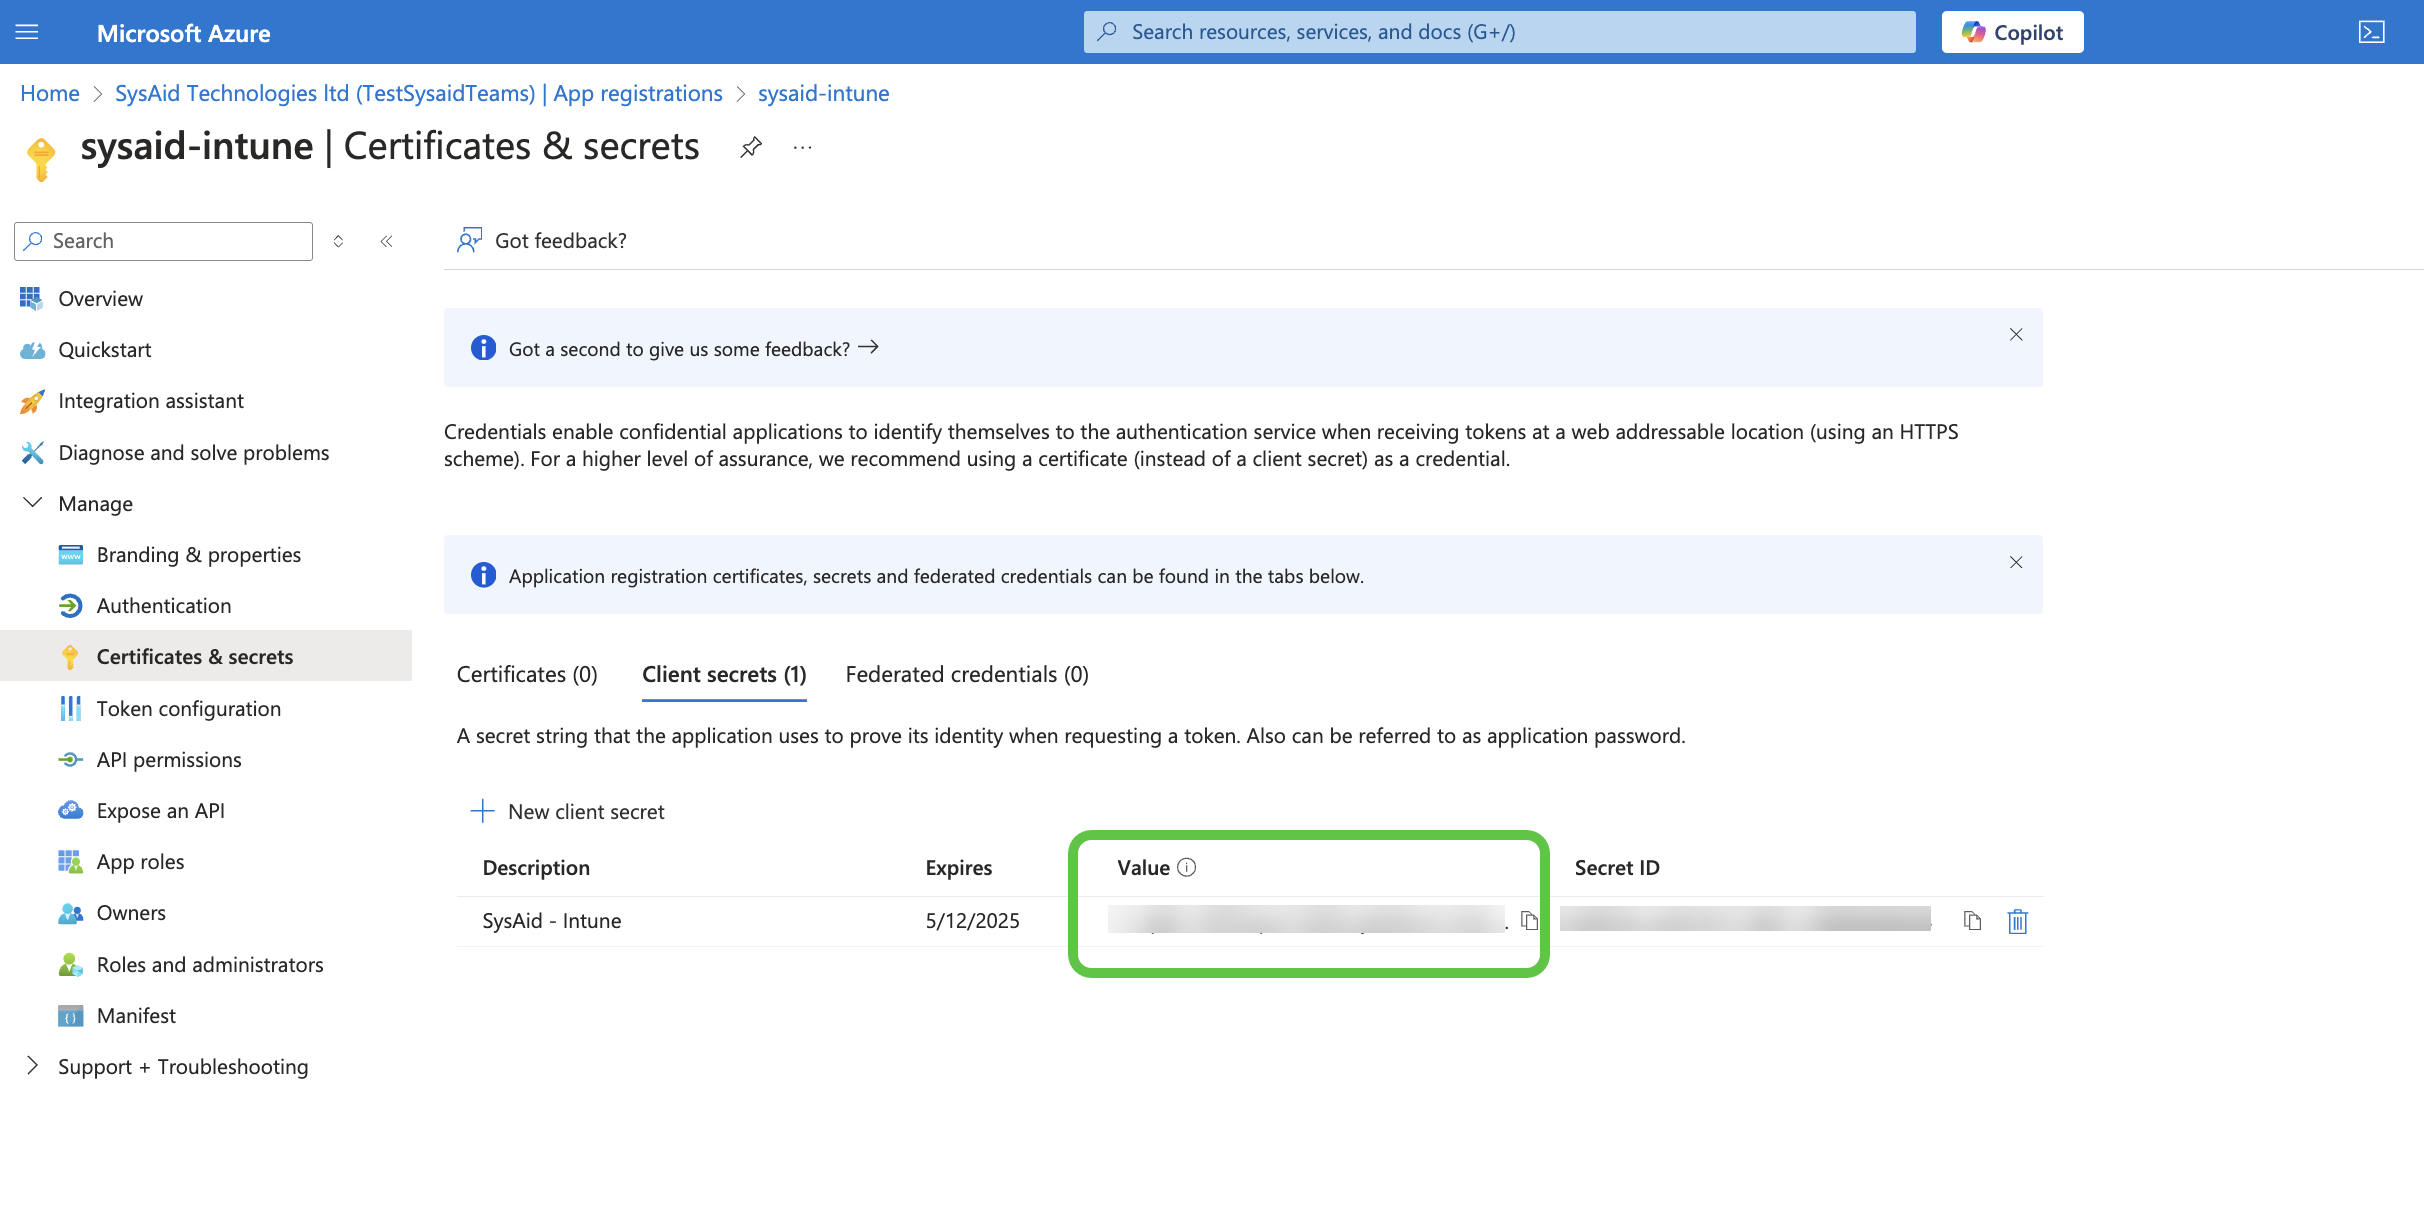
Go to Manage > Certificates & secrets.
Click + New client secret.
Add a description and choose the expiration date
Click Add.
Copy the Secret Value and paste it into the Secret Key field in SysAid.

Click Add.
Fill in the Filter field if you want to only import assets with specific parameters. You can view the full list of available device properties in Microsoft Ignite.
Click on the examples below to learn how to fill in the Filter field:Example #1 -Loading only company-owned devices
The input in the Filter field should look like this:
managedDeviceOwnerType eq 'company'
Possible value options: unknown, company, personal
Example #2- Loading devices with specific operating systems
The input in the Filter field should look like this:
operatingSystem eq 'macOS' or operatingSystem eq 'Windows'
Possible value options: Windows, iOS, Android, macOS
Click Test Connection to verify that you are connected to Intune.
Please note:
Incorrect syntax in the Filter field may cause the test to fail. If you’ve added a filter, try removing it and running the connection test once again.
Turn on the integration toggle - the Intune asset data will be imported to SysAid within 24 hours.
Run a test import:
To quickly preview how imported device data appears in SysAid, click the Import Sample button to instantly load up to 40 devices for review.
Select the Scheduled run checkbox.
Now, the scheduled sync will happen once every 24 hours and ensure the asset data is up to date. You can check the last time an import ran by checking the “Last Updated” field in the Intune addon page in SysAid.
Viewing Intune asset data in SysAid
Once your Intune integration is up and running, your Intune information is integrated with SysAid asset management. Here are a few places where you can view your Intune data.
Asset list
The imported Intune devices are displayed in the asset list. In addition, the integration allows you to add Intune-specific columns to the asset list view: Intune ID and Additional Data from Intune.
You can view all the devices that came from Intune by filtering the asset list by “Source is Intune”.
Please note:
This filtering will only show newly added devices. Models and serial numbers that already exist in SysAid’s database will be enriched with additional information from Intune, but still have “Agent” or “WMI” as their source - to avoid asset duplication.
When looking at a specific asset, you’ll see a new field named Additional data from Intune which is populated with a lot of additional information.