This page allows you to easily map CI Relations by importing a CSV list of commands to be applied to your CMDB.
To import a list of CIs
- Create a .csv file that details the relations you want to apply to the CIs in your system. Alternatively, you can also export the current CI relations by clicking Export CI relations to download the .csv file.
- If you are creating the file from scratch, create a sheet with four columns: Source, Relationship type, Destination, and Action.
- In the Source column enter the CI ID of the first CI whose relationship you want to create. Use the following Relationship names:
- In the Relationship type column, enter the number corresponding to the relationship type.
ID Relationship Name Corresponding Relationship 1 Consists Part of 2 Installed on Contains software 3 Used by Uses 4 Connected to Connected to 5 Hosts Hosted on 6 Covers Is covered by 51 Provided to Receives 52 Owns Owned by 53 Company Company - In the Destination column, enter the CI ID you are connecting the source CI to.
- In the Action column enter the action you want (1= add, 0 = remove, and blank = do not change).
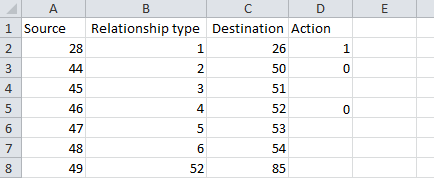
See the image below for an example.
A .csv file ready for import into SysAid
- Select the .csv you've created by clicking Choose File.
- If your .csv has column headers (like in the picture above) select the Do not import the head line check box.
- Select the field delimiter. If you create the .csv in Excel, this is a comma (,) by default.
- Click Submit to import your CI relations.
You can verify that your CI relations were correctly imported and/or updated by checking CIs in Assets > CMDB > CI List.
Automatically sync SysAid with a .csv file
You can set SysAid to automatically sync its CI information with a .csv file. This means that at the intervals you define, SysAid checks the .csv file for changes. If any changes have been made, SysAid imports the file and overrides the existing CI information with the updated information in the .csv file.
On-Premises users can accomplish this by pointing to the file location of the .csv file or by connecting to the .csv file via the RDS . Cloud users can perform this sync only by connecting to the .csv file via the RDS. The RDS scans the folder and uploads the copy of the .csv file to the server every 10 minutes. The server processes the updated information based on the selected schedule time.
To automatically sync your CIs with a .csv file via the SysAid server
- Check the Schedule box.
- In the Start Time field, select a date and time to begin syncing with the file.
- From the Rerun Every drop-down list, select if the sync should occur every hour, day, or week.
- Select the File path option button.
- In the File Path field, enter the file path location of the .csv file.
- Click Set scheduled import.
To automatically sync your CIs with a .csv file via the RDS
- Check the Schedule box.
- In the Start Time field, select a date and time to begin syncing with the file.
- From the Rerun Every drop-down list, select if the sync should occur every hour, day, or week.
- Select the File path option button.
- Click Set scheduled import.
- On your system, add a copy of the .csv file to the RDS folder under WEB-INF/csvCiFiles.Important
Do not attempt to permanently store the original .csv file in this location as the RDS uploads it to the server and removes it from this location.
- Access the RDS and open the DiscoveryService.properties file.
- Find the "csv.ci.import" parameter and set its value to "true". If the parameter does not exist in the file, add it manually.
- Save the file.
- Restart the RDS service.
