Cascading lists and dynamic fields are essential for creating a streamlined and user-friendly experience in SysAid. By tailoring form options based on previous selections, you can reduce errors, speed up submissions, and present users with only the most relevant choices.
This article explains how to configure a hierarchical CI dependency structure using dynamic fields. It covers creating CI Types and Subtypes, setting up custom fields, and designing responsive submission forms in the Self-Service Portal to support a smoother request process.
Available for:
Customer using SysAid Cloud
Only applicable for Self-Service Portal forms
How it works
Cascading lists let you guide end users through a form step by step, showing only the values that are relevant based on their previous selection.
Behind the scenes, this works through a hierarchy of Configuration Items (CIs):
CI Types and Subtypes define the structure of your options. For example, Division → Subdivision → Access Details.
CSV mapping links each option to its parent level, so SysAid knows which values to display after a user makes a choice.
Custom fields in the service record use relational lists that pull values from the CI database. Query Builder rules make sure each field only shows the correct subset of options.
Service record templates bring everything together in the Self-Service Portal, so when end users submit a request, each selection dynamically filters the next field.
Example:
If a user selects “Building” at the first level, the second-level field will only display the related “Floors” option, and the third level will drill down further into “Room 361.”
This way, end users see a streamlined form, while admins maintain a clear, structured dependency model in the CMDB.
Creating cascading lists in your account
Step #1: Adding CI Type and CI Sub Types
CI Type
To better accommodate the deployment, we recommend creating CI Types and CI Subtypes per template they’ll be used with. For example, if you’d like to build this on the “Sheraton Location” template and also in the “Holiday Inn Location,” two different CI types should be created.
Additionally, levels that would be used in this relationship should also be created, but linked to their particular CI Type.
To create a CI Type:
Go to Settings > CMDB > CI Types:
Click on +New.
Name the CI.
Take notes. We’ll need to use this piece of information later on.
CI Subtype
These will be 1st level, 2nd level, 3rd level (and so on), and they’ll be linked independently to each single CI type.
To create a CI subtype:
Go to Settings > CMDB > CI Types:
In the CI Type column, select the CI Type you just created.
On the CI Sub Type, write down the levels “1st level”,

Click ADD.
Repeat this process until you’ve added all levels for a particular CI type ( “2nd level”, “3rd level”, 4th level”, and so on).
Step #2: Creating a CSV spreadsheet
Create a CSV spreadsheet that you’ll be using to upload and map the field dependencies. The file must include the following columns:
ID
CI Subtype
Status
Depend on…
CI Name
Column name | Description |
|---|---|
ID | This is the CMDB ID that will be used.
|
CI Subtype | is will be the CI Subtype level (e.g., 1st level, 2nd level).
|
Status | Active or Disabled. This will determine if the dependency is on or not, as the relational list's values will be looking for all “Active” items. Leveraging disable means that items can be removed from the visualization by the end-user. |
Dependent on… | This is where SysAid will know the relationship between levels. You must include the “CI NAME” of the field on which this dependency is built. |
CI Name | This is what the end users will see when selecting values from the Self-Service Portal. |
Tip:
We recommend including the parent level in the Configuration Item (CI) name starting from the 3rd level. For instance: “Room 361 - 3rd Floor.”
In this example, the 3rd level CI, “Room 361 - 3rd Floor,” is part of a broader category called “Floors”.
To make this relationship clear to end users, the CI name combines both levels, improving clarity and visibility.
Here’s an example of what the CSV file should look like. Make sure to always include the column names:
ID | CI Subtype | Status | Dependent on... | CI Name |
|---|---|---|---|---|
1826 | 1st level | Active | Location | Buildings |
1827 | 2nd level | Active | Building | Floors |
1837 | 3rd level | Active | Floor | Room 361 - 3rd Floor |
Once the file is ready, you can upload it to your SysAid account.
To upload the CSV file into your CMDB:
Navigate to Settings > CMDB > Import CIs from a delimited file.
Click Choose file and upload the file from your computer.
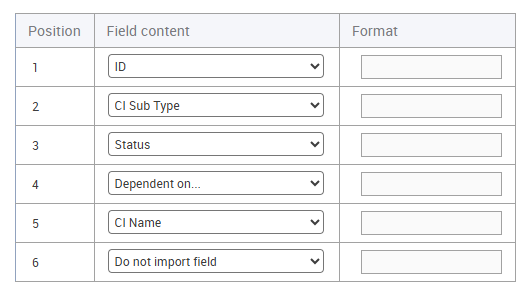
Select the following settings:
If you’re following the best practice indicated above (1st column in the CSV as the file’s header), check the Do not import the headline checkbox.
Do not change the Select the field delimiter.
Number of fields refers to the number of fields you’d like to import into your CMDB. In this example, it should be 5.
Key field number is the position where the unique identifier is shown in the spreadsheet. In other words, this is your unique database identifier. For easy comprehension, this field is the CI ID, which appears in column A of the spreadsheet. There, SysAid reads it as “1”
Default CI Type should be imported as the value you’ll be using for this template. This is the same CI Type you created before.
Do the mapping based on the columns created in the CSV file and the mapping within SysAid. For reference, column A on the CSV is equivalent to position 1 in SysAid’s Import CIs from a delimited file section. Column B is position 2, and so on.
Step #3: Adding Custom Fields
Create your custom fields in the service record entity. Each single level must have its own field.
Important!
If the value you need the end user to select is one value at a time, create a Relational List.
If the value you need the end user to select needs to be one OR more, create a Relational List - Multi Select.
On both types (Relational list or Relational list, multi-select), we will be pointing to the “CI” as the external entity.

Custom fields filtering:
When a field is created, you must add a list filter by clicking on the Query Builder button.
The query will be looking for the following four values:
CI Type
CI Subtype
Dependent on… (Not valid for 1st-level fields)
Status
Example
Let’s use a hotel scenario where the hierarchy is Location → Floor → Room.
Field name | Query builder | Internal Attribute Name |
|---|---|---|
Location | (CI Type = Hotel CI AND CI Sub Type = 1st level AND Status = Active) | CustomColumn470sr |
Floor | (CI Type = Hotel CI AND CI Sub Type = 2nd level AND Dependent on... = @@CustomColumn470sr@@ AND Status = Active) | CustomColumn471sr |
Room | (CI Type = Hotel CI AND CI Sub Type = 3rd level AND Dependent on... = @@CustomColumn471sr@@ AND Status = Active) | CustomColumn472sr |
In this setup:
The first field, “Location,” represents the hotel branch or city. Its query filters for items under the CI Type Hotel CI, 1st level, and Active status.
The second field, “Floor,” depends on the selected Location. Its query looks for 2nd-level items (Floors) that are active and linked to the chosen Location.
The third field, “Room,” depends on the selected Floor. Its query filters for 3rd-level items (Rooms) that are active and connected to that Floor.
Tip:
Always use the internal attribute name of the previous field inside double “@” symbols.
For example, if your Location field’s internal name is CustomColumn470sr, then in the Floor query, use
Dependent on... = @@CustomColumn470sr@@.
This ensures each level in the hierarchy dynamically filters based on the user’s previous selection. So when a user picks a hotel location, only the relevant floors appear, and after a floor is chosen, only the rooms on that floor are available.
Step #4: Creating a service record template
Create your template in the Service Desk Portal. To learn how to create a template, see the Templates article.
As soon as the template is created, a Self-Service Portal form is created as well. Add all the respective fields created under the “Service Record” entity into the Self-Service Portal form. To learn how to do that, see Request Submission Form.
Testing your new form
If all the steps are done, when fields are added to the Self-Service Portal submission form, values should be dynamically associated with their previous level.
After you’ve set up your CI hierarchy, CSV, custom fields, and template, test that everything works as expected:
Go to your Self-Service Portal.
Create the relevant service record type and select the relevant template if applicable.
Start filling out the form:
Select a value in the first-level field.
Check that the second-level field only shows options related to your first choice.
Continue down each level, verifying that each field filters correctly.
Submit a test service record.
Confirm that all the selected values appear correctly in the submitted record.
If the filtering doesn’t work as expected, review your:
CSV mappings - check for typos, case sensitivity, or incorrect dependencies.
Query Builder filters - make sure the syntax and internal attribute names are correct.
Please note:
If you have custom relational list fields that were created before April 1, 2025, please contact customer support to ensure they are not causing any issues.