The Shibboleth integration allows you to sync SysAid with your Shibboleth account so you can automatically log in to SysAid whenever you are logged in to Shibboleth.
For this integration to work, you must be running SysAid 16.3.18 or higher.
You cannot activate this integration if another single-sign on integration has already been enabled for SysAid.
Set up Shibboleth integration in SysAid
The first step to enabling your Shibboleth integration is configuring certain parameters from SysAid's Shibboleth integration page. Speak to your account manager to ensure that Shibboleth is added to your available integrations.
Only an admin with SysAid Administrator permissions can set up this integration.
To configure Shibboleth parameters in SysAid:
Generate the Service Provider in Shibboleth
- In Shibboleth, define a service provider for the SysAid integration using the following parameters:
| Parameter | Value |
|---|---|
| AuthnRequestsSigned | "false" |
| WantAssertionsSigned | "true" |
| protocolSupportEnumeration | "urn:oasis:names:tc:SAML:2.0:protocol" |
| Binding | "urn:oasis:names:tc:SAML:2.0:bindings:HTTP-POST" |
| Location | "<SYSAID_URL>/addons/shibboleth/jsp/consume.jsp" |
| index | "0" |
| isDefault | "true" |
Configure Shibboleth integration in SysAid
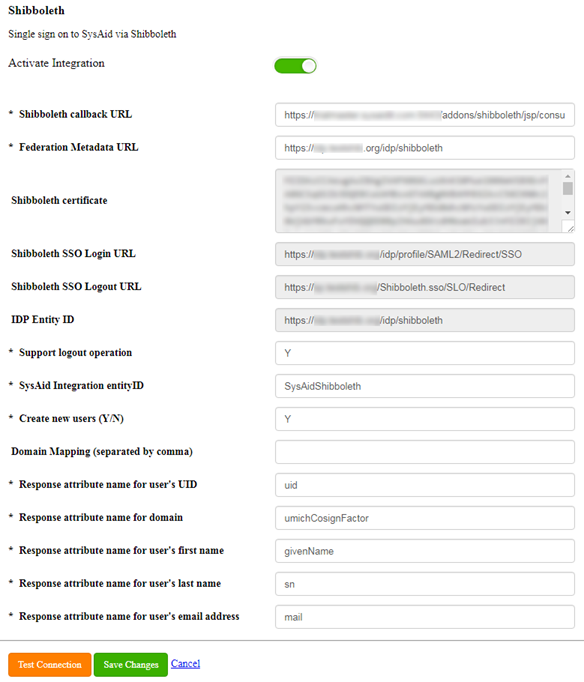
- Navigate to Settings > Integrations > Third-Party Integrations.
- Click the
 on the Shibboleth icon.
 - In the Shibboleth Callback URL field, enter your SysAid URL with the following extension**/addons/shibboleth/jsp/consume.jsp** appended to it.
- In the Federation Metadata URL field, your Shibbolet server URL, with the following extension /idp/shibboleth appended to it.
Enable the integration
- In the Support Logout Operation field, Enter "Y" if you want a logout from SysAid to end the Single-Sign-On session with Shibboleth. Enter "N" if you want the session to continue even after a user logs out of SysAid.
- (Optional) If you want SysAid to create new users with their Shibboleth IDs, Enter "Y" in the Create New Users field.
- (Optional) You can replace the domain of users that log in to SysAid via Shibboleth with any name you want in the Domain Mapping field. This allows you to sync users with their existing names in SysAid.
To map domains, use the "=" character. You can map multiple domains by entering them in a comma separated list. For example, "MyDomain= MyCompany.com, MyDomain2= MyCompany.com".
If you want user names to contain the Shibboleth domain, leave this field blank. - The Response Attribute fields map the Shibboleth responses to SysAid User fields. Enter the Shibboleth attributes you want to map to the relevant fields in SysAid.
- Click Save Changes.
- Click the Activate Integration slider.
This completes the SysAid Shibboleth integration!
When you access your SysAid login screen, you are routed to the Shibboleth login screen. If you are logged into Shibboleth, you are automatically logged in to SysAid.
If you need to manually log in to SysAid to fix your Shibboleth configuration, use the following URL: "<SYSAID URL> /Login.jsp?manual=true".
For further assistance, please contact SysAid Support.