SysAid’s Power BI Extract integration allows you to regularly export your SysAid SR data to your storage method of choice.
Method 1: Display your SR data as a JSON file and store it in your OneDrive, where Microsoft Power BI will read it and build the reports
Method 2: Use our SysAid Storage API, which allows you to securely access the URL with your saved JSON file
Power BI Extract video
Licensing
You can contact your account manager to purchase a license or a 30-day trial license for this Add-on.
Set up the Power BI Extract Add-on
Steps
From the SysAid Marketplace, get the Power BI Extract Add-on.
On the main My Apps page, in the Power BI Extract icon, click
 .
.Register the application in Azure
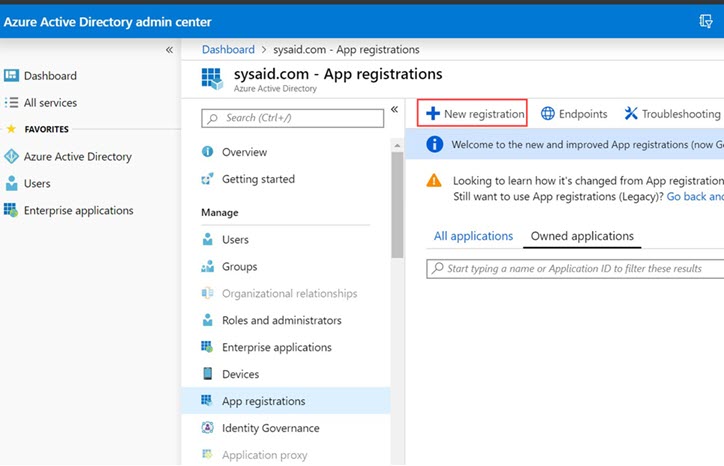
In the Azure dashboard, click App Registrations.
Click View All Applications.
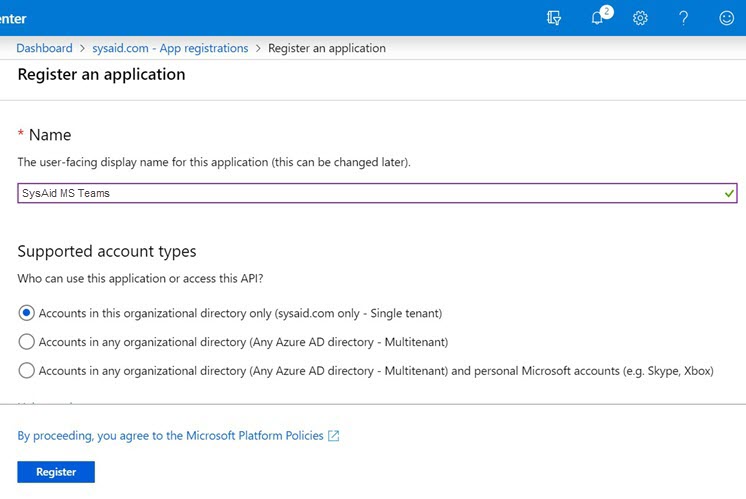
Click New Registration.
In the Name field, enter a name for the application (for example, "SysAid BI").
Click Register.
Get the Tenant ID
Hover over the Directory (tenant) ID field and click
 .
.Back in SysAid, paste the copied text into the Tenant Name field.
Get the Client ID
Hover over the Application (Client) ID field and click
.Back in SysAid, paste the copied text into the Client ID field.
Get the Secret Key
From the Left-menu, click Certificates & Secrets.
Click New client secret.
Add a description (e.g. "SysAid Power BI Extract").
In the Expires area, select Never.
Click Add.
In the entry you just created, click
.Back in SysAid, paste the copied text into the Secret Key field.
In the Email address field, enter the email address for the administrator's MS OneDrive account.
Enter the name you want for the JSON file that will be created with the BI data from SysAid. Make sure the file name includes the extension .json (for example, "SysAidData.json").
Configure API Permissions
In Azure, navigate to select API Permissions.
Click Add a permission.
Click Select an API > Microsoft Graph.
Click Application.
Select the following permissions:
Application.ReadWrite.All
Files.ReadWrite.All
Select the respective type for each permission.
Enable the following permissions:

Click Save Changes.
Click the slider to activate the Add-on.
Click Test Connection to ensure that everything has been configured correctly. The results appear at the top of the screen.
(Optional) You can click
 to manually import BI Data to the JSON file.
* The Last Updated field indicates when the file was last updated.

Import SysAid Storage data to Power BI
Steps
1. Create a Blank query in Power BI

2. Open the Query's Advanced Editor
.png)
3. Paste the Query script inside the Editor
.png)
You can copy and paste the following script (using the URL and Header you received from the Power BI Add-on):
let
Source = Table.FromColumns({Lines.FromBinary(Web.Contents("Paste the URL from POWER BI Extract addon", [Headers=[clientid="Clientid from POWER BI Extract addon", accountid="Your SysAid account id", authorization="The Token from Power BI Extract addon"]]))}),
#"Parsed JSON" = Table.TransformColumns(Source,{},Json.Document),
#"JSON to List" = #"Parsed JSON"{0}[Column1],
#"List To SysAid Table List" = Table.FromRecords({#"JSON to List"}),
#"Expanded SysAid" = Table.ExpandListColumn(#"List To SysAid Table List", "SysAid"),
#"Extract Headers" = Record.FieldNames(#"Expanded SysAid"[SysAid]{0}),
#"Merge Data To Table" = Table.ExpandRecordColumn(#"Expanded SysAid", "SysAid", #"Extract Headers")
in
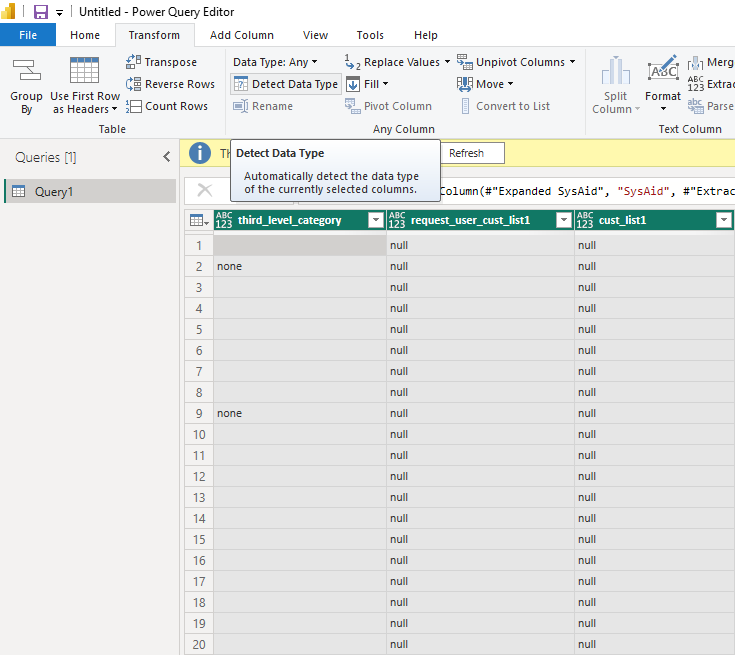
#"Merge Data To Table"You can copy and paste the following script (using the URL and Header you received from Power BI Add-on)4. Select all cells and click on Detect Data Type.
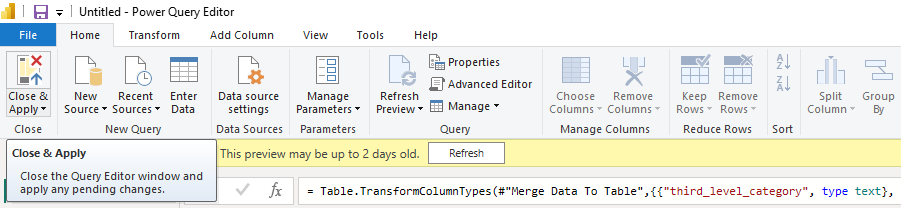
5. Close the Editor and apply your changes.
Please note:
The template is integrated with the field structure for SysAid tickets. It's important that you modify the data source to match the file location where you store this file. You can search for the file in OneDrive and use it to display the data in Power BI or other BI tools that you connect to OneDrive.
Click here to download a ready-to-go Power BI Template file that you can use to generate dashboards with your SysAid data.
If you encounter any issues with loading this template, ensure that "Application language" in your Power BI Regional Settings is set to English (United States). For any other issues importing your data into Power BI, we recommend referring to the Power BI community.
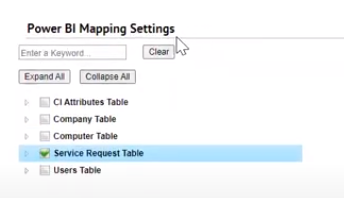
Map SysAid Fields to Power BI
The BI Analytics Settings section allows you to map Fields to be included in your Power BI data extract.
When you map a field to one of the Target BI Fields, that field can be accessed by Power BI Extract.
Changes made here take effect on new data collected by Power BI Extract from the time you make the changes and onward.
Steps
Select or expand the checkbox of the relevant Table lists
Select one or more fields from the lists (there is no selection limit)
Click Save Changes.
Please note:
Any Fields you selected for JSON export using the Power BI Integration prior to 23.4.10 must be re-selected once you start using the upgraded version
You can search for your desired Field in the search bar above the Table and Field selection list
You can multi select multiple Fields by pressing CTRL while selecting the Fields or Tables
Export data to SysAid Cloud
The SysAid Storage functionality allows you to export your data to SysAid Cloud and obtain secure access to it.
This is done by adding three headers to the URL, one of which is a token that is valid for three months.
Import data from a webpage
You can choose the option in Power BI to import data from a webpage, using the parameters highlighted below;
.png)
Please note:
You can define a reminder notification about updating the token.
These can be edited or added in Settings > Monitoring > Notifications.
Enable Power BI Add-on with SysAid Storage
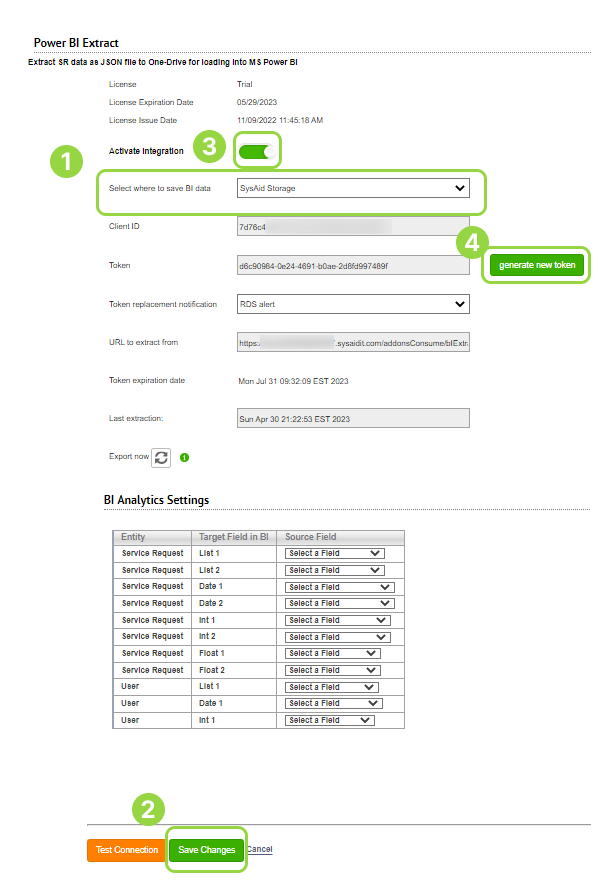
Step 1: Click "Select where to save BI data" and choose "SysAid Storage"
Step 2: Click "Save Changes"
Step 3: Enable the "Activate integration" Slider
Step 4: Click "Generate new token"
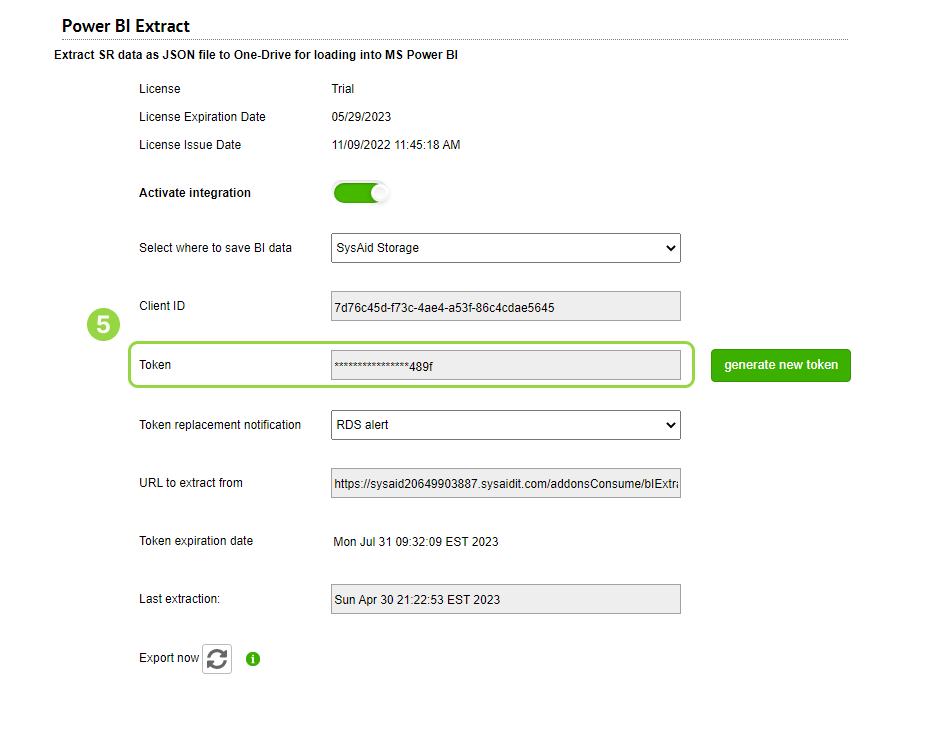
Step 5: Take note of the Token field's value (it becomes hashed after you exit the form)
Step 6: Replace the following values in the script via copy & paste:
URL from POWER BI Extract addon
.png)
Clientid from POWER BI Extract addon
.png)
accountid
The Token from Power BI Extract addon
.png)
let


Source = Table.FromColumns({Lines.FromBinary(Web.Contents("Paste the URL from POWER BI Extract addon", [Headers=[clientid="Clientid from POWER BI Extract addon", accountid="Your SysAid account id", authorization="The Token from Power BI Extract addon"]]))}),


#"Parsed JSON" = Table.TransformColumns(Source,{},Json.Document),


#"JSON to List" = #"Parsed JSON"{0}[Column1],


#"List To SysAid Table List" = Table.FromRecords({#"JSON to List"}),


#"Expanded SysAid" = Table.ExpandListColumn(#"List To SysAid Table List", "SysAid"),


#"Extract Headers" = Record.FieldNames(#"Expanded SysAid"[SysAid]{0}),


#"Merge Data To Table" = Table.ExpandRecordColumn(#"Expanded SysAid", "SysAid", #"Extract Headers")


in


#"Merge Data To Table"