This help page covers Chat Queues and Queue Automatic Texts.
Chat Queue
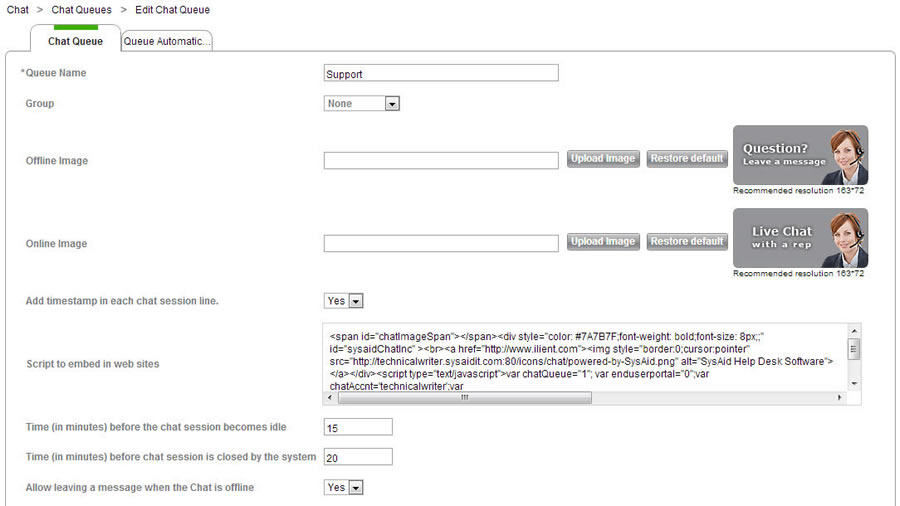
The chat queue configuration page allows you to control the vast majority of the settings for SysAid Chat. Remember that the settings you configure here apply only to the currently selected chat queue. If you have multiple chat queues, be sure to configure each according to your specific needs.
Be sure to save your work when you are done making changes to this page by clicking OK or Apply.
Chat Queue
Queue Name : Give your chat queue a name.
Group : Only administrators in this group will be able to access this chat queue. If you choose group "None," all administrators will be able to access this queue.
Chat Images
The chat icon appears on the End-User Portal* and in any website where you choose to embed it (see Script to embed in web sites below). The icon is dynamic, and will automatically reflect the online status of your administrators. If at least one administrator is online in Chat, it will show the online icon. If no administrators are online in Chat, it will show the offline icon.
The End-User Portal uses the chat icon from the "Support" queue. For that reason, the recommended dimensions for the icon for the support queue are 16372 pixels. If you create other queues, the icons you use there will not impact the End-User Portal and therefore can be of any size you like.
Offline Image : Choose an image that will be displayed to end users if no administrators are logged into Chat.
Online Image : Choose an image that will be displayed to end users if at least one administrator is logged into Chat.
- Important! If you change the chat icons, you must change the text embedded in your website to include the new image link, or else no image will show.
Miscellaneous Chat Settings
Add timestamp in each chat session line : If this is enabled, each chat message sent will have a timestamp (only on the administrator side, not on the end user side). This is a useful quality assurance tool for when you are reviewing chats at a later time under Service Desk >Chat >Chat Sessions.
Chat timestamp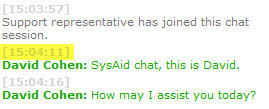
Script to embed in web sites *: Copy this segment of code into the html for your website to insert the SysAid Chat icon into your website. This will allow end users to access Chat from any intranet or internet page you maintain for them.
*Important note if you have created multiple chat queues: You can only embed one chat queue icon per web page. If you would like to have multiple chat queue icons on one page (e.g. IT chat icon next to Maintenance chat icon), you must embed the icons into two separate frames.
Time (in minutes) before the chat session becomes idle : If there are no messages sent by either user or administrator for the specified number of minutes, the chat will be marked as idle and a warning message will appear to both end user and administrator.
Idle chat
Time (in minutes) before chat session is closed by the system : If there are no messages sent by either user or administrator for the specified number of minutes, the chat session will automatically close. Please note that this time is from the time of the last message, not from the time the chat becomes idle. (e.g. idle time of 15 minutes, close time of 20 minutes: after 15 minutes, chat is idle; 5 minutes later, chat closes.)
Allow leaving a message when the chat is offline : Choose whether users will be able to leave a message in the event that there are no online administrators. If they do leave a message, it will open a service record.
Leaving a message Leaving a message is disabled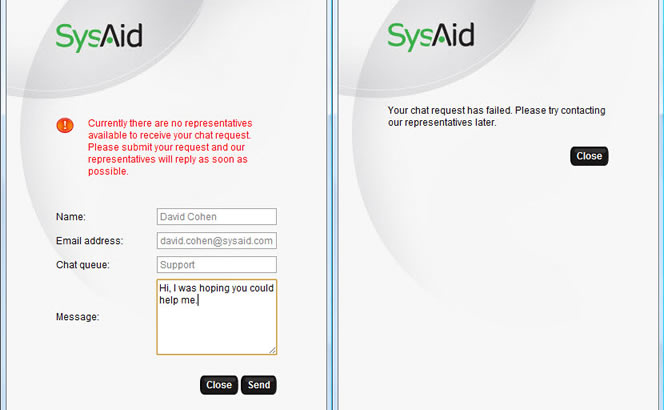
Display the details screen before the chat starts : If this is enabled, SysAid will show the chat user's details before they start the chat. This give the end user the opportunity to put in their service record number, if they have one, making it easy for the administrator to pull up the entire service record history. If this is not enabled, the chat window opens directly.
End user details and SR#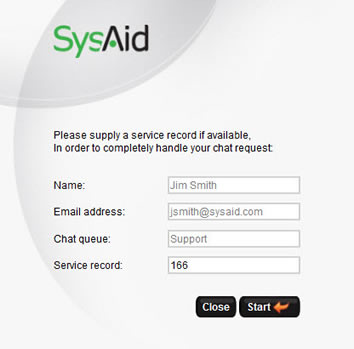
Chat System Messages
SysAid Chat allows you to customize the automated system messages that it displays in certain specific circumstances. The following is a description of these messages and when they appear:
- Chat Session Established : Automated message displayed to the end user after he has initiated a chat session from the chat icon.
- The chat was opened by the SysAid agent : The user will receive this message in their chat window after accepting a chat initiated by an administrator.
- Chat Session Accepted : An end user in a chat session will receive this message when an administrator joins the chat session.
- Release Message : An end user in a chat session will receive this message when the administrator handling the chat leaves the chat.
- Offline Chat Thank You Message : The end user will receive this confirmation after leaving a message when there are no online administrators in chat (see Leaving a message above).
- Chat Session Closed Message : An end user receives this message when an administrators closes his chat from the administrator chat console.
Queue Automatic Texts
SysAid Chat supports automatic texts so that you can easily send prewritten responses to your customers. Click here for information about using automatic texts.

Creating or modifying an automatic text
- To create a new automatic text, click the
 button. Go to step 3.
 - To modify an existing automatic text, click on it.
Edit Automatic Text
- Enter a title for your automatic text. This is what you will see in the chat console, and what you will click on to select this automatic text. For that reason, it's recommended to give a short title.
- Enter the message of your choice. This is what will appear in the chat entry pane when you select this automatic text.
- Click OK or Apply.
Note : Automatic texts are configured per queue, which is to say that if you want to use the same automatic text for two different queues, you must configure it for both queues.
List Actions
There are a number of actions you can perform on your list using the actions list. To open the actions list, select one or more list entries using the tickboxes at the left end of each row. This opens the actions list:
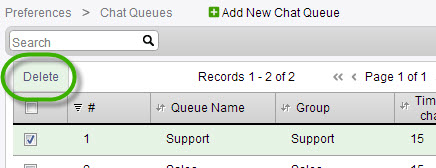
Delete
Delete the selected autmatic text(s).
HTML in automatic texts
Automatic texts support HTML for hyperlinks and for images. If you have links or images that you regularly send to customers, you can include them in your automatic texts.
Example hyperlink : <a href="http://www.sysaid.com" target="_blank">Welcome to SysAid!</a>
Example image *: <img src="http://www.sysaid.com/images/SysAid-IT-logo2.gif">
*When sending images, please keep in mind that the end user chat console text display area is about 300 * 350 pixels.