- Existing Zapier account
- SysAid Cloud Account (SysAid On-Premise doesn't support the Zapier integration)
Set up the Zapier Integration
Zapier setup video
In SysAid, go to Connect > My add-ons.
Search for Zapier and click the gear icon.
- Click the slider to activate the Integration.
- Click Save Changes.
- Create a dedicated user in SysAid to connect with Zapier
- Navigate to Tools > User Management > Administrators
- Click New
- Enter the username. It should be a name that indicates that the user is for the Zapier integration (e.g., "Zapier Admin")
- Copy the password you enter for later use
- Enter the rest of the user's information
- In the Permissions tab, grant the admin SysAid Administrator permissions
- Click OK.
- In Zapier, click My Apps
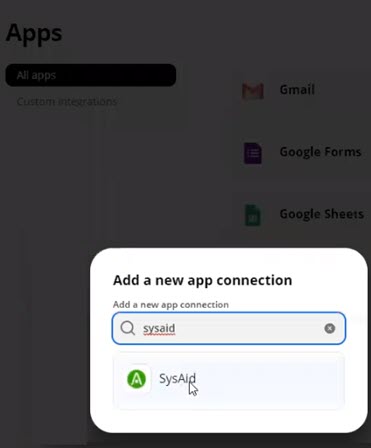
- Click Add Connection
- Search for "SysAid" and select it when it appears

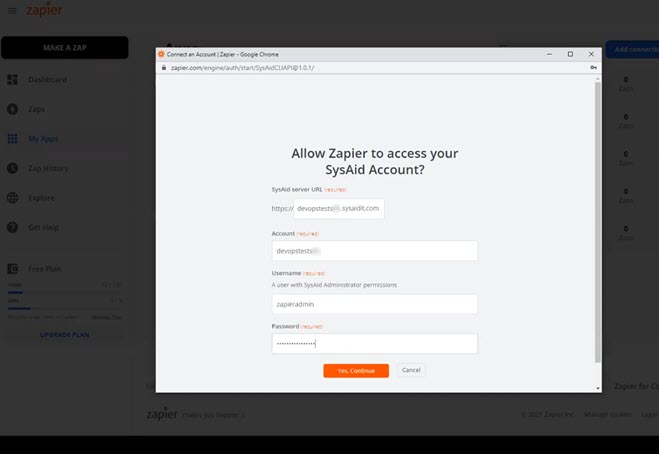
- Fill in the Authentication form for SysAid.
- In the SysAid Server URL field, enter your SysAid account URL (for example "Acmecorp.sysaidit.com")
- In the Account field, enter your SysAid account ID (for example "Acmecorp")
- Enter the username for the user you created in SysAid
- Enter the SysAid password you set for that user
- Click Yes, Continue.

Use the Zapier Integration
You can configure connections in Zapier by setting up Zaps. Zaps are triggered by a defined event in one application and perform an action in a second application.
This section describes how to set up:
When setting up a Zap, we recommend:
- Creating custom fields in SysAid and in the application you are integrating with
- Displaying the SysAid Ticket ID in the integrated application and the other system record ID in your SysAid ticket
- Using fields that can include hyperlinks to the ticket and system record
This allows for optimal bidirectional integration.
Zap creation video
Create Zap triggered by SysAid
- From the menu, click Zaps
- Click make a New Zap.
- On the top of the page enter a name for the Zap that describes what you want to accomplish
- Select your SysAid account
- In the App Event area, search SysAid, and click the SysAid option when it appears
- From the Trigger Event dropdown list, select the event in SysAid that triggers the Zap
- Click Continue
- In the SysAid Account field, select the SysAid account that you defined
- Click Continue.
- Set up the trigger
- In the User Defined Name field, enter a name for the trigger that describes what you want to do. You can copy the name of the Zap you entered earlier.
- Use the other fields to define the conditions in which service records will trigger this Zap. You can specify the service record type, title, text in the Description field, category, etc.
- Once you've defined the conditions for the trigger, click Continue.
- (Optional) Click Test Trigger to ensure that Zapier is communicating with SysAid and recognizes your defined trigger conditions. Once you get the response, click Continue.
- Define the Action.
- In the App Event area, search for the application you want, and select it when it appears.
- From the Action Event drop-down list, select the action you want the Zap to perform in the selected application.
- Click Continue.
- Select your account for the selected application.
- Click Continue.
- In the User Defined Name field, name the action.
- Fill in the details for the action you want the Zap to perform.
- Click Continue.
- (Optional) Click Test & Continue to test that connection between SysAid and the selected application via Zapier. This actually performs the action in the selected application.
- Click Turn on Zap.
The created Zap appears in your Zaps page in Zapier.
Create Zap that performs an action in SysAid
- From the menu, click Zaps.
- Click make a New Zap.
- On the top of the page enter a name for the Zap that describes what you want to do.
- Define the application
- In the App Event area, search for the application you want, and select it when it appears.
- From the Trigger Event drop-down list, select the event in in the selected application that triggers the Zap.
- Click Continue.
- Select your account for the selected application.
- Click Continue.
- Set up the trigger
- In the User Defined Name field, enter a name for the trigger that describes what you want to do. You can copy the name of the Zap you entered earlier.
- Use the other fields to define the conditions in which the application will trigger this Zap.
- Once you've defined the conditions for the trigger, click Continue.
- (Optional) Click Test Trigger to ensure that Zapier is communicating with the selected application and recognizes your defined trigger conditions. Once you get the response, click Continue.
- Define the Action
- In the App Event area, search SysAid, and click the SysAid option when it appears.
- From the Action Event drop-down list, select the action you want the Zap to perform in SysAid.
- Click Continue.
- In the SysAid Account field, select the SysAid account that you defined.
- Click Continue.
- In the User Defined Name field, name the action.
- Use the other fields to define the service record this Zap creates or modifies. You can specify the service record type, title, text in the Description field, category, etc.
- Click Continue.
- (Optional) Click Test & Continue to test that connection between SysAid and the selected application via Zapier. This actually performs the action in the selected application.
- Click Turn on Zap.
The created Zap appears in your Zaps page in Zapier.
Use SysAid templates in Zapier
SysAid provides out-of-the-box Zap templates that you can use in SysAid. These are zaps that are preconfigured with a specific trigger and action involving SysAid and another application. You can acquire the template, add your credentials and any customizations that you like and enable the Zap for your SysAid-Zapier integration.
To access a template, click the template name in the table below.

Available SysAid Zap templates
| Application | Template Name | Description |
|---|---|---|
| Azure DevOps | Get all the upcoming features and bug fixes reflected in your IT team's daily driver with this Zap. | |
| Azure DevOps | Make your DevOps team happy with this Zap automation, which immediately generates a work item in Azure DevOps when a ticket is created in SysAid. | |
| Gmail | Create new SysAid ticket for new emails matching a label on Gmail (Business Accounts only) | Make it easy for your business stakeholders, who are busy living in their Gmail Inbox. Use this Zap automation to trigger creation of a new SysAid ticket, directly from a labeled Gmail email. The ticket will automatically include all data from the email. |
| Google Sheets | If your organization is using Google Sheets to manage projects, think how helpful it can be to have new tasks, which are inserted as new rows, automatically logged as a new SysAid ticket. Use this Zap automation to make that a reality. No need to copy/paste and manually open each task as a ticket. | |
| Salesforce | We know that your CRM is the heart of your business, so of course you need to keep it up-to-date and in sync with your other business applications, including SysAid.
Use this Zap automation to create a SysAid ticket from any new record in Salesforce, and keep the information updated as well.
Consider a request coming from your company's website – which uses a form that is connected to Salesforce and immediately opens a new record. If that task record is to create a new trial environment, for example, then you'll be notified immediately in SysAid. Or, say a new contract record is created – the stakeholders will be notified immediately.
Start enjoying! | |
| Salesforce | We know that your CRM is the heart of your business, so of course you need to keep it up-to-date and in sync with your other business applications, including SysAid.
Use this Zap automation to create a Salesforce case from any new SysAid ticket, and keep the information updated as well.
Aligning with Salesforce's 360-degree customer experience, this Zap provides the ammo to carry that from SysAid into Salesforce and beyond. For example, let's say a customer opens a ticket for your Support. The account manager for that customer needs to know about it. They need to stay in the loop and keep their customer happy. Maybe they'll even perform an impromptu health check to avoid any risk to that customer.
Start enjoying! | |
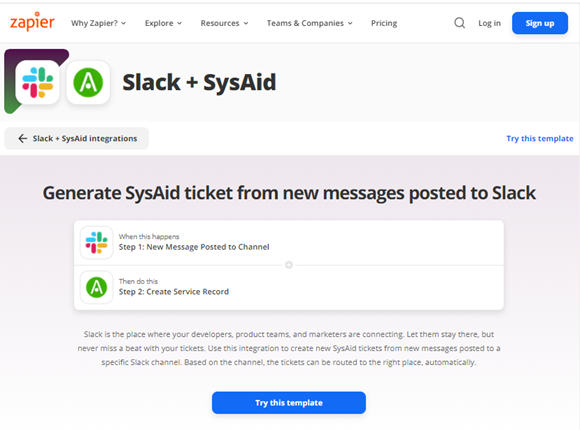
| Slack | Create new SysAid ticket for new message posted to Slack Channel | You love Slack at your organization. It's easy and fast communication. It's the place where your developers, product teams, and marketers are connecting. Let them stay there, but never miss a beat with your tickets. Use this Zap automation to create new SysAid tickets from new messages posted to a specific Slack Channel. Based on the Channel, the tickets can be routed to the right place automatically. |
| Slack | You love Slack at your organization. It's easy and fast communication. Then why not enjoy this Zap automation by sending a direct message to the person who is assigned a new SysAid ticket? They'll get immediate notification; no time wasted. | |
| Trello | You've got teams in your organization managing projects on Trello. However, you want to monitor everything in SysAid. No problem! Use this Zap automation to create SysAid tickets when a new Trello card is posted. All information will stored in the newly created ticket. | |
| Trello | You've got teams in your organization managing projects on Trello, while you're managing your ticket queue in SysAid. So what to do? Not a problem! It's simple to have your SysAid tickets reflected in Trello cards. |