The Slack integration allows you to create a Slack channel from an SR, pull Slack data into SysAid, post to a Slack channel from SysAid, send direct messages in Slack from SysAid, approve/deny pending action items from Slack, and more.
For further information, see Use the Slack Integration.
Any changes in Slack generated by this Integration are logged under your name in Slack.
To avoid confusion, we recommend creating a user in Slack named "SysAid" as an owner or an admin of the team you want to integrate.
Set up this integration while logged in under that name.
This way, the Slack Token is registered under that user and all resulting automatic changes are correctly logged under "SysAid".
Set up the Slack integration
Only Admins with SysAid Administrator permissions and the Slack primary owner can set up this integration.
We recommend that the primary owner should be designated for this integration as all of his or her Slack channels are exposed to all SysAid admins who use this integration.
Alternatively, the primary owner can delegate permission to manage the app by right-clicking in Slack and selecting Setting & administration > Manage apps > App Management Settings. From there the primary owner can select the Workspace Owners and selected members or groups option and add users or groups to field. The selected admins can then set up the integration with SysAid. For more information, see the Slack documentation.
- In Slack, login as the the primary owner of the Slack team you want to sync with SysAid.
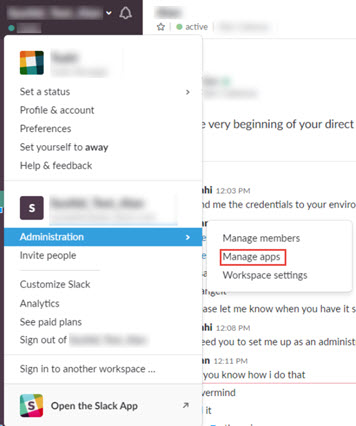
- Click your team name in the top-right corner of the page.
- Click the Team's profile menu and select Administration > Manage apps.
- Click Build.

- Click Start Building.

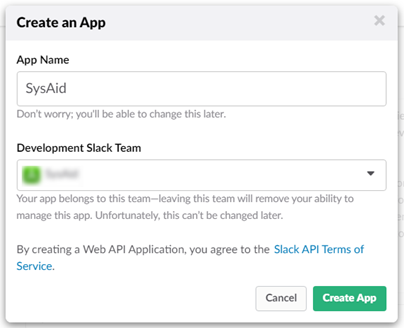
- Enter the name of your app. We recommend that you enter "SysAid" here.
- Select the Slack team that you are creating this app for.
- Click Create App.
- (Optional) Upload an image such as the SysAid icon to visually represent this app in Slack:
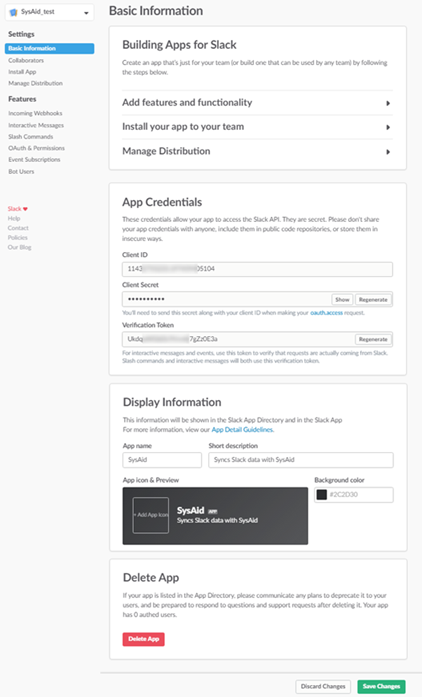
- On the sidebar, select Basic Information.
- In the Display Information area, click Add App Icon.
- Select an image and click Open.
- On the bottom of the screen, click Save Changes.
- (Optional) Add a Short Description field:
- If you have not already done so, On the sidebar, select Basic Information.
- In the Short Description field describe what the app does. For example, "Syncs Slack data with SysAid."
- On the bottom of the screen, click Save Changes.
- Add scopes
On the sidebar, select OAuth & Permissions.
In the Scopes area under the Bot Token Scopes, click Add an Oauth Scope.
Locate and select the following scopes
- channels:history
- channels:manage
- channels:read
- chat:write
- commands
- files:read
- files:write
- groups:history
- groups:read
- groups:write
- im:read
- incoming-webhook
- mpim:write
- users:read
- users.profile:read
- users:read.email
Under the User Token scopes, click Add an Oauth Scope.
- channels:history
- channels:read
- channels:write
- chat:write
- groups:history
- groups:read
- groups:write
- im:read
- mpim:read
- usergroups:read
- user:read
- users:write
- users:read.email
In SysAid, go to Connect and click Explore in the Marketplace banner.
Search for Slack and click on the card.
Click Setup and manage. You will be redirected to the My add-ons page, where you’ll see Slack.
Click the gear icon.
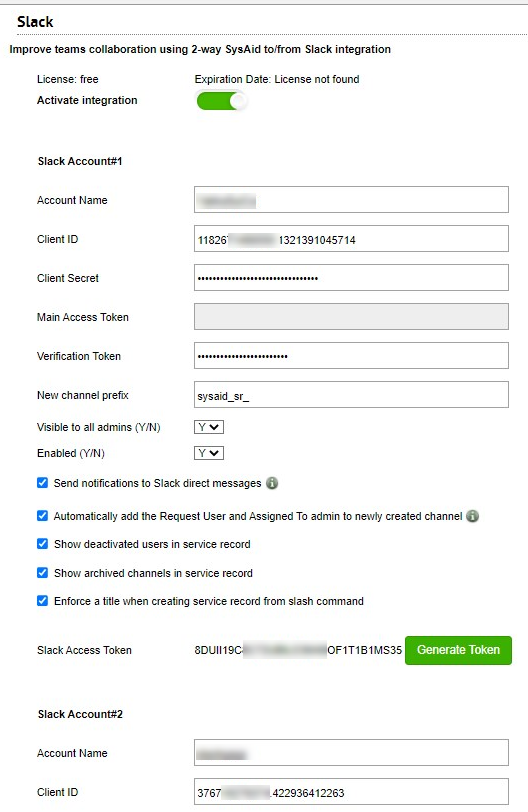
- In the Account Name field, enter the application name.
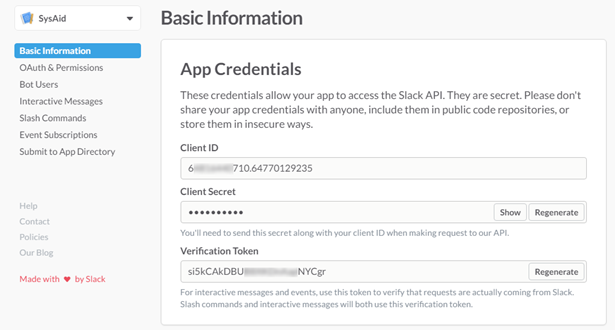
- Get the client ID, client secret, and verification token:
- On the Sidebar, select Basic Information.
- Copy the contents of the Client ID, Client Secret, and Verification Token fields and paste the contents into their corresponding fields in SysAid's Slack integration screen.
- (Optional) In SysAid, in the New Channel Prefix field, enter a prefix for new channel names created from SysAid.
- In the Visible to All Admins field, enter a value of Y (Yes) or N (No) to determine if the integration is visible for all admins. If you enter N, you can set which admins can view the integration from the Admin Groups form.
- In the Enabled field, enter a value of Y (Yes) or N (No) to determine if the integration is enabled for that account.
- Click Save Changes.
- Click Generate Token.
- Copy the generated token for later use.
- Back in Slack, from the sidebar, clickOAuth & Permissions.
- Click Add a new Redirect URL.
- In the Redirect URL field, enter the following URL:
https://<SysAid URL>/addonsConsume/slack?accessToken=<token>
In the URL above, replace
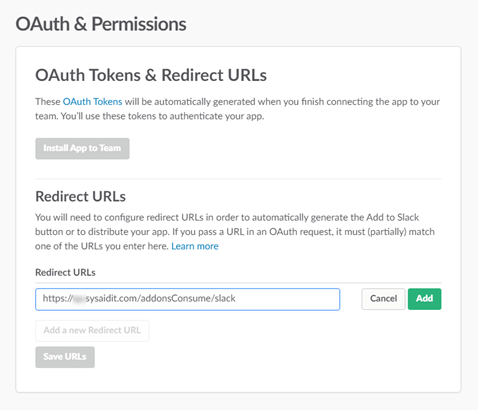
- Click Add.
- Click Save URLs.
- (Optional) Create Slash Commands to allow for creating SRs or Linking to SRs from Slack:
- Back in Slack, from the sidebar, click Slash Commands.
- Click Create New Command.
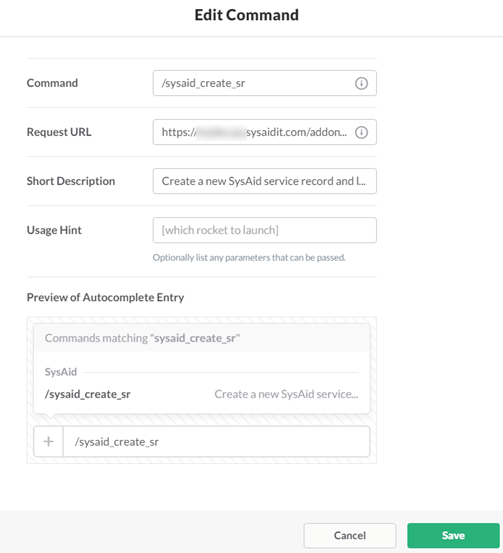
- In the Command field, enter the command name.
Available commandsCommand Name Description /sysaid_create_sr Create a new SysAid service record and link it to this channel /sysaid_link_to_sr Link this channel to an existing SysAid service record /sysaid_my_approvals Retrieve Approve/Deny workflow notifications (Available in updated Slack Add-on - in SysAid Cloud) - In the Request URL, enter the following URL (same as the redirect URL you entered previously:
https://<SysAid URL>/addonsConsume/slack?accessToken=<token> - In the Short description enter a summary of what the command does (see the Available Commands table above).
- Click Save.
- In SysAid, if the Slack Main Access Token field is populated, follow the following steps to revoke the token:
- In Slack, on the Oauth and Permissions page click Revoke Tokens.
- When prompted click Yes, I'm sure.
- From the side menu, click Select Install app.
- Click Reinstall to Workspace.
- Generate the Main Access Token:
- Copy the contents of the Client ID field. Paste the Client ID in notepad or somewhere else for use in the next step.
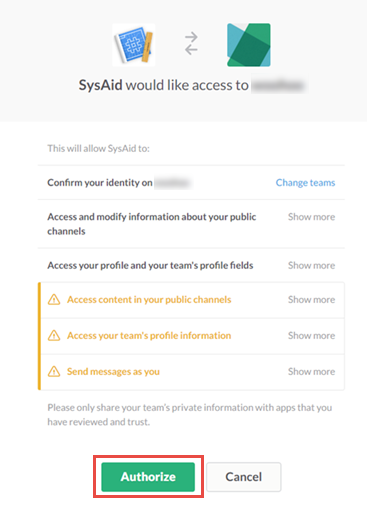
- Open a new browser tab and go the authorization page at the following URL:
https://slack.com/oauth/authorize?scope=channels:read,commands,groups:history,groups:read,groups:write,im:read,im:write,mpim:read,mpim:write,team:read,users:read,users:read.email,channels:history,channels:write,usergroups:read,users.profile:read,chat:write:user&state=<App Name>-!!-accountToken&client_id=<Client ID>Important:In the URL above, replace <CLIENT_ID> with the client ID that you just copied and <appname> with the name you've given to this app in Slack.
- Click Authorize.
- In SysAid, refresh the Slack integration page. The Slack Main Access Token field should populate.
- (Optional) The following features are enabled by default. To disable any of these features clear their corresponding check boxes:
- Automatically add the request user and assigned to admin in newly created channel - When this feature is enabled, whenever you create a private Slack channel from a SysAid ticket, the ticket's request user and assigned admin are automatically added to the Slack channel. This ensures that the relevant parties receive updates regarding this ticket. It also allows them to receive direct messages from this ticket.
- Show deactivated users in service record - When this feature is enabled, users who are deactivated in Slack, still can be selected in the Slack tab in the SysAid ticket.
- Show archived channels in service record - When this feature is enabled, all channels, even archived ones, are displayed in the Slack Channels drop-down in the ticket form.
- Enforce a title when creating service record from slash command - When this feature is enabled, user who create a SysAid ticket from the /sysaid_create_sr will have to add a title to the ticket in the slash command. Entering the slash command without a title generates an error message informing the user that they must include a title for their ticket.
- Click the Activate Integration slider.
- Click Save Changes.
- Repeat this process for up to three Slack accounts that you want to integrate with SysAid.
It may take a few hours until the Slack integration is ready for use.
- If you have an enterprise grid in slack, you'll need to authorize the new token for each organization once the app has been approved for the first organization.
