Set up SysAid for Teams (Microsoft Teams)
- 08 Apr 2025
- Print
- PDF
Set up SysAid for Teams (Microsoft Teams)
- Updated on 08 Apr 2025
- Print
- PDF
Article summary
Did you find this summary helpful?
Thank you for your feedback!
SysAid for Teams allows users to submit SysAid tickets from within Teams and to send messages and notifications from a SysAid ticket to groups and individuals in Microsoft Teams. This allows for easier collaboration within organizations that use Microsoft Teams for internal communication.
Please note:
SysAid for Teams is only available for SysAid Cloud customers and is currently for single-tenant use only
SysAid for Teams supports the 'New Teams'
Licensing
The Microsoft Teams integration includes SysAid for Teams. You can expand the chatbot’s AI capabilities by adding the AI End User Chatbot to your account. For more information, click here.
Prerequisites
Before setting up SysAid for Teams, please ensure that you have Microsoft Teams up and running and that the Azure integration is set up and enabled for your SysAid account.
Please note:
If you have users that were imported via LDAP integration, to avoid duplicate users, make sure that:
The users have the same email addresses in the Azure and LDAP repositories
The Sync user based on email address check box is selected in the Azure integration settings
You can opt to continue using LDAP as your primary user depository integration by selecting the option to set up Azure as your secondary user depository in SysAid. This feature is not yet available for all accounts. If you want to enable this feature, contact your SysAid Customer Care manager.
Set up SysAid for Teams
Get SysAid for Teams from the SysAid Marketplace.
Click the gear icon on the Microsoft Teams icon on the main My Apps page. Now, you can go ahead and connect the apps - keep your SysAid account in one tab and open a new tab to connect to your Azure portal.
In the Azure portal, under Azure services, choose Microsoft Entra ID.
In the Overview section, go to Manage > Custom domain names.
Copy the name with an “Available” status and paste it into the Tenant Name field in SysAid.
Register the application in Azure
In the Azure dashboard, click App registrations.
Click View All applications.
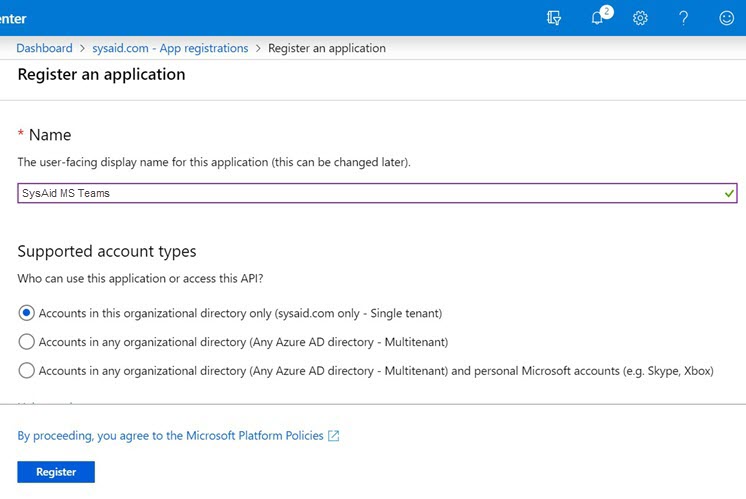
Click +New registration.
Enter a name for the application (for example, "SysAid Microsoft Teams") in the Name field.
Click Register.
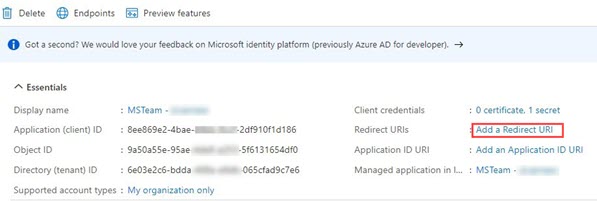
Get the Client ID
Hover over the Application (client) ID field and click copy.
Back in SysAid, paste the copied text into the Client ID field.
Get the Tenant ID
Hover over the Directory (Tenant) ID field and click copy.
Back in SysAid, paste the copied text into the Tenant ID field.
Get the Secret Key
Click Certificates & secrets on the left-hand menu.
Click New client secret.
Add a description (e.g., "SysAid Microsoft Teams").
Select 24 Months In the Expires area,
Click Add.
Click copy next to the Value column in the entry you just created.

Back in SysAid, paste the copied text into the Secret Key field.
Add redirect URI
Click Add Platform.
Click Web.
In the Redirect URIs field, click Add a Redirect URI.
In the Web area, click Add URI.
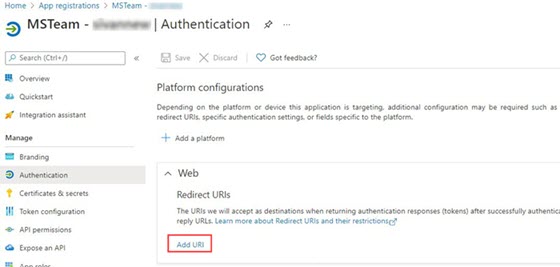
Enter "https://<SYSAID URL>/addonJspWrapper.jsp?a=msTeams&p=msTeamsGenerateToken.jsp" (make sure you add your specific SysAid URL).
Click Configure.
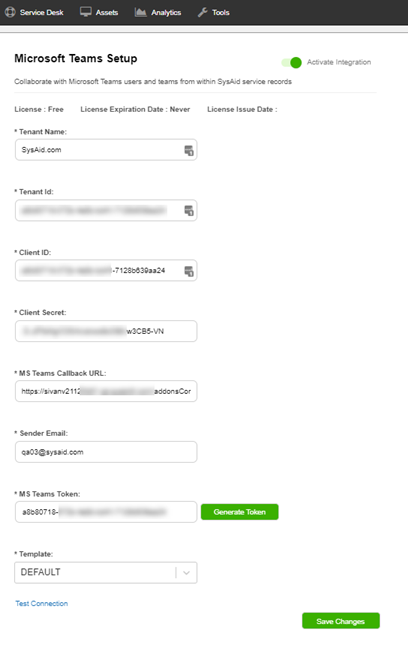
Get the Callback URL
In the MSTeams Callback URL field, enter:
https://<SYSAID URL>/addonJspWrapper.jsp?a=msTeams&p=msTeamsGenerateToken.jspMake sure you add your specific SysAid URL.
In SysAid, enter the callback URL in the Callback URL field.
Configure API Permissions
In Azure, navigate to select API permissions.
Click Add a permission.
Click Select an API > Microsoft graph.
Click Delegated.
Select the following permissions:
ChannelMessage.Send
Channel.ReadBasic.All
Chat.Create
ChatMessage.Send
Presence.Read.All
Team.ReadBasic.All
User.ReadBasic.All
You should have 7 permissions selected.
Click Grant admin consent for <Domain> and then click Yes.
In Azure, create a dedicated admin user for this integration. This is the displayed name for the sender of all automatic notifications from SysAid. Ensure that the user has sufficient permissions (at least Application Administrator level permissions) in the Azure portal to grant consent so that you will be able to successfully generate a token later in this process.
Please note:
We recommend using the name of your help desk and using your help desk's logo as its avatar.
For example, if your help desk is named SysAid, you can use one of these logos as the user's avatar in Microsoft Teams:

Back in SysAid, add the email for the user you just created to the Sender Email field.
From the Template drop-down list, select which SysAid template will be the default for tickets opened by Microsoft Teams.
Click Save Changes.
Click Test Connection to ensure that everything has been configured correctly.
Click the slider to activate the AI Service Desk.
Click Save Changes.
Populate the Token field
Within the same browser that you are running SysAid in, log in to Azure with the user you just created.
Click Generate Token.
A new browser tab opens. When a message appears indicating that the token was generated successfully, refresh the Microsoft Teams page in SysAid to populate the field.
Click Save Changes.
Please note:
SysAid will send out a system notification when the expiration date for the Secret Key (token) has passed.
In this case, you’ll need to create an new Secret Key and regenerate the token in order for the integration to work.
To learn more about this system notification, see Edit Monitoring Notifications.
SysAid Bot in Microsoft Teams
SysAid offers its own bot in Microsoft Teams that allows you to create SysAid tickets from Microsoft Teams. You can follow Microsoft's instructions for pinning this bot for your users in Teams, so they won't need to set it up themselves.
Once the bot is pinned, the users will receive a welcome message from the SysAid bot in their Teams account, inviting them to use the bot to contact their IT departments. We recommend informing your users about the bot before pinning it to ensure they understand the welcome message.
Please note:
Only the first tenant configured on the Azure AD integration can access the bot.
Set up the SysAid bot
In Microsoft Teams, click Apps.
Search for "SysAid."
Select SysAid.
Click Add.
Microsoft Teams adds the SysAid bot to the Chat channels.
Whitelabel the SysAid Bot
Admins can now customize the SysAid bot on Microsoft Teams to fit their own company culture and branding (including visual assets and voice & tone). There is now the option to configure the following properties from the Microsoft Teams store: Short Name Short Description Full Description App Icon Icon Outline Color Accent Color
Please note:
End users will get the updates after logging back into MS Teams.
Follow Microsoft's Instructions to customize the bot.
Upgrade the SysAid Bot
As SysAid is continuously adding new capabilities to the SysAid Bot, we recommend periodically upgrading your SysAid Bot to the latest version. Ensure that your end users upgrade the SysAid Bot in their individual Microsoft Team accounts so they can access the latest capabilities.
To upgrade the SysAid bot:
In Microsoft Teams, click Apps.
Search for "SysAid."
Select SysAid.
If there is a more current version available, the button will say 'Upgrade' instead of 'Open'.Click Upgrade.
Configure survey notifications
The SysAdmin can configure a survey notification to be sent to the end user upon ticket closure.
This creates an opportunity to improve survey response rates, which can lead to a clearer demonstration of the improved employee experience.
To configure the survey:
In General Settings, click on "Request User".
Verify that the 'Add a link to survey' option is checked.
Go to Customize > Notifications.
Click to edit notification #1005 (this notification is sent when a ticket is closed).
Insert or remove a survey
Click the "Insert Survey" button.
From the dropdown list, select the survey to be sent via MS Teams upon ticket closure.
To remove the survey, click "Remove Survey".
Please note:
If the "Add a link to survey" checkbox is checked, but no survey was added to the notification template, the notification will be sent with no survey.
This feature is also enabled for Teams custom notification #1002 (notifies when a ticket has been created).
Although this is not the primary use case of the survey, the SysAdmin can use it to learn more about the users' experience of the ticket submission flow.
Accounts with the previous configuration of MS Teams custom notifications #1005 and #1002 need to enable the survey capability by clicking "Reset to default" in "Version History."
Related content
Set up AI Service Desk (Microsoft Teams)
Tags for SysAid Notifications in Microsoft Teams
.png)