Manage Attachments Storage
- 05 Sep 2023
- Print
- PDF
Manage Attachments Storage
- Updated on 05 Sep 2023
- Print
- PDF
Article summary
Did you find this summary helpful?
Thank you for your feedback
SysAid's Manage Attachments Storage page helps admins (with SysAid Administrator permissions) stay within their allowed attachment storage space by enabling them to filter, export, and delete attachments.
When managing your attachments, we recommend that you:
- Export all attachments you wish to keep locally before deleting them
- Delete all attachments from SysAid that are older than 1-2 years, (unless you explicitly know that you need them)
- Repeat this process every 3-6 months
- Conduct an annual evaluation of your account's storage requirements prior to renewing your license
Note
If your account is reaching the storage space limit, we recommend preparing an external storage solution of your choice (i.e. cloud-based storage or physical disks) in advance, before performing any file exports.
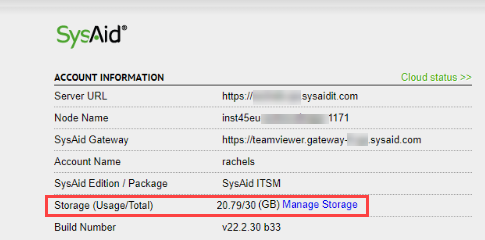
View your storage usage
You can see how much of your allotted storage space you are using in the About window, which you can access from the profile menu;
To view your storage space usage:
- Open the profile menu by clicking your user name in the top-right corner, and select About
- Locate the Storage row
- (Optional) Navigate to the Manage Attachments Storage page by clicking Manage Storage (it will open in a new tab)

Manage attachments storage
The following functionality is available under Settings > Service Desk.
On this page, you can view existing attachments; arranged per year, and per entity type (i.e. Service Requests, Articles, Users etc. ). Here you can locate attachments, select files to export, and later delete attachments to free up your SysAid storage space.

Locate attachments
- Select a year from the list from the Attachments storage per year (left panel).
- On the right panel, filter the attachments by size. Select if you want to see data that's "Greater than" or "Less than" a certain size, and enter the size and select either MB or KB. (Optional)
- To filter the data by date, select which date you want to see data for.
Note that the Date filter is relevant to the selected year only. (Optional)
Export attachments
Exporting data allows you to back it up in your external storage solution of choice so that you can free up your SysAid storage space without losing the data.
We recommend exporting all relevant attachments to your chosen external storage method and arranging the data in a defined way, for future use.
For example, arrange all service requests attachments in a dedicated folder and repeat this process for all other relevant entity-types.
Note
A maximum number of 10,000 files with a total size of 10GB can be handled at a single time. If your selection exceeds these limits, please modify your selection and try again.
When selecting attachments for Export, SysAid creates a zipped folder that you can locally.
All files are arranged in dedicated folders, matching the selected options in the Export process.
To export data:
- Select the checkboxes that correspond to the file types you want to export
- Click Export. This process may take a while. You can work as normal during this time, but no other Storage Management processes can be initiated until this process is complete
- Click Download to download your exported data.
- The downloaded file includes the following folders: [account name]/[entity types]//all the attachments for that entity.

Note
The Export process (and the Delete process) run in the background, and may take a short while to complete; depending on the total number and size of the selected files.
After initiating an Export/Delete process, you can continue with other daily tasks and return later to check if the process is completed.
Once the Export process is completed, the new exported file link will appear in the bottom section of the page.
The exported data links are saved temporarily on an S3 bucket, and expire after seven days. During this time, your storage usage is not impacted by these files.
Delete Attachments
Once your data is backed up or you've determined you don't need it anymore, you can delete it to increase your available storage space in SysAid.
Note
Deleting attachments does not delete the tickets or assets they were attached to. Those remain intact in your SysAid records.
To delete data, select the checkboxes that correspond to the files you want to delete and click Delete.
Once the process is complete, the relevant check boxes are removed from the page.
Attachment Storage Limits
Messages displayed when approaching or exceeding the Storage limit
When your account reached 85% of the total storage space, SysAid Administrators will get a popup warning message upon every login. This message explains to the SysAid Administrator what can be done to resolve the storage issue.
If the issue goes unresolved (by either freeing up the storage or by increasing the storage space, see below), a popup error message appears when the storage is completely exceeded.
In the event that there's no remaining storage space, attachments cannot be uploaded to SysAid until storage space becomes available. All other functionalities remain unchanged, apart from uploading additional attachments.
Note
If you've reached 100% storage capacity and an attachment cannot be uploaded (due to storage space being 100% full), a popup notification will appear, explaining that no attachments can be uploaded since storage capacity is full.
This applies to any scenario where users (administrators or end users) are attempting to upload attachments to SysAid, whether in the admin portal or in the Self-Service Portal.
Exporting older files from SysAid
Exporting older files from SysAid may cause Errors due to some file types that are currently considered unsafe.
If this occurs, customers should refine their Filters to try and identify the specific file that is causing this error and then consider whether to ignore and download, or to refrain from downloading.
Increasing storage space
- To purchase extra storage, contact the Customer Success team.
- For technical questions, contact Customer Care.
.png)