The Jira integration allows you to sync information between Jira and SysAid to increase collaboration between IT and development teams and improve visibility and efficiency across departments.
With the integration, you'll be able to:
View Jira information in SysAid service records
Generate Jira issues from SysAid service records
Link existing Jira issues from SysAid service records
Configure email and escalation rules to generate Jira issues
Map fields and sync statuses between Jira and SysAid
Set up multiple integration configurations to support multiple Jira projects
Requirements:
SysAid Spaces edition. If you’re Using SysAid Classic, please see Jira integration with SysAid Classic.
How it works
The integration allows IT teams to streamline workflows, enhance collaboration, and reduce manual effort when managing incidents and development tasks across Jira and SysAid.
Once Jira and SysAid are connected, you can do the following:
Map fields
Fields in SysAid service records can be mapped to corresponding fields in Jira issues. This allows data to flow seamlessly between the two systems during ticket creation and updates.
Synchronize service statuses
Status changes in Jira issues are synchronized with SysAid service records, ensuring both systems reflect the latest state of a task or ticket.
Create and link service records
Users can create a Jira issue directly from a SysAid service record or link an existing Jira issue to a service record in SysAid - linking the workflow across the platforms. Any file attached in SysAid is synced to Jira, and any file added in Jira is synced back to the service record.
Customize descriptions
Admins can define what information from a SysAid ticket should be included in the corresponding Jira issue descriptions, ensuring relevant context is transferred.
Set project-specific configurations
The integration allows custom setups for different Jira projects, enabling tailored field mappings and configurations based on project needs.
Licensing
You can contact your Account Manager to purchase this add-on. If you want to set up a trial, enter your Jira credentials on the setup page and enable the add-on. This will initiate a 10-day trial license for you to try out SysAid's Jira add-on.
Connecting Jira and SysAid
The connection process consists of 4 steps:
Step #1: Adding the Jira add-on
Step #2: Adding your Jira account details to SysAid
Step #3: Creating a Webhook in Jira
Step #4: Verifying the connection
We’ll walk you through each step.
Step #1: Adding the Jira add-on
In SysAid, go to Connect and click Explore in the Marketplace banner.
Search for Jira Software – Cloud Service and click on the card.
Click Setup and manage. You will be redirected to the My add-ons page, where you’ll see Jira Software – Cloud Service.
Click the gear icon.
Now, you can connect the apps - keep your SysAid account Jira integration page open in one tab and open a new tab to connect to your Jira portal.
Step #2: Adding your Jira account details to SysAid
Log in to Jira and click this link.
Click Create API token.
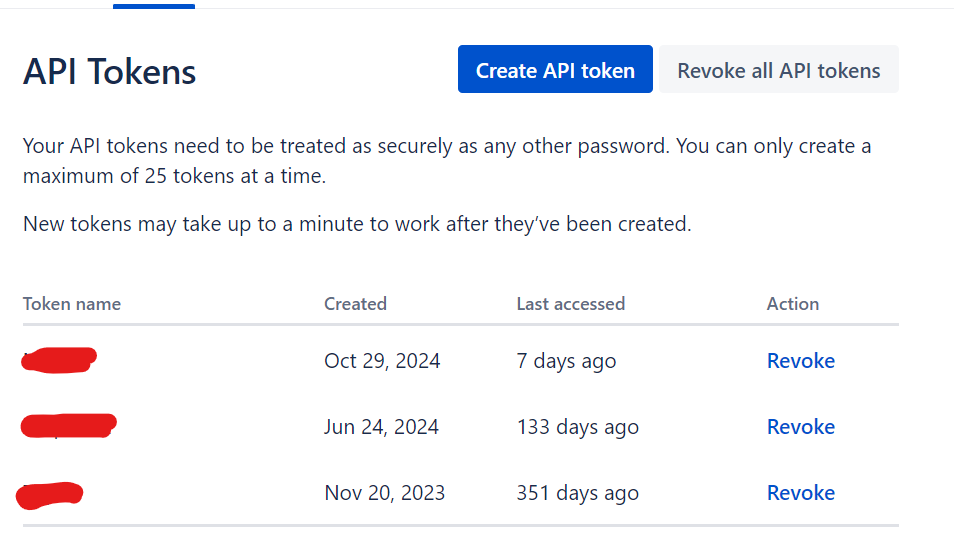
Enter a name for the API token.
Click Create.
Click Copy.
Back in SysAid, paste the token into the Jira Token field.
Enter your Jira URL.
Enter your Jira username and password.
Click Save Changes.
Now, you’ll need to authenticate the integration by creating a Webhook in Jira with a SysAid token.
Step #3: Creating a Webhook in Jira
In SysAid, in the SysAid access token field, click Generate Token.
Copy the token.
In Jira, go to System > Webhooks (in the Advanced section).
You can also use the quick search and type “webhooks”.Click Create a webhook.
Enter a name for the Webhook. For the URL, use the URL below and insert the relevant details:
https://{YOUR_SYSAID_ACCOUNT_ID.sysaidit.com/add-onsConsume/jiraEmbedded?ticket=${issue.key}&accessToken={TOKEN_COPIED_FROM_SYSAID}Tip!
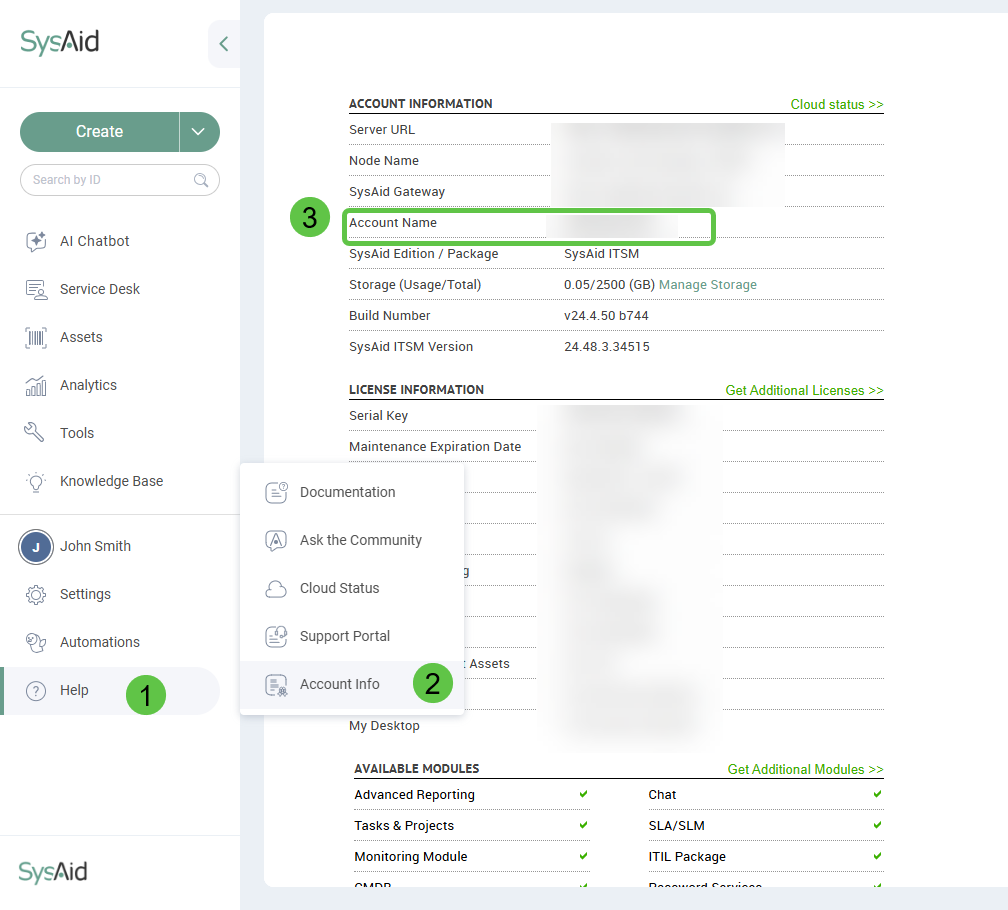
To find your SysAid account ID:
1. In the SysAid main menu, go to the question mark icon.
2. Click on Account Info
3. You’ll find the name under the Account Name field.
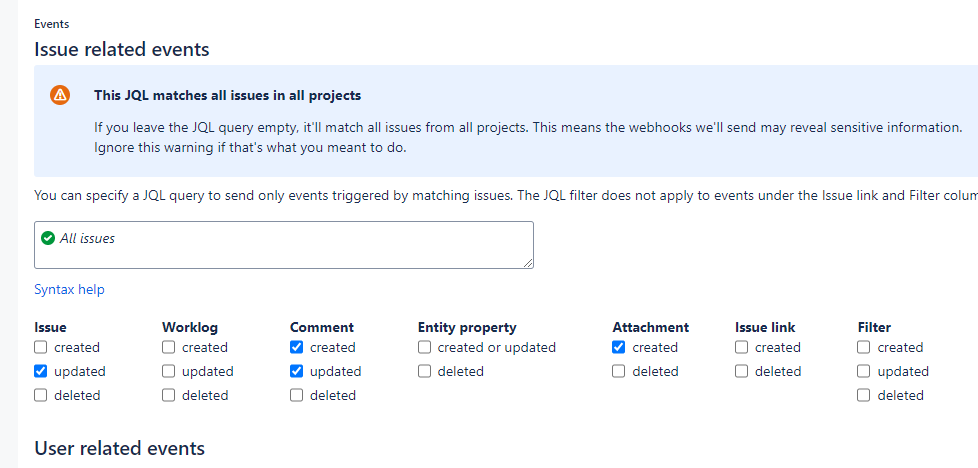
Under Issue related events, choose the following:
Issue > updated
Comment > created, updated
Attachment > created
Click Save.
Step #4: Verifying the connection
In SysAid, turn on the Activate integration toggle.
Click Test connection to see if SysAid is successfully communicating with Jira.
If the connection is successful, a confirmation message is displayed.
If the connection is unsuccessful, check that you have copied the information correctly. If it’s still not working, please contact our Support team.
Once the apps are connected, you can go ahead and link service records to Jira issues or create Jira issues from service records.
You can also customize the different aspects of the integration to suit your business needs.
Using the Jira integration
Now that you've set up the integration, you can create a Jira issue from a SysAid service record or link an existing Jira issue to a SysAid service record.
To create and link Jira issues, you must first enable the Jira section in all the relevant service record templates in SysAid.
Enabling the Jira functionality in service record templates
To enable the Jira functionality on your service record templates:
In your SysAid account, go to Settings > Customization > Templates & Fields >Ticket Templates & Workflows.
Select the relevant service record template or create a new one
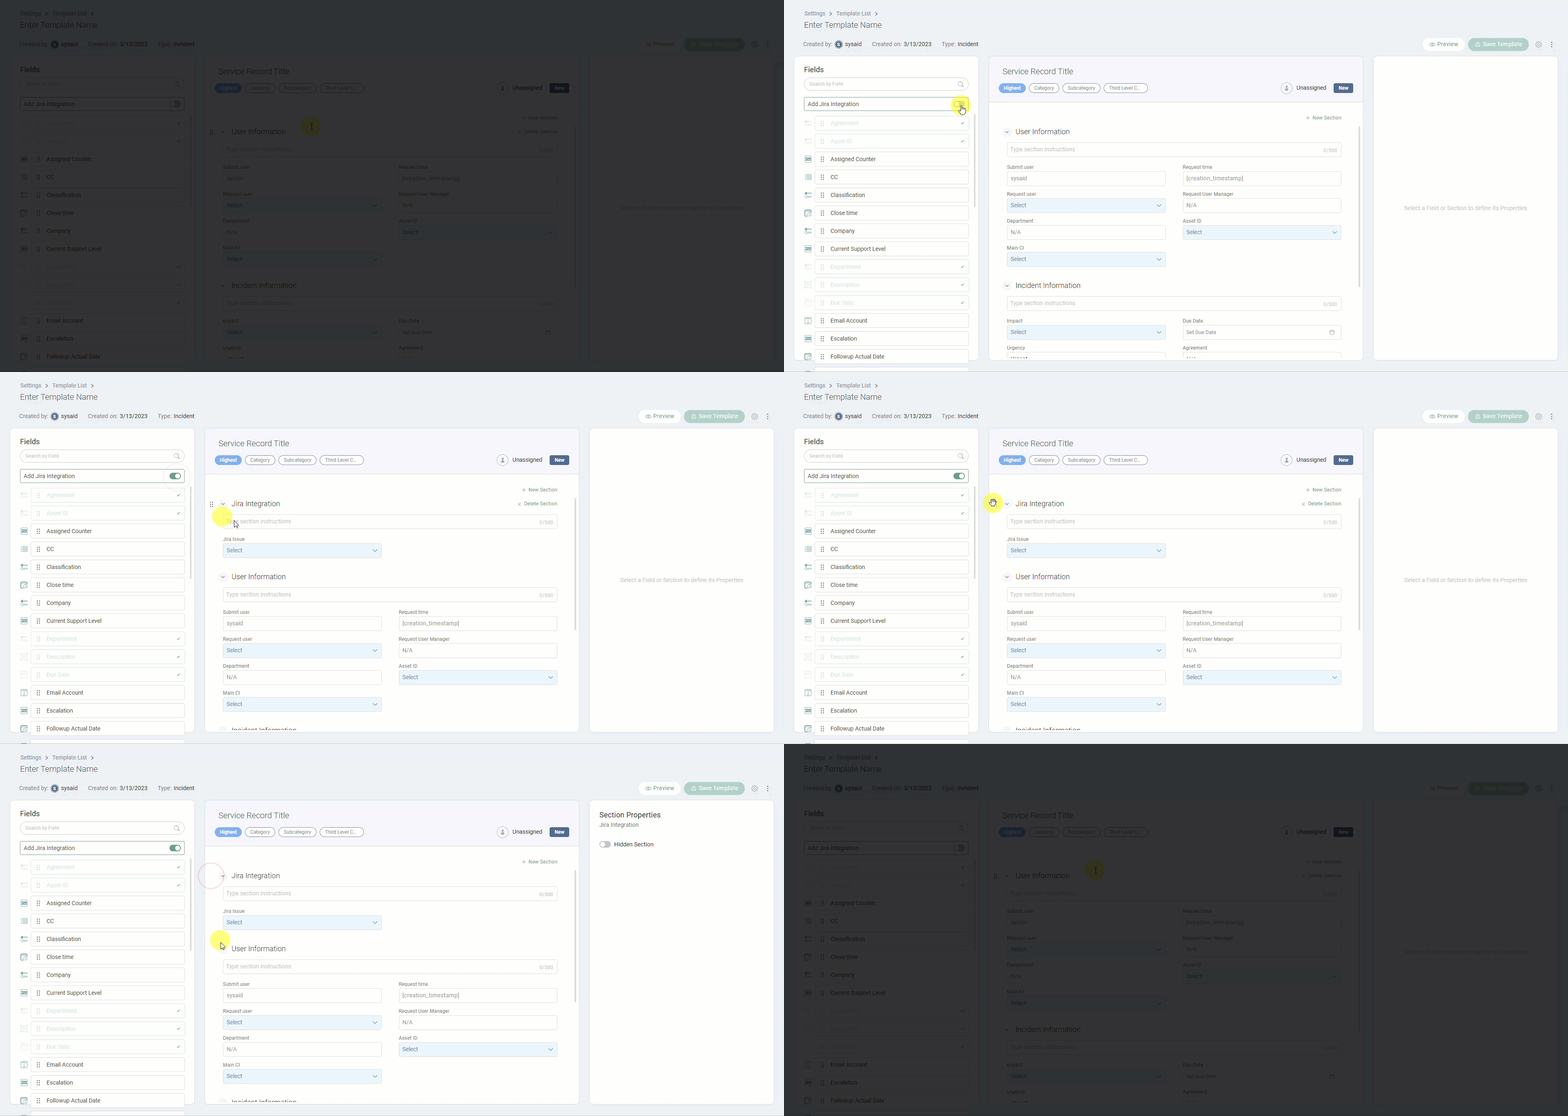
Turn on the Add Jira Integration toggle. This will add a Jira section to your template. You can move the section around the template, but not edit it.
Creating a Jira issue from a SysAid service record
To create a Jira issue from a SysAid service record:
Select the relevant service record from the queue.
In the service record view, select Create from the Jira Issue drop-down menu.
Select which Jira project you want the issue to be included in.
Select a Jira type for the issue and fill in the assignee and parent if relevant.
Click Save.
SysAid generates an activity in the service record corresponding to creating and linking the new Jira issue. It may take up to 5 minutes for all the data to be populated.
To view more information on the issue, click the link in the Jira issue field.
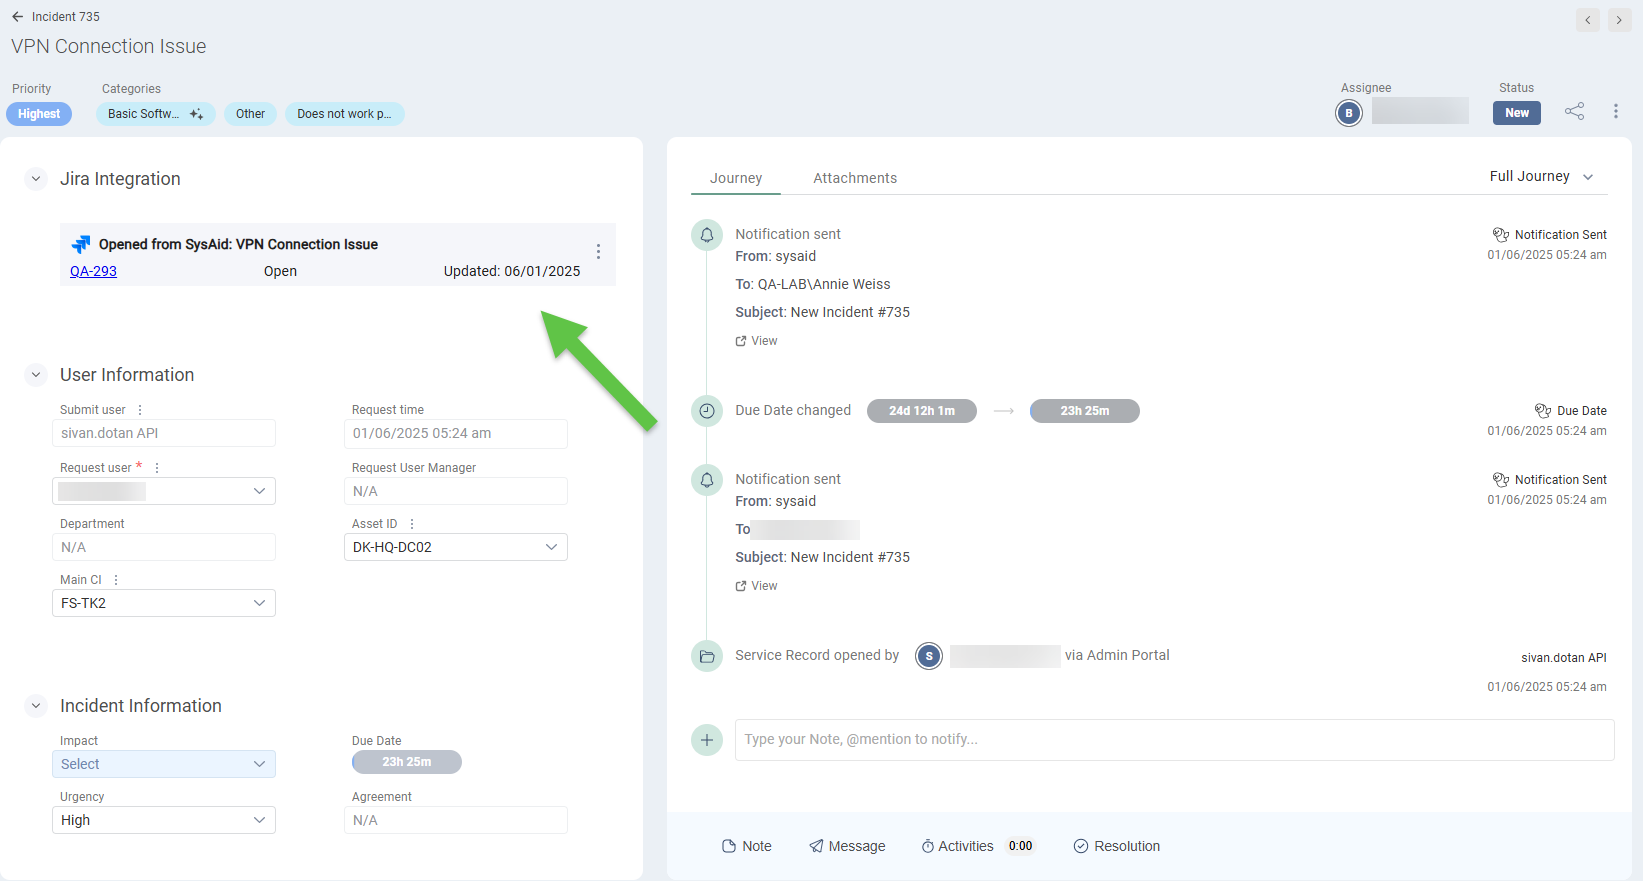
The Jira issue contains all the information you defined when you set up the SysAid-Jira integration.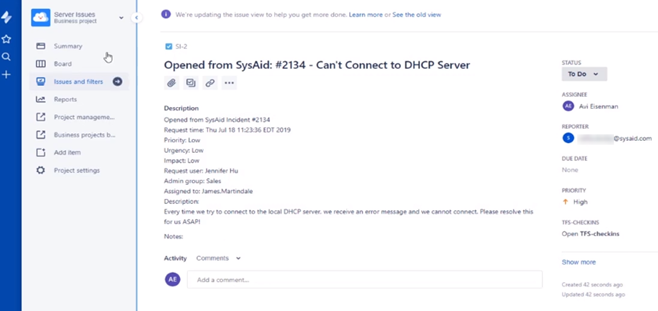
When you change an issue's status in Jira, the status is automatically updated in SysAid in the Jira issue field.
Please note:
You can move Jira tasks from one project to another and the change will be reflect in the linked service record following the automatic sync which occurs every 5 minutes.
Removing a linked issue
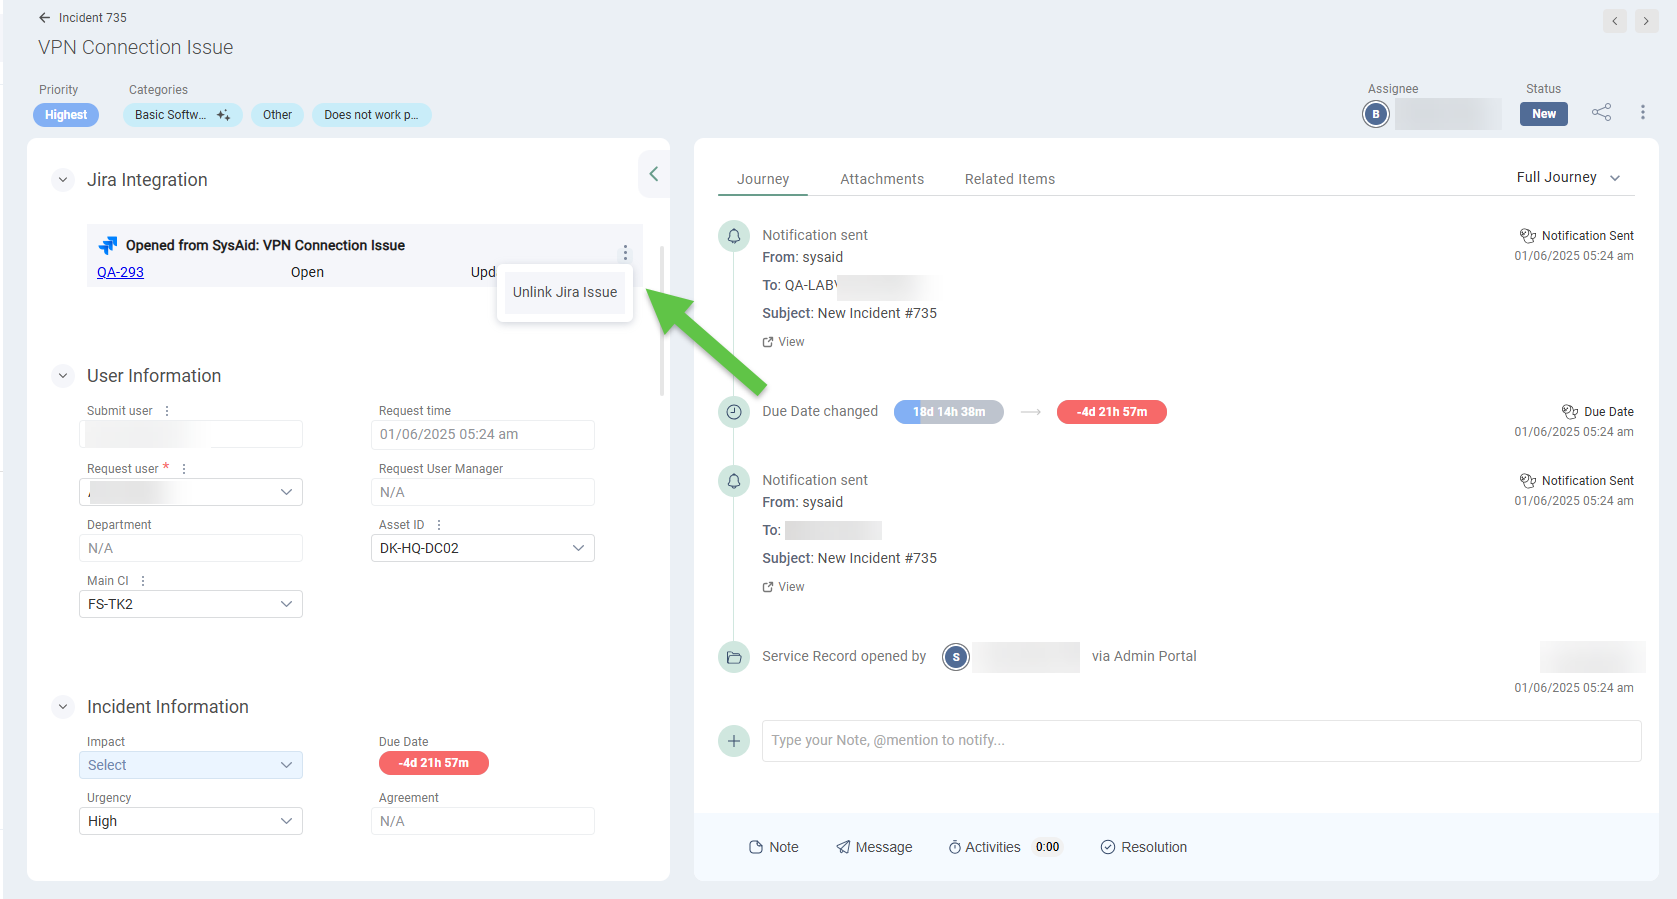
Go to the relevant service record and click the 3-dot menu at the top right corner of the Jira issue to unlink it or relink the service record to another Jira issue.
Setting a Jira escalation or email rule
You can also set escalation rules and email rules to create Jira issues.
To set an escalation rule or email rule to create a Jira issue based on a SysAid service record:
Set the criteria for the rule. For more information, see Escalation Rules or Email Rules.
In the Query Builder/Action Builder section of the rule, select the Jira-related fields you want the escalation rule to affect:
For the Jira Issue field, select Create.
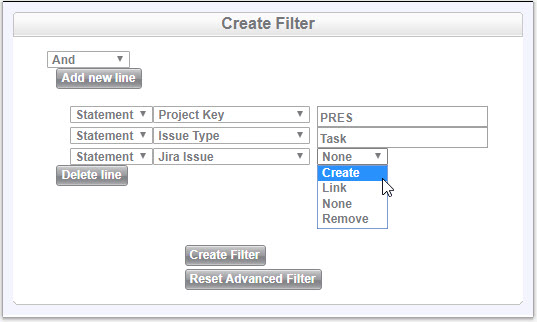
Select the Jira Project field and enter the Project ID.
Tip:
Your Jira Project ID can be found on the URL of the project's page in Jira.
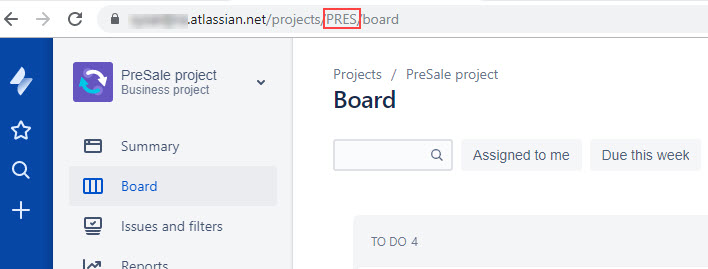
Click Create filter.
Click Save.
Customizing the integration
Once the apps are connected, you can customize the following:
Mapping fields between Jira and SysAid
Map out the fields between SysAid and Jira. This means that values of SysAid service record fields are populated in their corresponding fields in Jira.
Once Jira and SysAid are connected, the following fields will be automatically synced from SysAid to Jira when creating a Jira issue from a service record:
Jira Issue Key
Jira Issue
Issue Type
Project Key
Add Comment To Jira
Jira Log
Jira Attachment
Jira Assignee
Jira Parent Issue
Please note:
Attachments are shared between the SysAid service record and the linked Jira task. Any file added in SysAid is synced to Jira, and any file added in Jira is synced back to the service record.
You can use the mapping process to align additional fields across Jira and SysAid. Jira fields can only be mapped to SysAid custom text or text area fields.
To map Jira fields to SysAid fields:
Create custom Jira fields in SysAid. Make sure that the DB Field Name begins with "jira_". For more information about creating custom fields in SysAid, see Create Custom Fields.
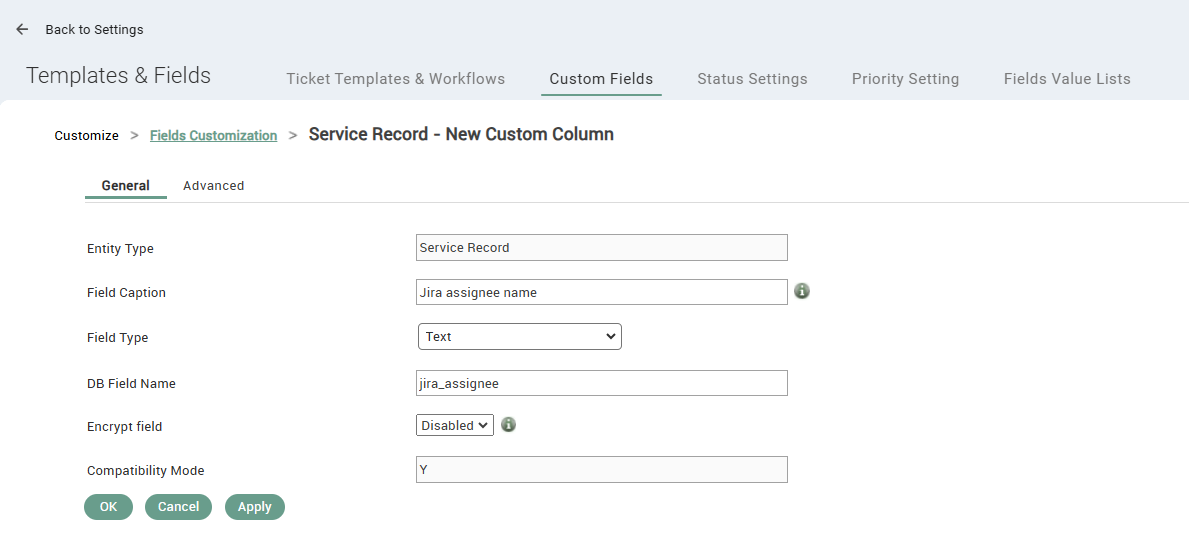
On the Jira integration page in SysAid, go to Default Profile > Mapping.
Select a “Jira Project” and a “Jira Issue” as a template for the mapping.
Link the relevant “SysAid fields” you created to their corresponding “Jira Field”.
To change the direction of the mapping (i.e., when an update occurs on SysAid to update in Jira or vice versa), click the arrow.
Red arrow: SysAid field update will trigger a Jira field update
Green arrow: Jira field update will trigger a SysAid field update
Check the relevant checkbox to enable the mapping.
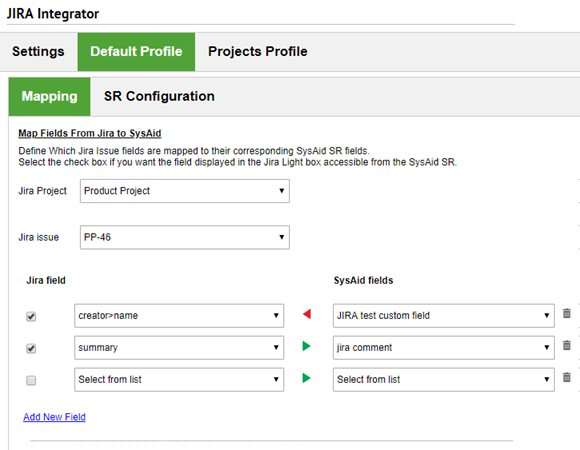
Click Save Changes. You can repeat this process and map out additional fields by clicking Add New Field. Use the trash can icon to delete a mapped field.
Mapping statuses between Jira and SysAid
The Status Mapping area allows you to connect a Jira status with a status in SysAid. This way, when a status is updated in a Jira issue, the update is reflected in the connected SysAid Service Record.
To map statuses:
In the Jira integration page in SysAid, go to the Default Profile > Mapping
Select a status from the Jira status drop-down menu.
Select a corresponding status from the SysAid status drop-down menu.
You can repeat this process and map out additional statuses by clicking Add New Status. To delete a mapped field, use the trash can icon.
To also update Jira issue statuses, based on changes to SysAid Service Record statuses, check the Update status in Jira issue when a status is changed in the SysAid SR checkbox.

Service record configuration
The Service Record Configuration tab lets you determine the information sent to the description fields for Jira issues generated from SysAid service records. A new Activity within the service record in SysAid is created when a JIRA item is created, linked, or removed.
To configure service records:
In the Jira integration page in SysAid, go to the Default Profile > SR Configuration
You can copy any service record data from SysAid to Jira using the Description field. You can manually edit the description templates for the Jira issues that are automatically created by this SysAid <> Jira integration to add or remove service record information that will appear in the Jira issue.
(Optional) To generate a SysAid service record activity every time the integration creates, links to, or removes a Jira issue, check the Add Service Record activity when creating/linking/removing a Jira issue checkbox.
(Optional) In the "Display SysAid Service Record ID in this field" field, enter the ID of the custom field that Jira will use for displaying the ID of the service record connected to the automatically generated Jira issue:
In Jira, click the gear icon.
Select Issues.
Select Custom fields.
Search for the field you created in Jira for this purpose.
Select Configure.
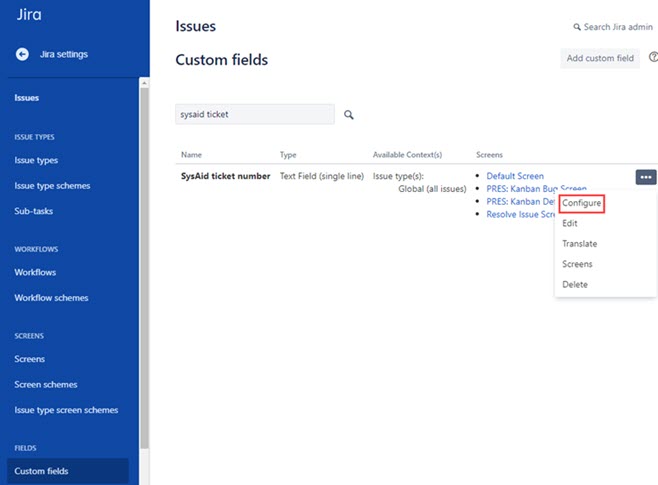
Copy the ID at the end of the URL.

Back in SysAid, in the Service Record Configuration tab, enter "customfield_" and paste the copied ID after the underscore in the "Display SysAid Service Record ID in this field" field.
Click Save Changes.
Project profile configuration
Please note:
When a Jira task linked to a SysAid service record is moved to another Jira project, SysAid automatically updates the record with the new project information. There is no need to configure anything per project for this to work.
In Jira, an issue's fields may differ depending on which project it belongs to. That's why you should set up different configurations to apply to different projects in addition to your default configuration.
To add a new designated Jira project configuration:
In the Jira integration page in SysAid, go to the Projects Profile tab.
Click Add Jira Project.
Set up the field mapping, status mapping, and Service Record configuration according to the procedures detailed above.
Click Add to Projects List.
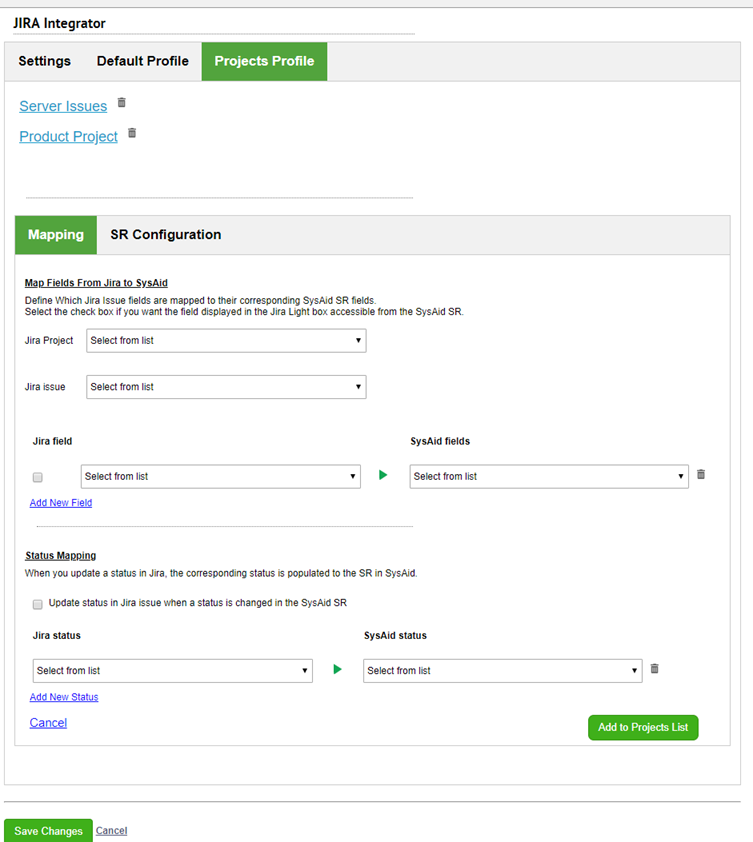
You can always delete a project configuration by clicking the trash can icon next to that project.
Syncing comments and notes
SysAid’s Jira integration supports two-way syncing of comments and notes between Jira issues and SysAid service records. You can configure this behavior using the following two settings:
Sync Jira comments into SR notes
Sync SR notes into Jira comments
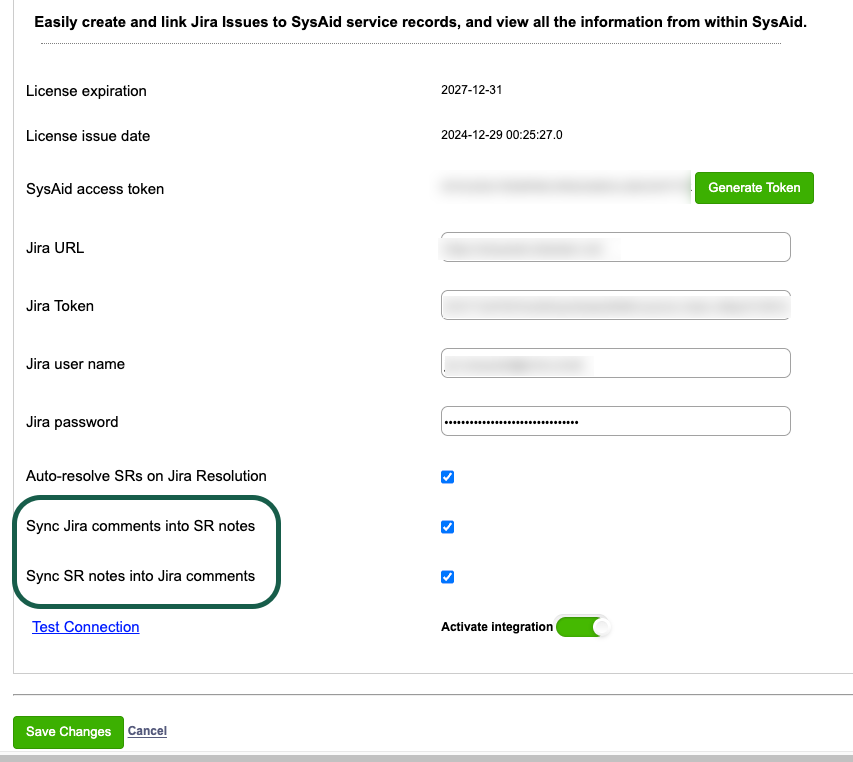
When both settings are enabled, comments from Jira are pulled into SysAid as internal notes on the linked service record, and notes added in SysAid are pushed to the corresponding Jira issue as comments. If only one setting is enabled, communication flows in one direction only.
By default, all synced notes and comments are internal and aren’t visible to the Request User in the Self-Service Portal. To make a Jira comment visible to the request user, the comment must include the "SysAid Integration" tag. This tag is used to link the comment to SysAid and ensures it is displayed to the Request User.
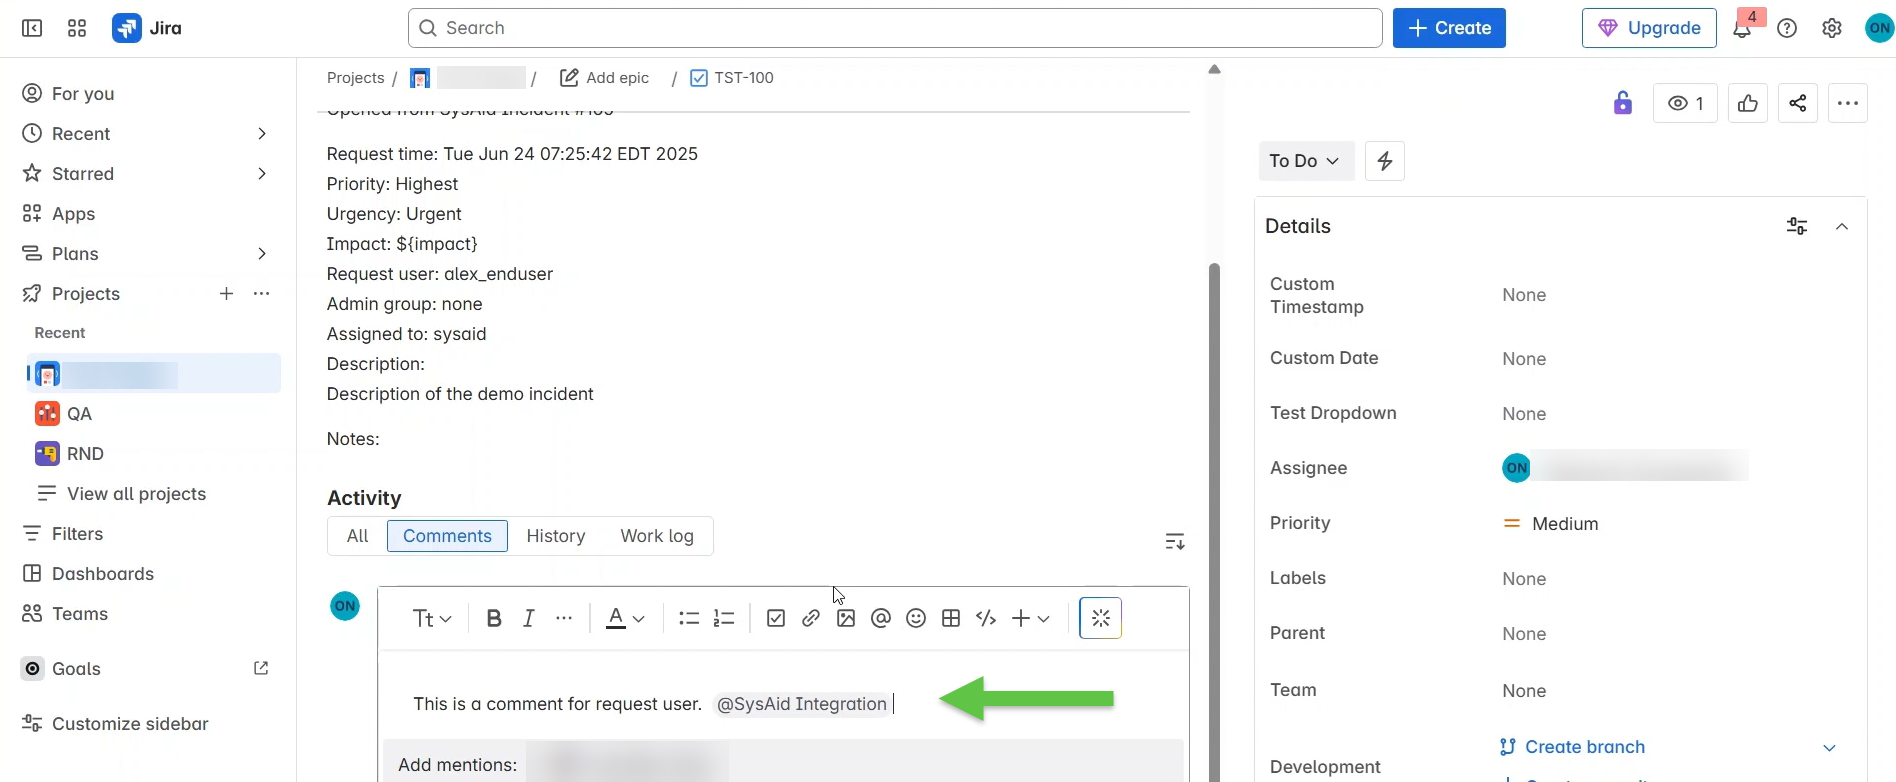
When a Request user sends a note from the Self-Service Portal, the note will appear in Jira as:
"Request user (Full Name) replied:" followed by their message.
Please note:
Mentions and emojis not relevant to SysAid are removed during syncing
Syncing occurs every 5 minutes, so updates may take up to 5 minutes to appear
Automatically resolving service records when a Jira issue is resolved
When the Auto-resolve SRs on Jira Resolution checkbox is checked, SysAid automatically sets the linked service record to Resolved as soon as the associated Jira issue is closed. This helps keep both systems aligned without requiring manual updates from Agents.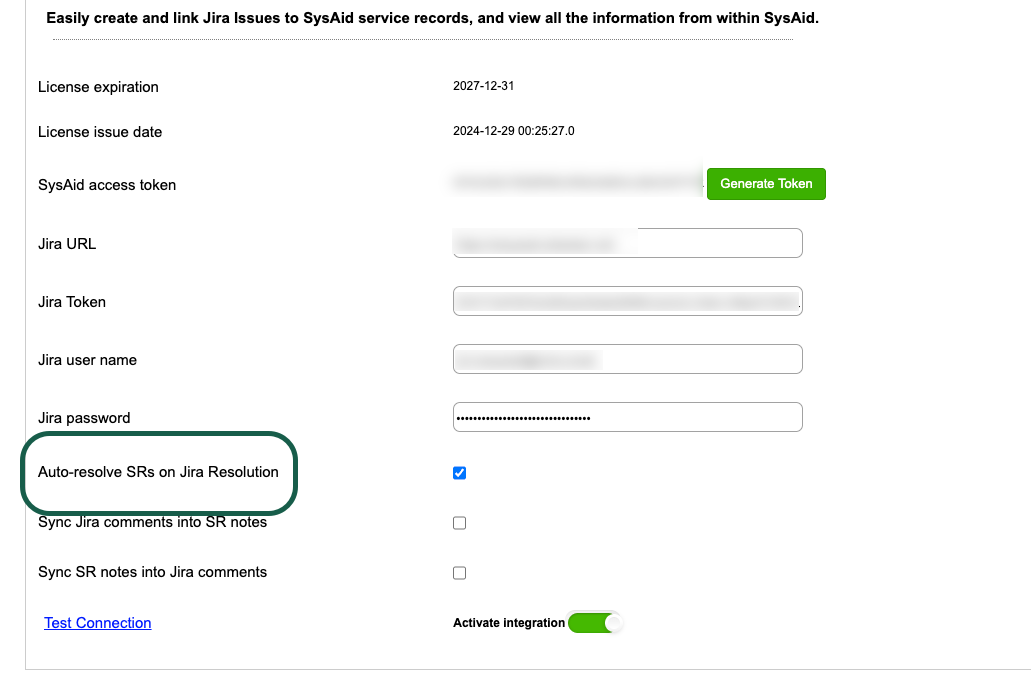
By default, when a Jira issue is closed:
The service record status will change to Closed in Jira
The service record solution will be populated with whatever was written in Jira
The service record Resolution will also say - Closed in Jira
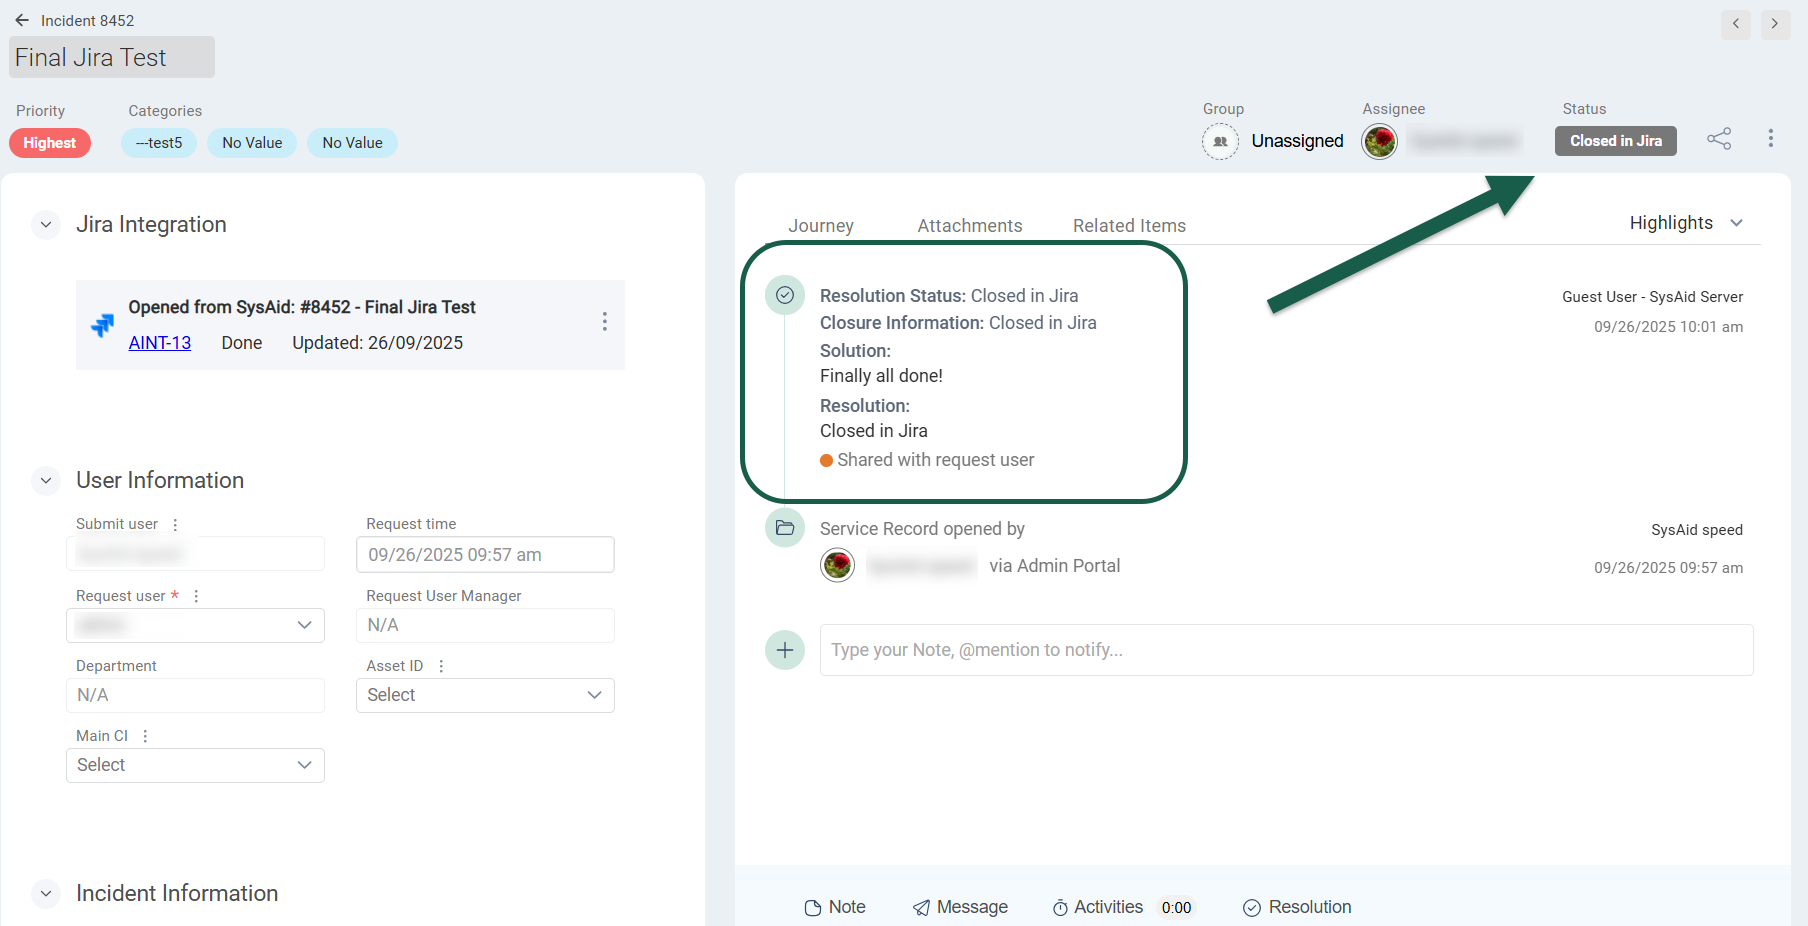
If you want a different Jira field to populate the service record, you can go to Mapping > Solution mapping and select the Jira data you would like to have auto-populated in the Solution field of the service record.