SysAid includes a large variety of out-of-the-box reports that allow you to evaluate the performance of your help desk, track inventories, measure the progress of your various tasks and projects, and more. You can build new reports using SysAid's Report form or a third-party application, such as iReport. Once a report is created in SysAid, it is not editable (with exception of iReport files) and all out-of-the-box report are set as Read Only.
In an upcoming version, all SysAid reports will be editable from within SysAid.
SysAid offers two methods for designing new reports:
For general information on reports in SysAid, see Reports.
To customize and/or run existing reports see Customize and Run a Report.
To edit report properties, see Edit Reports.
To organize reports on the page, see Organize Reports.
Create a new report
You can add new reports to the All Reports tab. If you want to create a customized report, see the Customized Report section below.
Creating Reports
To create a new report
- Click Create New.
- Click Create New Report.
- In the New Report Options dialog, in the Report Type drop-down, select an entity to report on.
- In the Report Name field, enter a name for the report.
- From the Category drop-down, select the category in which you want the report to be located.
- To limit the report to specific admin groups
- Click within the Accessible to field.
- Select a group from the drop-down.
- Repeat to add as many groups as you want.
- If you want remove a group, click the X corresponding to that group.
- Click Done.
- Your report is created in the All Reports tab. To further customize the report, click on the newly created report to open it's Report form.
Create a clustered report
You can create clustered reports that consolidate multiple reports into a single PDF report. This allows admins to more efficiently get the results they need for multiple reports that they need to run regularly. Currently this option is only available for SysAid Cloud accounts.
Please note that clustered reports must consist of reports of the same entity and only reports that were created with the report builder can be selected for Clustered reports. Customized or legacy reports cannot be selected.
To create a new report
- Click Create New.
- Click Create New Clustered Report.
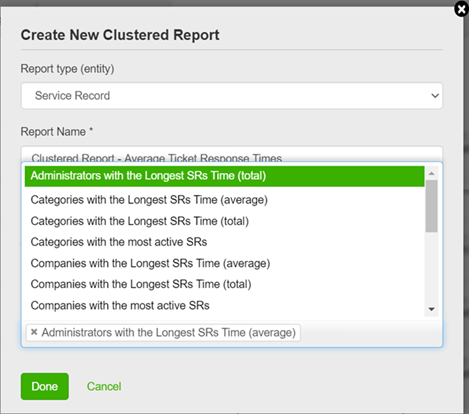
- In the New Clustered Report Options dialog, in the Report Type drop-down, select the entity for the reports you want to include.
- In the Report Name field, enter a name for the clustered report.
- From the Category drop-down, select the category in which you want the clustered report to be located.
- To limit the clustered report to specific admin groups
- Click within the Accessible to field.
- Select a group from the drop-down.
- Repeat to add as many groups as you want.
- If you want remove a group, click the X corresponding to that group.
- Add reports to the clustered report
- Click within the Clustered Reports field.
- Select a report from the drop-down.
- Repeat to add as many reports as you want.
- If you want remove a group, click the X corresponding to that group.
- Click Done.
Your report is created in the All Reports tab. Clustered reports are displayed with a Unique icon.
Duplicate a Report
You can use an existing report as a template for a new report by duplicating it. Let's say you have a report and you'd like to create another report just like it with some adjustments to the filters, a different chart type, and modified text on the cover page. Instead of creating the new report from scratch, you can duplicate the existing report and perform the small modifications in a fraction of the time.
To duplicate a report
- In the All Reports tab, locate the report you want to duplicate and click
 .
. - Select Duplicate Report.
- Enter a name for the new report.
- Click Done.
- Open the new report to modify it as you like.
Create a customized report from a jrxml file
You can create a customized report from an external jrxml file that contains the body of your report, including headers and footers. Customized reports can also include sub reports, prompt code and a script. If you are creating a static report, you only need to edit the jrxml, the prompt and script are not necessary.
Sub reports add extra design output and allow you to create more complex reports. For example, you can use sub reports to divide an Open/Closed requests by Company report, between local companies and regional companies. You can include as many sub reports as you want.
The Prompt contains the code for the Report form. This code allows you to make your reports more dynamic by including filters, date ranges, etc. If you know HTML and Velocity script, you can edit the fields that appear in the Report form.
Click here to learn more about Velocity script.
The parameters that you choose in the Report form when running a report must be processed before they can be fed into the jrxml that generates your report. The Groovy code Script is responsible for this processing.
For more information about Groovy, click here.
To create a customized report
- In the All Reports tab, click Create New.
- Select Create new Report.
- From the Report Type drop-down, select Customized Report.
- In the Report Name field, enter a unique name for the report.
- From the Category drop-down, select the category in which you want the report to be located.
- To limit the report to specific admin groups
- Click within the Accessible to field.
- Select a group from the drop-down.
- Repeat to add as many groups as you want.
- If you want to remove a group, click the X corresponding to that group.
- Click Add jrxml report file. Select the jrxml file you want to base the report on and click OK.
- If you want to include a sub report, click Add sub report. Select the jrxml file you want, and click OK.
- If you are including a prompt code, add it in the Prompt text box.
- If you are including a script, add the Groovy code in the Script text box.
- If you want to limit the report to specific admin groups, remove the All Groups parameter and enter the names of the groups you want to grant access to the report.
- Click Done.