Obtain the SharePoint credentials you need to add a SharePoint Dataset to your Data Pool
Requirements:
SysAdmin or AI Admin permissions
Cloud Microsoft Office365 SharePoint
Microsoft Entra ID Account with published SharePoint Sites
Configuring SharePoint Datasets inside the AI Chatbot’s Data Pool requires them to be synced with the organization’s Microsoft Entra (Azure Active Directory) account.
Once the Data Pool processes the SharePoint Sites (including their pages and nested files), the AI Chatbot can refer to the SharePoint Dataset as a knowledge source.
The Data Pool’s SharePoint Datasets support these formats:
.docx
.pdf
.xslx
SharePoint page
.pptx
This document lists the steps to extract the credentials needed to create a SharePoint Dataset in the Data Pool.
Create a SharePoint Dataset
Read this article to learn how to create a SharePoint Dataset for your Data Pool
Step #1: Create Dataset
Once you’ve created a SharePoint Connector Dataset, this pop-up form will open:
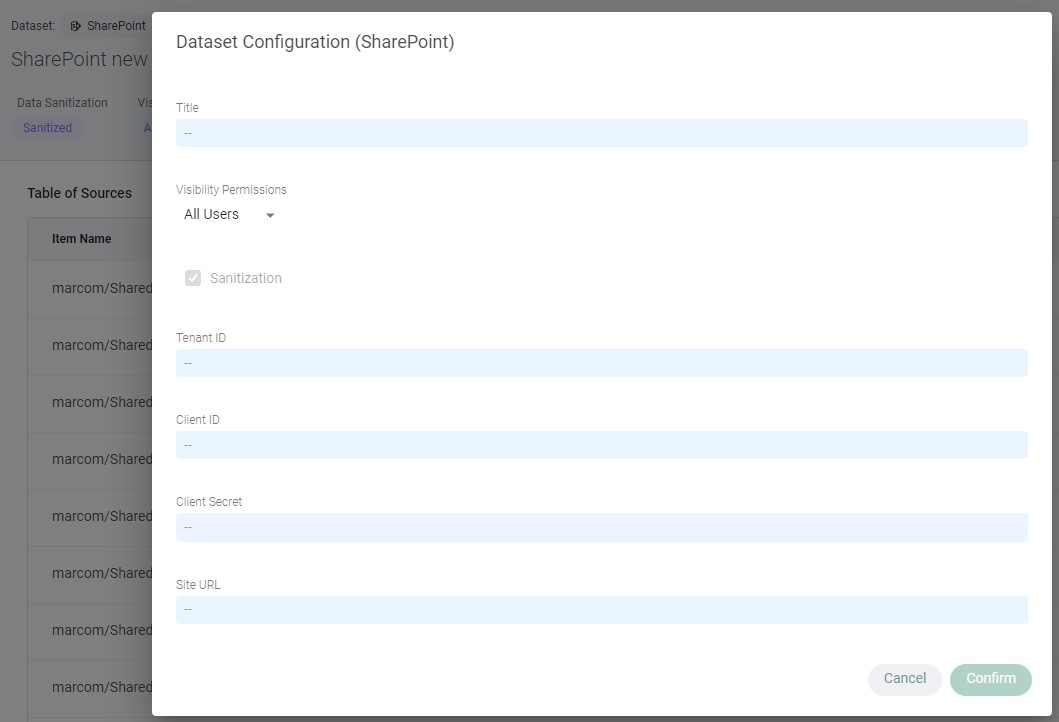
The (five) values for “Title”, “Tenant Name”, “Client ID”, “Client Key”, and “Site URL” Fields need to be taken from the Admin’s Microsoft Entra (Azure Active Directory) account.
Step #2: Obtain “Tenant Name”
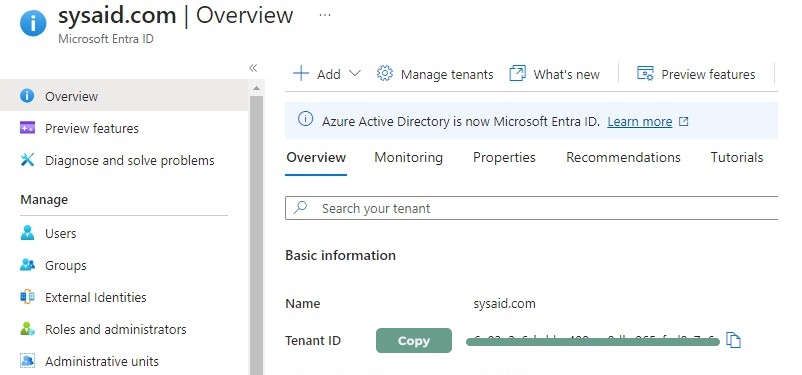
In the Azure portal, under Azure services, choose Microsoft Entra ID.
In the Overview section, go to Manage > Custom domain names.
Copy the name with an “Available” status and paste it into the Dataset Configuration form’s Tenant ID field.
Step #3: Add the SysAid Copilot App
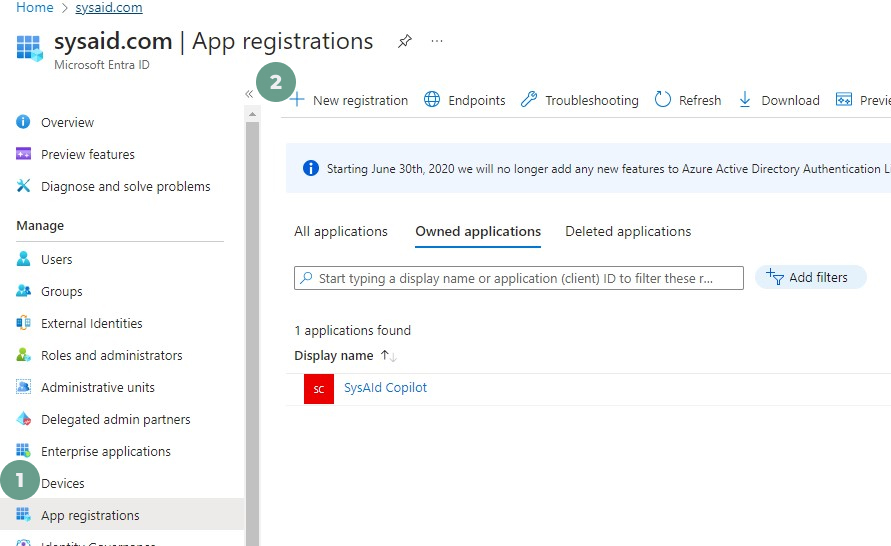
Navigate to the App registrations tab.
Click New registration.
In the Name field, enter a name for the application, for example, "SysAid Copilot". This is the name the users will see.
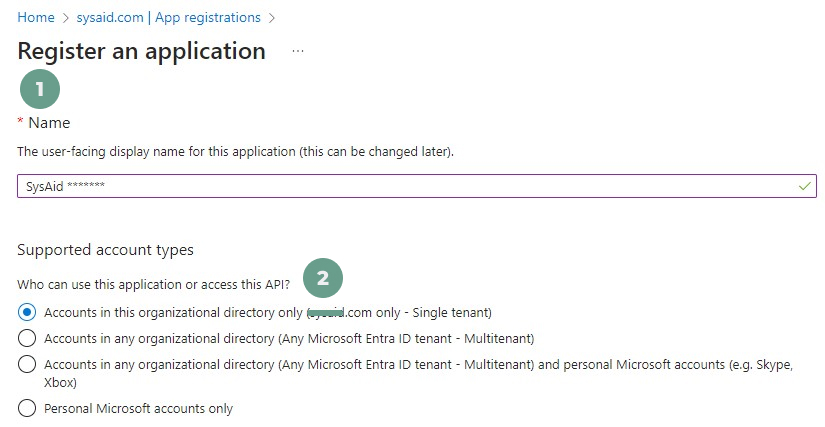
Select an account type for who can use the application
Click Register.
Copy the Application (client) ID value and paste it into the Dataset Configuration form’s “Client ID” field.
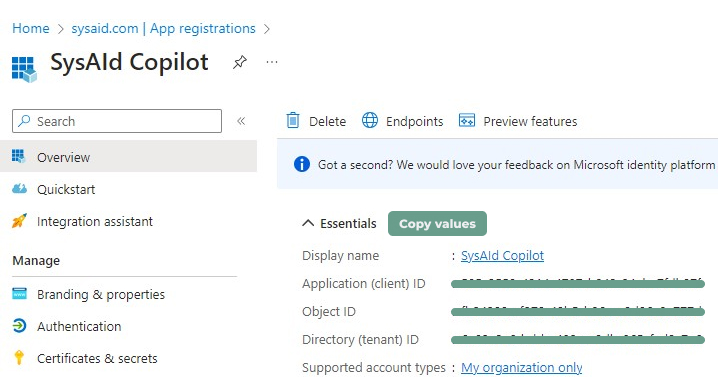
Step #4: Add a “Client Secret”
Go to the Certificates & secrets tab.
Add a “Description”
Select an expiration period.

Copy the Client Secret for the relevant application in the list and paste it into the Dataset Configuration form’s Client Secret field.

Step #5: Add API permissions
Go to the API permissions tab.
Click Add a permission.
Add the following permissions:
Microsoft Graph
Sites.Read.All
User.Read
SharePoint
Sites.Read.All
.png)
API Permissions Recommendations:
Specifically grant Read access to the app registration for the site you're targeting
Use the 'Sites.Selected' permission instead of 'Sites.Read.All' if you want to restrict access to only specific SharePoint sites within the organization
Step #6: Add the SharePoint site URL
To get the correct URL for accessing a SharePoint site using the Graph API, follow these steps:
Log in to your SharePoint account
Navigate to the SharePoint site you want to access with the Graph API
Look at the URL in your browser's address bar
It should look something like `https://yourcompany.sharepoint.com/sites/YourSiteName`Note down your SharePoint domain (yourcompany.sharepoint.com) and the site path (/sites/YourSiteName)
Replace yourcompany.sharepoint.com with your actual SharePoint domain and /sites/YourSiteName with your site path in the following format:
`https://graph.microsoft.com/v1.0/sites/yourcompany.sharepoint.com:/sites/YourSiteName`.
Ensure you replace yourcompany.sharepoint.com and /sites/YourSiteName with the correct information from your SharePoint URL.
Paste the URL address into the Dataset Configuration form’s “Site URL” field
Your SharePoint site will now appear in your AI Chatbot’s Data Pool, so that the AI Chatbot can derive data from your SharePoint site and its files when formulating responses in AI Chatbot chats.